Are you looking to enhance your auditory experience while using your favorite audio peripherals? Are you tired of the irksome crackles and buzzes that disrupt your voice during important calls or recording sessions? Look no further! In this article, we will delve into the perplexing issue of persistent background noise and explore effective measures to mitigate this interference.
Amateur and professional individuals alike who depend on headphones for clear audio transmission often encounter the frustrating phenomenon of microphone static. Merely utilizing high-quality headphones doesn't shield us from the cumbersome presence of static sounds that ruin the communication experience. Whether you are an aspiring content creator, an avid gamer, or regularly engage in remote work, understanding the root cause of this disturbance is essential to rectifying the problem.
Throughout our exploration, we will highlight practical methods to eliminate those irritating audio disturbances. Our post will present you with a diverse range of potential solutions, so you can confidently select the most suitable approaches to counteract microphone static. Brace yourself, as we embark on a journey to reclaim crystal-clear audio performance, enabling you to communicate effectively without any unwanted disruptions.
Check the Connection

In order to troubleshoot and resolve any microphone static issues with your headphones, it is important to start by checking the connection. Ensuring a secure and stable connection between your microphone and the device it is connected to is essential for clear audio transmission.
- Inspect the physical connection: Start by examining the cable that connects your microphone to the device. Look for any visible damage, such as fraying or bending, which may be causing the static issue. If you notice any damage, it may be necessary to replace the cable.
- Verify the plug-in connection: Check that the headphone plug is securely inserted into the appropriate port on your device. A loose connection can result in static or poor audio quality. Gently wiggle the plug to ensure a snug fit and listen for any changes in the static sound.
- Clean the connections: Over time, dust, dirt, or debris can accumulate on the connectors and affect the audio quality. Use a soft, dry cloth to carefully clean the plug and the port on your device. Ensure that both are free from any obstructions or residue that may be causing static.
- Check for compatibility: It is important to make sure that your microphone is compatible with the device you are using. Refer to the manufacturer's guidelines or documentation to confirm compatibility. Using an incompatible microphone may result in static or other audio issues.
- Try a different port or device: If you are still experiencing microphone static after checking the connection, try plugging your headphones into a different port on your device or connect them to a different device altogether. This will help determine if the issue is specific to the port or device you were previously using.
By thoroughly checking the connection and taking the necessary steps to ensure a secure and clean connection, you can eliminate common causes of microphone static and improve the audio quality of your headphones.
Adjusting the Sensitivity of your Microphone
When it comes to enhancing the quality of audio captured by your device's microphone, adjusting the sensitivity settings can play a crucial role. By fine-tuning the sensitivity, you can optimize the microphone's performance and eliminate unwanted background noise or distortion, resulting in a clearer and more professional audio experience.
| Step | Instructions |
|---|---|
| 1 | Locate the microphone sensitivity settings in your device's audio settings menu. This may be in the system settings or within the specific application you are using. |
| 2 | Adjust the microphone sensitivity slider or numeric value to modify the sensitivity level. Increasing the sensitivity increases the microphone's ability to capture sound, while decreasing it reduces sensitivity to background noise. |
| 3 | Test the adjusted sensitivity by speaking or recording audio while monitoring the output. You may need to make small adjustments until you achieve the desired balance between capturing clear audio and minimizing unwanted noise. |
| 4 | If applicable, experiment with additional microphone settings such as noise cancellation or noise reduction features. These options can further enhance the microphone's performance in varying environments. |
| 5 | Save the changes once you are satisfied with the adjusted sensitivity settings. It is recommended to test the microphone in different scenarios to ensure optimal performance across various recording situations. |
| 6 | If you are still experiencing issues with microphone static or unwanted noise, consider using an external microphone or contacting the manufacturer for further assistance or troubleshooting. |
By following these steps and customizing the sensitivity settings of your microphone, you can effectively improve the overall audio quality and eliminate any disturbances that may hinder your listening or recording experience.
Updating Audio Drivers

In order to address any underlying issues causing unwanted noise during microphone usage with headphones, it is essential to ensure that your audio drivers are up to date. Audio drivers act as a bridge between your computer's operating system and your audio hardware, enabling communication and proper functioning.
Updating audio drivers can often resolve static or distorted microphone audio. By keeping your drivers current, you can take advantage of any bug fixes, performance improvements, and compatibility updates that may have been released by the manufacturer.
Here is a step-by-step guide on how to update your audio drivers:
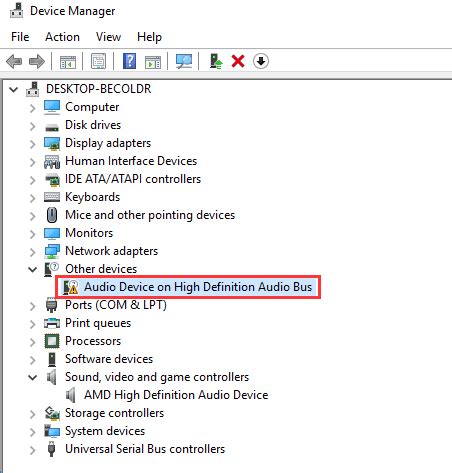
| Step 1: | Open the Device Manager. To do this, press Windows Key + X and select "Device Manager" from the menu. |
| Step 2: | Expand the "Sound, video, and game controllers" category by clicking on the arrow next to it. |
| Step 3: | Locate your audio device from the list. It might be labeled differently based on your hardware manufacturer, but it is likely to include terms such as "audio," "sound," or your headset's brand name. |
| Step 4: | Right-click on your audio device and select "Update driver" from the context menu. |
| Step 5: | Choose the option to automatically search for updated driver software. Windows will then search for the latest drivers for your device and install them if available. |
| Step 6: | Restart your computer to apply the changes. |
If Windows cannot find updated drivers through the automatic search, you may need to manually download the latest drivers from the manufacturer's website. Visit their support page, locate the drivers specific to your audio device model, and follow their instructions for installation.
By updating your audio drivers, you can ensure that your computer and headphones are equipped with the most up-to-date software, potentially resolving any microphone static or distorted audio issues.
Clean the Microphone and Headphone Jack
In order to address any issues with static or distortion in your audio, it is important to ensure that both the microphone and headphone jack are clean and free from any debris or dirt. Regular cleaning can help to improve the audio quality and reduce any unwanted noise or interference.
Start by gently inspecting the microphone and headphone jack for any visible dirt or debris. Use a soft, lint-free cloth or cotton swab to carefully clean these areas. Be cautious not to apply excessive pressure or use any abrasive materials that could damage the delicate components.
If you are unable to effectively remove any dirt or debris with a cloth or cotton swab, you may also consider using a small amount of isopropyl alcohol on a clean cloth. Dampen the cloth with the alcohol and gently wipe the microphone and headphone jack. Ensure that the cloth is not dripping wet and avoid allowing any moisture to enter the internal components of the device.
| Materials needed: | - Soft, lint-free cloth | - Cotton swabs | - Isopropyl alcohol (optional) |
|---|---|---|---|
| Steps to clean the microphone and headphone jack: | 1. Inspect both the microphone and headphone jack for visible dirt or debris. | 2. Gently clean these areas using a soft, lint-free cloth or cotton swab. | 3. If necessary, dampen a clean cloth with isopropyl alcohol and wipe the microphone and headphone jack. |
Remember to always exercise caution when cleaning delicate electronic components and avoid using excessive force or harsh cleaning agents. Taking the time to regularly clean the microphone and headphone jack can help to maintain optimal audio performance and solve any static issues you may be experiencing.
Use a Grounded Power Outlet

In the pursuit of achieving optimal audio quality on your headphones, considering the source of power is crucial. One way to address unwanted microphone static is by using a grounded power outlet.
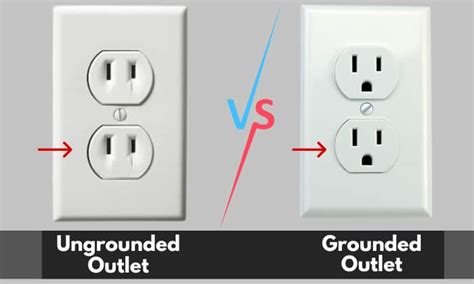
A grounded power outlet provides a safe and reliable source of electricity, minimizing the chances of electrical interference and static noise during audio transmission. The grounding process helps divert excess electrical charges, ensuring a stable power supply and reducing the risk of electromagnetic interference.
By using a grounded power outlet, you can effectively mitigate the occurrence of microphone static and enjoy a cleaner and clearer audio experience. Ensure that your power outlet, as well as any power extension cords or surge protectors you may be using, are properly grounded to maximize the effectiveness of this solution.
Reducing Background Noise
When using headphones, it is common to encounter unwanted sounds or background noise that can disrupt the quality of audio communication. In order to enhance the clarity of sound and improve the overall listening experience, it is important to minimize background noise. This section will explore effective methods to reduce unwanted noise and create a more immersive audio environment.
- Optimize your environment: Make sure to select a quiet and secluded area for using your headphones. Avoid places with excessive ambient noise such as loud machinery, traffic, or crowded areas.
- Use noise-cancelling headphones: Investing in high-quality noise-cancelling headphones can significantly reduce background noise. These headphones are designed to actively cancel out external sounds, allowing you to focus on the desired audio.
- Adjust microphone sensitivity: Check the microphone settings on your device and adjust the sensitivity levels. Lowering the sensitivity can help minimize the pickup of background noise, resulting in clearer audio capture.
- Position the microphone correctly: Properly positioning the microphone can help reduce background noise. Ensure that the microphone is placed close to your mouth and away from any potential sources of noise, such as fans or air conditioning units.
- Use a pop filter: Attach a pop filter to your microphone to reduce harsh plosive sounds and minimize unwanted background noise caused by breathing, wind, or other air movement.
- Utilize software enhancements: There are various software programs available that offer noise reduction features. These programs can help in reducing background noise during audio recording or communication sessions.
- Minimize electronic interference: Keep your headphones away from electronic devices that may cause interference, such as smartphones, laptops, or Wi-Fi routers.
By following these methods, you can effectively reduce background noise and enhance the overall audio quality while using headphones. Implementing these techniques will result in a more enjoyable and immersive audio experience, free from unwanted distractions.
Disabling Audio Enhancements

One effective approach to addressing the issue of excessive background noise or interference often experienced when using headphones is by deactivating audio enhancements.
Many audio devices, such as computers and phones, come equipped with built-in features intended to enhance the listening experience. However, these enhancements can sometimes inadvertently introduce unwanted artifacts or distortions, resulting in static or crackling sounds during microphone usage. Therefore, disabling audio enhancements can be a beneficial step towards improving the overall audio quality.
Turning off audio enhancements:
Disable any additional audio processing or audio effects settings that may be active on your device. Look for options such as "audio enhancements," "sound enhancements," or "special effects."
Note: The exact location of these settings may vary depending on your operating system and audio driver software.
Windows:
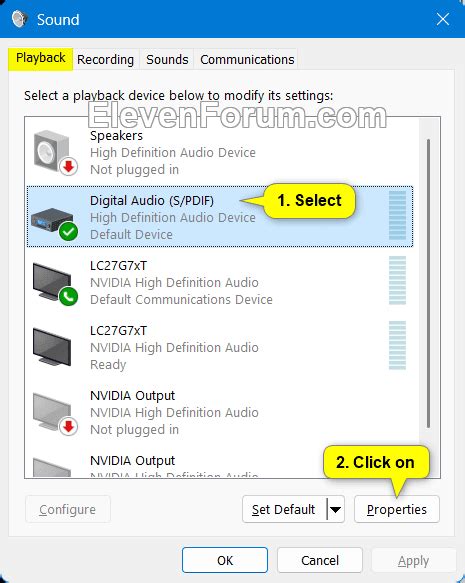
1. Right-click the speaker icon in the system tray and select "Playback devices."
2. In the "Playback" tab, select your headphones or the default audio playback device.
3. Click the "Properties" button and navigate to the "Enhancements" tab.
4. Check the "Disable all enhancements" box and click "Apply" or "OK."
Mac OS:
1. Go to "System Preferences" and select "Sound."
2. Choose the "Output" tab and select your headphones from the list of devices.
3. Uncheck the "Use audio port for:" checkbox, if available.
Mobile Devices:
On most mobile devices, the option to disable audio enhancements can be found in the device's settings menu, under the "Sound" or "Audio" section. Look for any relevant options and disable them to improve microphone performance.
Disabling audio enhancements can help minimize static and improve the overall audio quality when using headphones with a microphone. Remember to restart your device and test the microphone again to see if the static issue has been resolved.
Seek Professional Assistance
If you find that your audio equipment is consistently experiencing unwanted background noise or distortion despite your best efforts, it may be time to consider seeking professional help. While troubleshooting and fixing microphone static on headphones can be done at home, some issues may require the expertise of a trained technician.
Professional assistance can offer a more in-depth analysis of the problem and provide tailored solutions to suit your specific needs. They have the knowledge and equipment necessary to accurately diagnose the cause of the static and offer effective remedies. By consulting an expert, you can ensure that the issue is addressed properly and minimize the risk of causing further damage to your headphones or other connected devices.
Moreover, seeking professional help can save you time and frustration, especially if you have already tried various troubleshooting techniques to no avail. Professional technicians are experienced in dealing with a wide range of audio equipment and can efficiently identify and fix issues that might be difficult for non-experts to address.
Additionally, consulting a professional can provide you with valuable advice on maintaining and preventing future microphone static. They can guide you on the proper care and usage of your headphones, as well as recommend any necessary equipment upgrades or modifications that may enhance the overall audio quality.
| Benefits of Professional Assistance |
| 1. Expert analysis and diagnosis of the issue |
| 2. Customized solutions for your specific needs |
| 3. Time-saving and frustration-free resolution |
| 4. Valuable advice on maintenance and prevention |
FAQ
Why is there static in my headphones when I use the microphone?
There can be several reasons for static in your headphones when using the microphone. It could be due to a faulty microphone cable, interference from other electronic devices, or a problem with the audio settings on your computer. To fix this issue, you can try using a different cable, moving away from electronic devices, or adjusting the audio settings.
What can I do if the microphone on my headphones produces static noise only sometimes?
If your headphone microphone produces static noise only intermittently, it could be caused by a loose connection. Try unplugging and plugging in the microphone cable securely. Additionally, check if the microphone jack on your computer or audio device is clean and free of debris. If the issue persists, you may need to replace the microphone or contact the manufacturer for further assistance.
How can I reduce static in my headphones when using the microphone for gaming?
If you experience static in your headphones while gaming with the microphone, there are a few steps you can take to reduce the issue. Firstly, make sure your headphone and microphone cables are separated and not tangled together, as this can cause interference. Additionally, try adjusting the microphone volume and sensitivity settings in your game or communication software. If the problem persists, consider using a dedicated external microphone or contacting the headset manufacturer for support.
Is there a way to eliminate static noise in headphones without buying new equipment?
Yes, there are a few things you can try to eliminate static noise in your headphones without purchasing new equipment. Start by checking the audio settings on your computer and adjusting the microphone levels and audio enhancements. You can also try using a different USB port or audio jack on your computer. If the issue remains, consider using a ground loop isolator or a USB audio adapter, as these can help eliminate static caused by electrical interference.
Why do my headphones produce static noise when I use the microphone but work fine with other devices?
If your headphones produce static noise only when using the microphone but work fine with other devices, the issue may be related to your computer's audio settings or drivers. Make sure you have the latest audio drivers installed and try adjusting the microphone settings in your computer's audio control panel. It could also be helpful to test your headphones on another computer or audio device to determine if the problem is specific to your computer.
What causes static on headphones when using a microphone?
Static on headphones when using a microphone can be caused by various factors, such as electromagnetic interference, faulty cables, or a misconfigured audio setup. It is important to identify the specific cause to effectively troubleshoot and fix the issue.


