Having trouble with your headphone case? Whether your favorite pair of headphones refuses to charge, won't connect to your devices, or simply won't turn on, we've got you covered. In this troubleshooting guide, we'll explore possible solutions for resolving common problems with headphone cases.
If you're experiencing issues with your headphone case, it can be frustrating and inconvenient. Before panicking or assuming the worst, take a deep breath and follow our step-by-step troubleshooting process. By identifying potential causes and solutions, you can save yourself time, money, and the headache of having to replace your beloved headphones.
It's important to note that headphone case problems can vary in complexity, but don't fret – you don't need to be an expert to solve most issues. With a little patience and the right information, you can often diagnose and fix the problem on your own. So, grab your troubleshooting cap and let's get started!
Check the Physical Connection

Ensure Proper Connectivity
One of the first steps in troubleshooting a non-working headphone case is to check the physical connections.
Make sure that all cables and connectors are securely plugged into their respective ports. Examine the headphone's audio jack for any signs of damage or debris that could be obstructing the connection. It is also recommended to check the headphone's cable for any signs of fraying or breakage.
Try Different Devices
If the headphone case is still not working, it is worth trying the headphones with different devices to determine if the issue lies with the headphones themselves or the device they are being connected to.
Connect the headphones to a different audio source, such as a smartphone, computer, or tablet. If the headphones work properly with another device, then the issue may be with the original device's audio output.
Clean Connectors
Dirty or corroded connectors can also cause connectivity issues with headphone cases.
Using a soft, dry cloth, gently clean the connectors on both the headphones and the device they are being plugged into. Avoid using any liquids or abrasive materials, as they may cause damage.
Test with Another Cable
If cleaning the connectors does not solve the problem, it may be worth trying a different cable.
Borrow or purchase another compatible audio cable and connect it to the headphones and audio source. Test if the headphones work with the new cable. If they do, it indicates that the original cable may be faulty and in need of replacement.
Consider Professional Help
If all else fails and the headphone case is still not working, it may be time to seek professional assistance.
Consult a certified technician or the manufacturer's customer support for further troubleshooting steps or to arrange for repair or replacement of the headphone case.
Clean the Audio Port
Proper maintenance and cleanliness of the audio port, also known as the headphone jack, is crucial for ensuring the optimal functioning of your headphones. Over time, debris, dirt, or lint may accumulate inside the audio port, leading to connectivity issues and poor sound quality. Therefore, it is important to regularly clean the audio port to prevent such problems.
To clean the audio port, start by carefully inspecting it to identify any visible dirt or debris. Using a flashlight can help in seeing inside the port better. Once identified, gently remove the debris using a small cleaning tool. It is important to be cautious while doing this to avoid damaging the sensitive components inside the audio port.
If the debris cannot be easily removed, using a can of compressed air can be a useful alternative. With a gentle and steady hand, direct the airflow into the audio port to dislodge any trapped debris. Remember to hold the can upright and avoid tilting it, as this can release moisture that may damage the port.
For stubborn dirt or debris that cannot be removed with the above methods, a soft-bristled brush or toothpick can be used. Carefully brush or scrape the inside of the audio port, ensuring that you do not apply excessive pressure or force. The goal is to dislodge the dirt without causing harm to the delicate components.
It is advisable to clean the audio port periodically, even if you do not encounter any issues with your headphones. By doing so, you can prevent potential problems from arising and ensure that your headphones always deliver optimal sound performance.
Updating or Installing the Audio Driver

In order for your headphones to function properly, it is essential to have the correct audio driver installed on your device. The audio driver acts as a bridge between your operating system and your headphones, allowing them to communicate effectively.
If you are experiencing difficulties with your headphone case not working, it is advisable to check if your audio driver is up to date or if it needs to be installed. An outdated or missing audio driver can often be the cause of issues such as sound distortion, no audio output, or incorrect device recognition.
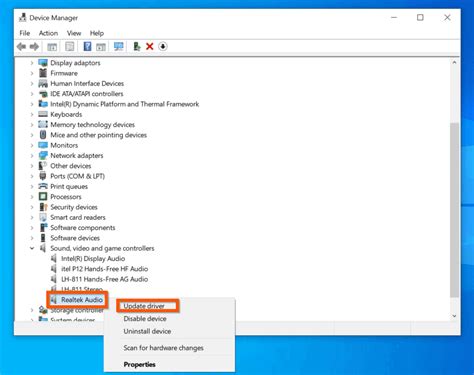
To update your audio driver, begin by identifying the manufacturer and model of your sound card or integrated audio device. Once you have this information, visit the official website of the manufacturer to locate the latest driver version available for your specific hardware.
Alternatively, you can utilize device management tools or automated driver update software to simplify the process. These tools can scan your system for outdated drivers and provide you with a list of available updates, including the audio driver.
If you are installing the audio driver for the first time, refer to the manufacturer's instructions for the correct installation procedure. This might involve downloading a setup file from their website and running it, or using an installation wizard to guide you through the process.
After updating or installing the audio driver, it is recommended to restart your device to ensure the changes take effect. Once your device has rebooted, test your headphone case to see if the issues have been resolved. If not, consider seeking further troubleshooting steps or consulting a professional for assistance.
| Pros of Updating or Installing an Audio Driver | Cons of Not Updating or Installing an Audio Driver |
|---|---|
| Improved audio performance and compatibility | Potential sound distortion or lack of audio output |
| Correct device recognition and driver communication | Inability to use headphones with the device |
| Access to additional audio features or enhancements | Limited control over audio settings |
Testing the Headphones on Another Device
One practical way to determine the root cause of a non-working headphone case is by testing the headphones on a different device. By doing so, you can ascertain whether the issue lies with the headphones themselves or with the original device you were using.
Connecting your headphones to another device can help you identify if there are any hardware or software compatibility issues that may be interrupting the proper functioning of your headphones. This process involves using a different device, such as a smartphone, tablet, or computer, to connect and test your headphones.
Testing the headphones on an alternative device is a valuable troubleshooting step as it helps isolate the problem and pinpoint the source of the issue more effectively. If the headphones work correctly on the new device, it suggests that the problem is related to the original device's settings or hardware. Conversely, if the headphones exhibit the same non-working behavior on multiple devices, it indicates that the issue lies with the headphones themselves.
Through this testing process, you can gather essential information that will aid in further troubleshooting and finding an appropriate solution in fixing your non-working headphone case.
Replace the Headphone Cable

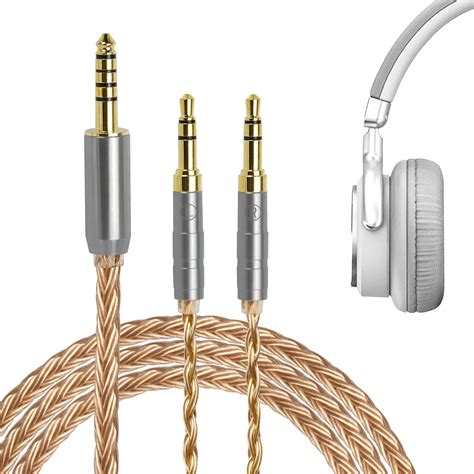
In this section, we will discuss the process of replacing the cable of your headphones. The cable of your headphones is responsible for transmitting audio signals from the device to the speakers in the ear cups. Over time, the cable may become damaged due to wear and tear or accidental mishandling. If you are experiencing issues with the audio quality or if there is no sound coming from your headphones, replacing the cable might be the solution.
Step 1: Identify the cable type
The first step in replacing the headphone cable is to identify the type of cable used in your headphones. Different headphone models use different types of cables, such as detachable cables or fixed cables. Detachable cables can be easily replaced by disconnecting them from the headphones and connecting a new cable. Fixed cables, on the other hand, require more complex procedures to replace.
Step 2: Gather the necessary tools
Before replacing the headphone cable, make sure you have the necessary tools. These may include a replacement cable, a screwdriver (if applicable), wire strippers, and heat shrink tubing. It's also a good idea to have a guide or tutorial specific to your headphone model for reference.
Step 3: Disconnect the old cable
If you have detachable cables, this step will be relatively simple. Disconnect the old cable from the headphones by gently pulling it out from the audio jack or the ear cups. For headphones with fixed cables, you may need to open the ear cups or the headband to access the connection point, depending on the design of your headphones.
Step 4: Connect the new cable
Take the replacement cable and connect it to the headphones, making sure it is securely plugged into the audio jack or the connection point inside the ear cups or headband. Ensure that the cable is properly aligned and seated to avoid any audio issues.
Step 5: Test the headphones
Once the new cable is connected, it's time to test the headphones. Plug them into a device and play some audio to check if the sound is clear and balanced. If everything is working correctly, you have successfully replaced the cable of your headphones.
Note: If you are not confident in replacing the cable yourself, it is recommended to seek professional assistance or contact the manufacturer for support.
FAQ
My headphone case is not working. What could be the problem?
The problem could be caused by a variety of factors. It could be a faulty headphone jack, a loose connection, or even a software issue on your device. The first step in troubleshooting is to identify the specific problem.
How can I determine if the issue lies with the headphone case or my device?
To determine if the issue lies with the headphone case, try connecting a different pair of headphones to your device. If they work properly, then the issue is likely with your headphone case. If the problem persists with other headphones, it might be a problem with your device.
What should I do if my headphone case has a loose connection?
If your headphone case has a loose connection, you can try gently wiggling the headphone plug while it is inserted into your device. This may help establish a more secure connection. If the issue persists, you might need to consider replacing the headphone case or seeking professional repair.
My headphone case is not being detected by my device. How can I fix this?
If your headphone case is not being detected by your device, make sure the headphone jack is fully inserted into the device's audio port. Additionally, try cleaning the headphone jack and port to remove any debris that may be obstructing the connection. If the problem continues, there may be a hardware issue with either the headphone case or your device.
Is it possible to fix a non-working headphone case on my own?
Yes, it is possible to fix a non-working headphone case on your own, depending on the specific issue. However, it's important to note that attempting any repairs could void any warranties you have on the product. If you feel comfortable and have the necessary knowledge, you can try troubleshooting and fixing the problem. Otherwise, it's recommended to seek professional assistance or contact the manufacturer for further guidance.
What do I do if my headphone case is not working?
If your headphone case is not working, there are several troubleshooting steps you can try. First, check if the case is charged or if the battery needs to be replaced. If the case is charged and the headphones still don't work, try resetting the case by holding down the reset button for a few seconds. If that doesn't work, try connecting the case to a different power source or charging cable. If none of these steps solve the problem, it may be necessary to contact the manufacturer for further assistance.
How do I know if my headphone case's battery needs to be replaced?
If your headphone case's battery needs to be replaced, you may notice that the case doesn't hold a charge for as long as it used to, or that it drains quickly even when not in use. You might also experience issues such as the case not powering on at all or not providing enough power to charge the headphones. If you suspect the battery is the problem, you can try charging the case for a longer period of time to see if that improves its performance. Alternatively, you can contact the manufacturer for guidance on how to replace the battery.


