Encountering difficulties with the microphone capabilities of your audio device can be quite frustrating. Whether you rely on a pair of headphones for communication or recording purposes, it is essential to understand the potential causes behind this malfunction. By recognizing the symptoms and implementing a series of troubleshooting steps, you can reclaim the functionality of your microphone and get back to enjoying its full potential.
Identifying the underlying problem is the first step towards resolving any technical issue, and microphone failure is no exception. Several factors could contribute to this frustrating setback, such as hardware malfunctions, software conflicts, or simply incorrect configuration settings. It is crucial to be patient and methodical when attempting to diagnose the root cause of the microphone problem, as a rushed or haphazard approach may lead to further complications.
Hardware issues are a common culprit when it comes to microphone dysfunction. Faulty cables, damaged connectors, or even physical obstructions may interfere with the proper functioning of your microphone. Taking the time to inspect the physical components of your audio setup will provide valuable insights into the possible causes of the malfunction. Furthermore, ensuring that all connections are secure and free of debris can significantly enhance the microphone's performance.
Basic Troubleshooting Steps to Resolve Microphone Issues

When facing difficulties with your headphone microphone, there are several basic steps you can follow to troubleshoot and rectify the problem. By applying these simple solutions, you can potentially resolve the issue without professional assistance.
- Ensure that your headphones are securely connected to the device you are using. Check for any loose connections or tangled wires that may prevent the microphone from functioning properly.
- Verify that the microphone is not muted or turned down to a very low volume. Adjust the microphone settings on your device and ensure that the volume is appropriately set.
- Inspect the microphone port on your device for any debris or dirt that may be obstructing its functionality. Gently clean the port using a soft cloth or compressed air to remove any potential blockages.
- Try using the headphones with another device or computer to determine if the issue lies with the headphones or the device you are currently using. If the microphone works on another device, then the problem is likely related to your initial device.
- Update the audio drivers on your device to ensure compatibility and optimal performance. Visit the manufacturer's website or use a trusted driver update tool to download the latest drivers and install them accordingly.
- If none of the above steps resolve the issue, consider resetting your device's audio settings to their default configurations. This can be done by accessing the audio settings menu and selecting the reset or restore option.
- If available, check for any firmware updates for your headphones. Manufacturers often release updates to address known issues and improve functionality. Follow the instructions provided by the manufacturer to update the firmware.
- As a final resort, contact the customer support of your headphone manufacturer or seek professional assistance. They can provide specific guidance based on your headphone model and device setup.
By following these troubleshooting steps, you can increase the chances of resolving microphone issues with your headphones and restore their functionality for optimal audio experiences.
Checking the Connection and Cables
In this section, we will discuss the steps you can take to troubleshoot the issue when the microphone on your headphones is no longer functioning properly. We will focus on examining the connection and cables for any potential issues.
Firstly, it is important to ensure that the cables connecting your headphones to the device are securely plugged in. Check that they are inserted fully into the appropriate ports on both the headphones and the device. Sometimes, a loose connection can lead to microphone problems, so a simple reseating of the cables may resolve the issue.
Next, inspect the cables for any signs of damage or wear. Look for frayed wires, bent connectors, or any other visible issues. A damaged cable can often cause disruptions in the microphone's functionality. If you notice any damage, it may be necessary to replace the cable to restore proper microphone operation.
| Problem | Solution |
|---|---|
| The cable is loose or not fully plugged in | Check the connections and ensure they are securely plugged in |
| The cable is damaged | Replace the cable with a new one |
Additionally, it is worth checking if the microphone port on your device is functioning correctly. Try connecting your headphones to a different device or trying a different pair of headphones with a microphone on your current device. By doing so, you can determine whether the issue lies with the headphones or the device itself.
Furthermore, consider cleaning the connections and ports if you notice any dirt or debris. Dust or lint can interfere with the connection, so gently clean the connectors using a soft cloth or compressed air. Be cautious not to apply excessive force or liquid to avoid causing further damage.
By carefully examining the connection and cables, you can often identify and resolve issues that may be causing the microphone on your headphones to stop working. These steps should help you determine if the problem lies with the cables or connectors, and guide you towards a potential solution.
Adjusting the Mic Settings on your Device

When encountering issues with the microphone on your headphones, it is essential to check and make necessary adjustments to the microphone settings on the device you are using. By carefully configuring these settings, you can potentially resolve any problems related to sound input and ensure optimal microphone performance.
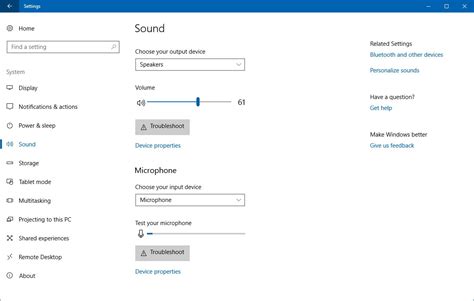
To begin with, delve into the settings menu of your device, where you will find various options for adjusting microphone settings. Look for options such as "Sound," "Audio," or "Input/Output" settings. Once you have located the appropriate menu, explore the available settings and options.
One important setting to check is the microphone volume level. It determines how loud or soft the microphone input will be. Adjust the volume level based on your preferences and ensure that it is not set too low or too high, as extreme settings can result in distorted or inaudible audio.
Additionally, you might also find options related to microphone sensitivity or gain control. These settings allow you to fine-tune the microphone's responsiveness to different sound levels. By adjusting the sensitivity or gain control, you can eliminate background noise, enhance voice clarity, and achieve a better recording or communication experience.
Some devices may offer advanced settings like noise cancellation or echo reduction. These features can help reduce unwanted background noise and echoes, particularly in noisy environments or during online calls. Experiment with these settings to find the optimal configuration that suits your needs and ensures clear communication.
It is worth noting that microphone settings can vary depending on the device and operating system you are using. Therefore, it is essential to refer to the device's user manual or consult the manufacturer's website for specific instructions on adjusting microphone settings.
| Tips for Adjusting Microphone Settings on your Device: |
|---|
| 1. Check the microphone volume level and adjust it accordingly. |
| 2. Explore options for microphone sensitivity or gain control to fine-tune its responsiveness. |
| 3. Experiment with advanced settings like noise cancellation or echo reduction. |
| 4. Refer to the device's user manual or manufacturer's website for specific instructions. |
Updating the Audio Drivers
Ensuring that your audio drivers are up to date is crucial in order to maintain the proper functioning of your headphones' microphone. By regularly updating these drivers, you can optimize the performance and reliability of your audio hardware, enabling uninterrupted communication and recording capabilities.
- Check the manufacturer's website for driver updates.
- Download the latest version of the audio driver software.
- Follow the installation instructions provided by the manufacturer.
- Restart your computer after the installation is complete.
- Test the microphone to see if the issue has been resolved.
Keeping your audio drivers up to date not only helps in fixing microphone issues but also ensures compatibility with the latest operating system updates and hardware changes. This proactive approach can save you from unnecessary troubleshooting and frustration, allowing you to fully enjoy the capabilities of your headphones and microphone.
Testing the Microphone on a Different Device

When experiencing issues with the microphone on your headphones, it is important to determine whether the problem lies with the headphones themselves or with the device you are using. To do so, it is advisable to perform a simple test by connecting the headphones to another device.
Before proceeding with the test, ensure that the alternate device you plan to use is compatible with the headphones. This can be done by checking the device's specifications and ensuring that it supports the same connection type as your headphones (e.g., Bluetooth, USB, etc.).
Once you have confirmed compatibility, follow these steps to test the microphone on another device:
- Connect your headphones to the alternate device using the appropriate method.
- Open any application or program that allows you to use the microphone (such as a voice recording app, video conferencing software, or a chat platform).
- Speak into the microphone, and closely observe if the audio is being detected and recorded.
- If the alternate device successfully captures the audio from the microphone, it indicates that the issue may lie with the device you were initially using, rather than the headphones themselves.
- However, if the microphone still does not work on the alternate device, it is likely that there is a problem with the headphones and further troubleshooting or repair may be necessary.
Testing the microphone on another device is a crucial step in diagnosing the root cause of the issue. It helps eliminate any doubts about the headphones being the direct cause of malfunction and allows you to narrow down the problem to either the device or the headphones themselves. This information can then guide you in finding an appropriate solution to rectify the microphone issue.
Cleaning the Microphone and Removing Obstructions
Ensuring optimal performance of your headset's microphone entails regular cleaning and identifying and removing any obstructions that may affect its functionality. Proper maintenance of your microphone will help maintain clear and accurate audio during calls or recordings.
- Start by using a soft, lint-free cloth to gently wipe the exterior of the microphone. This will remove any dirt or dust that may have accumulated over time.
- If the microphone has a removable cover or windscreen, carefully detach it and clean it separately. Use a mild solution of water and soap to gently remove any build-up or debris.
- For stubborn dirt or residue, you can use a cotton swab or a soft-bristle toothbrush dipped in isopropyl alcohol. Be sure to apply the solution sparingly and avoid excessive moisture. Allow the microphone to air dry completely before reattaching any covers or using it.
- Inspect the microphone for any physical obstructions that may be blocking sound input. Check for foreign objects or debris that may have become lodged in the microphone port. Use a small, clean brush or compressed air to carefully remove any obstructions without causing damage.
- If the microphone is detachable, detach it from the headphones and inspect the connection points for any dirt or debris. Gently clean any visible dirt before reattaching the microphone.
Regularly cleaning your microphone and ensuring there are no obstructions will help to maintain its functionality and longevity. By taking these simple steps, you can enjoy clear and uninterrupted sound during your headphone use.
Exploring Alternative Microphone Options

When facing challenges with your headphones, it can be frustrating when the microphone ceases to function properly. In such instances, exploring alternative microphone options can provide a valuable solution. By experimenting with different types of microphones, you may find one that not only fits your needs but also enhances your overall audio experience.
- Consider using a different microphone brand or model: Sometimes, using a microphone from a different manufacturer or a newer model can resolve the issue. Do some research or ask for recommendations from fellow headphone users to find a microphone that is known for its high performance and compatibility.
- Explore wired versus wireless options: Depending on your specific requirements, consider trying a different type of microphone connection. If you are currently using a wired microphone, experimenting with a wireless option could provide greater flexibility and convenience. Conversely, if you currently use a wireless microphone, switching to a wired one may enhance stability and reduce potential connectivity issues.
- Experiment with different microphone placements: Changing the position or placement of the microphone on your headphones can also significantly impact its performance. Try positioning the microphone closer to your mouth or adjusting the angle to capture your voice more accurately. Small adjustments like these can often make a big difference in the audio quality.
- Investigate external microphones: If your headphones have a detachable microphone, consider investing in an external microphone. These peripherals can offer superior audio quality and customization options compared to built-in headphone microphones. Look for options that are compatible with your headphone model and that suit your specific needs, such as gaming, conference calls, or recording.
- Consult customer support or seek professional assistance: If none of the above solutions work, it might be beneficial to contact the customer support of your headphone manufacturer. They can provide guidance tailored to your specific situation or advise you on potential repairs or replacements. Additionally, seeking assistance from a professional audio technician can help diagnose and fix any underlying technical issues.
Remember, when your headphone microphone is no longer working as intended, trying a different microphone can be a worthwhile endeavor. With the variety of options available today, it's possible to find a microphone that meets your needs and enables you to fully enjoy your audio experience.
Checking for Software Conflicts
One crucial step in troubleshooting issues with your microphone on headphones is to investigate potential conflicts with software programs or settings. Software conflicts can arise due to a variety of factors, leading to the microphone ceasing to function properly.
Review Installed Programs: Begin by examining the list of programs installed on your computer. Look for any applications or software that could potentially interfere with the microphone's functionality. This could include audio recording or editing software, communication applications, or system utilities. If you identify any such programs, consider temporarily disabling or uninstalling them to see if it resolves the microphone issue.
Check Audio Settings: Next, navigate to your computer's audio settings and verify that the correct microphone is selected as the default input device. It is possible that a conflict arises when multiple microphones are connected, and the system is attempting to use the wrong one. Additionally, ensure the microphone's volume levels are appropriately set to avoid any potential muffled or distorted audio recordings.
Update Drivers: Outdated or incompatible audio drivers can often result in microphone malfunctions. Therefore, it is important to consider updating your sound card drivers to their latest versions. You can do this by visiting the manufacturer's website or utilizing utilities provided by the operating system to check for any available driver updates.
Run Diagnostic Tools: Many operating systems offer built-in diagnostic tools designed to troubleshoot hardware and software conflicts. Take advantage of these tools to scan for any potential issues related to your microphone. The diagnostic results may provide insights into conflicts that need to be resolved or indicate the need for further troubleshooting steps.
Disable Audio Enhancements: Some audio enhancements or effects provided by software or system settings can interfere with the microphone's performance. If you have any audio enhancements enabled, try disabling them temporarily to see if it resolves the microphone issue. This can be done either through the audio settings on your computer or within specific audio management software.
Contact Technical Support: If you have followed the steps above and are still experiencing issues with your microphone on headphones, it may be time to reach out to technical support. Provide them with detailed information about the problem and the troubleshooting steps you have already taken. They may be able to provide further guidance or determine if there is a hardware defect that needs to be addressed.
Seeking Professional Assistance for Persistent Issues

When confronted with ongoing concerns related to the functionality of the microphone in your headphones, it may be wise to seek the assistance of a professional. In instances where various troubleshooting techniques have been attempted without success, consulting with an expert can often provide valuable insights and potential solutions to resolve the issue.
Identifying Knowledgeable Professionals
Seeking the guidance of professionals who specialize in audio equipment and headphone repairs is key. Look for technicians or service centers that offer expertise in addressing microphone-related problems specifically. These professionals possess the necessary skills and resources to assess and troubleshoot the issue effectively.
Providing Detailed Information
When engaging with professionals, it is crucial to provide them with comprehensive details about the problem you are facing. Be prepared to describe the specific symptoms, such as whether the microphone is completely non-functional or if it is experiencing intermittent issues. Additionally, mention any previous troubleshooting steps you have undertaken, as this information can assist the professionals in diagnosing the root cause.
Diagnosing and Repairing
Once you have consulted with a professional, they will likely conduct a thorough evaluation of your headphones, focusing on the microphone component. This examination could involve checking the physical connection, ensuring proper software settings, and examining any potential hardware or wiring faults. Based on their assessment, the professional will then be able to recommend appropriate repair or replacement options.
Consider Warranty and Repair Costs
It is important to consider the warranty status of your headphones before seeking professional assistance. If the device is still covered by a warranty, contacting the manufacturer or authorized service center can provide a cost-effective resolution. However, if the warranty has expired or the issue is not covered, be prepared to discuss potential repair costs with the professional and weigh them against the value of your headphones.
Exploring Alternative Options
If the cost of repair is prohibitively high or the professional deems the issue irreparable, there may be alternative options to consider. This could involve purchasing a separate microphone or exploring the possibility of upgrading to a new set of headphones that better suit your requirements. The professional can provide recommendations based on your budget and needs.
Conclusion
While it can be frustrating when the microphone in your headphones continues to malfunction, seeking professional help offers a potential solution to persistent issues. By relying on the expertise of knowledgeable professionals, you can increase the chances of resolving the problem and enjoying optimal functionality once again.
Tips to Prevent Microphone Issues in the Future
Ensuring the optimal functioning of the audio recording component in your headset is essential for uninterrupted communication and clear sound quality. In order to enhance the longevity and consistent performance of your microphone, it is advisable to adopt a few preventive measures. By implementing these tips, you can avoid potential microphone malfunctions and continue enjoying seamless audio experiences.
1. Maintain a clean headset: Regularly cleaning your headset, especially the microphone area, is crucial in preventing any debris or dust particles from affecting its functionality. Use a soft cloth or a small brush to gently remove any dirt or buildup that may accumulate over time.
2. Protect from moisture: Exposure to moisture can be detrimental to the microphone's performance. Be cautious while using your headset in humid environments or during activities that may lead to excessive sweating. Consider using a sweat-resistant cover for your headphones or avoid using them in situations where moisture is a concern.
3. Handle with care: Mishandling your headset can lead to damaging the delicate microphone component. Avoid dropping or forcefully pulling the wires as this can strain the connections and result in malfunctioning. When not in use, store your headphones in a safe and secure location to avoid unnecessary pressure or impact.
4. Verify compatibility: Ensure that your headset is compatible with the device you are using it with. Using a microphone that is not designed to work with the specific device may cause compatibility issues, resulting in unsatisfactory sound quality or complete failure to function.
5. Update drivers and firmware: Regularly checking for driver and firmware updates for both your headset and the device it is connected to can help in resolving any software-related issues that may affect the microphone's functionality. Keeping the software up to date ensures optimal performance and compatibility.
By adhering to these preventive measures, you can significantly minimize the probability of experiencing microphone issues in the future. Following these tips will not only prolong the lifespan of your headset but also ensure a seamless audio experience for your communication needs.
Microphone Not Working on PS4! [Solved in 3 Easy Ways]
Microphone Not Working on PS4! [Solved in 3 Easy Ways] by Fix369 214,121 views 1 year ago 2 minutes, 22 seconds
Fix Microphone Not Working on Windows 10
Fix Microphone Not Working on Windows 10 by The Geek Page 6,045,467 views 5 years ago 2 minutes, 41 seconds


