When it comes to enhancing the performance and reliability of your computer's data storage, one solution that stands out is the implementation of RAID arrays. By combining multiple storage drives into a single logical unit, RAID (Redundant Array of Independent Disks) arrays offer several benefits such as improved data protection, increased storage capacity, and faster data access speeds. However, to fully leverage the potential of RAID arrays, it is crucial to configure your Windows system accurately.
Streamlining Disk Management with Crucial Settings
In order to harness the power of RAID arrays effectively, it is essential to optimize your Windows system for seamless compatibility. One crucial aspect of this process involves configuring the appropriate disk management settings. By adjusting the disk cache, aligning the partition boundaries, and enabling write-back cache, you can ensure efficient data transfer and reduce the risk of data loss.
First and foremost, fine-tuning your disk cache settings is imperative for achieving optimal performance. By enabling write caching, you allow the system to store write operations temporarily in the cache before committing them to the storage disks. This significantly enhances write speed, especially for small files and random write operations. Additionally, aligning the partition boundaries to match the RAID array's stripe size optimizes data read and write operations, leading to improved performance and reduced access latency.
Enhancing Data Security and Resilience
In today's digital landscape, ensuring the security and integrity of your data is paramount. RAID arrays offer various levels of data protection, commonly known as RAID levels. Depending on your specific needs, you can choose between RAID 0, RAID 1, RAID 5, RAID 6, and RAID 10. Each level offers a unique combination of performance, capacity, and data redundancy.
RAID arrays with redundancy (such as RAID 1, RAID 5, RAID 6, and RAID 10) can withstand the failure of one or more disks without losing data, thanks to their built-in fault tolerance mechanisms. These redundancies come in the form of mirroring, striping with parity, or a combination of both. By implementing these RAID levels, you can protect your critical data and ensure system resilience, even in the event of disk failures.
By understanding the key considerations and implementing the appropriate configurations, you can unlock the full potential of RAID arrays and optimize your Windows system for seamless and efficient data storage. Whether you are a professional seeking enhanced performance or an individual aiming to improve data security, these steps will guide you on your way to an optimized RAID configuration.
Setting Up RAID Arrays in Microsoft Windows: A Comprehensive Guide

In this section, we will explore the process of configuring RAID arrays in the Microsoft Windows operating system. Throughout this comprehensive guide, we will delve into the intricacies of setting up various RAID levels, maximizing storage performance, and ensuring data redundancy without relying solely on a single hard drive. By following these step-by-step instructions and utilizing the available tools, you will be able to create a robust RAID array system tailored to your specific needs.
Choosing the Right RAID Level: Exploring Different Options for Data Storage
In the realm of data storage, it is paramount to carefully select the appropriate RAID level for your needs. By understanding the different options available, you can make an informed decision that aligns with your requirements.
One significant aspect to consider is the level of data redundancy and fault tolerance required for your system. Different RAID levels offer varying degrees of redundancy and performance, catering to different scenarios.
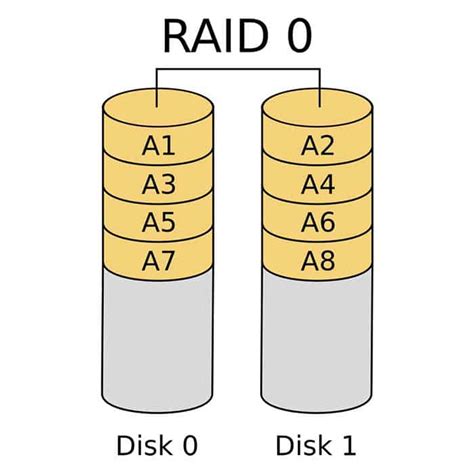
RAID 0, often referred to as striping, provides increased performance as data is divided across multiple disks in parallel. However, it offers no redundancy, making it susceptible to data loss in the event of a drive failure.
RAID 1, or mirroring, ensures data redundancy by creating an exact copy of each disk onto another. Although it offers excellent fault tolerance, it utilizes more storage space compared to RAID 0.
RAID 5 distributes data and parity across multiple drives, combining the benefits of performance and redundancy. With the ability to withstand the failure of a single drive, it offers a balanced solution in terms of storage efficiency and data protection.
For systems with higher reliability requirements, RAID 6 could be the ideal choice. This level utilizes double parity, allowing for the failure of two drives without losing any data. However, it does come at the cost of reduced write performance.
Ultimately, the decision on the right RAID level depends on your specific needs and priorities. Careful consideration must be given to factors such as performance, reliability, storage space, and budget. By evaluating these aspects, you can confidently select the most suitable RAID level for your data storage requirements.
Installing and Configuring RAID Hardware: Setting Up Your RAID Controller

In this section, we will explore the essential steps involved in the installation and configuration of RAID hardware, specifically focusing on setting up your RAID controller. The RAID controller plays a pivotal role in managing and controlling the RAID arrays, ensuring optimal performance, data redundancy, and fault tolerance.
Firstly, it is crucial to select a suitable RAID controller that aligns with your system's requirements. The RAID controller serves as the intermediary between the operating system and the physical storage drives, enabling the efficient creation and management of RAID arrays. Consider factors such as the number of supported drives, RAID levels, and compatibility with your system's interface (such as SATA or SAS).
Once you have acquired the appropriate RAID controller, begin the installation process by carefully reading and following the manufacturer's instructions. This typically involves opening your computer's case, locating an available PCIe or PCI slot (depending on the type of RAID controller), and securely inserting the card. Ensure proper grounding and anti-static precautions are taken to prevent any damage to the hardware.
With the RAID controller physically installed, the next step entails connecting the storage drives to the controller. Depending on the RAID level you plan to implement, you may need to connect multiple drives. SATA or SAS cables are typically used for this purpose, ensuring a reliable and high-speed connection between the drives and the RAID controller.
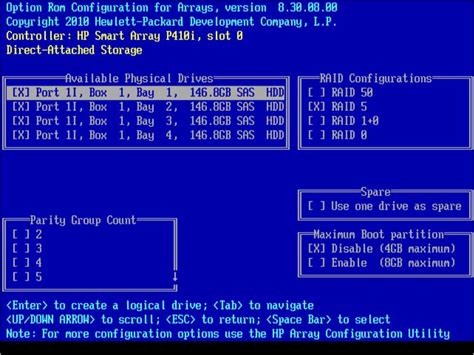
After the physical connections have been made, power on your system and access the RAID controller's BIOS or firmware settings. This can usually be achieved by pressing a specific key during the system's boot-up process. Inside the RAID controller's settings, you will need to navigate to the configuration options related to drive management and RAID settings.
From within the RAID controller settings, you can create RAID arrays, define the RAID level, allocate the appropriate amount of storage space, and configure other parameters such as strip size and cache settings. It is essential to consult the RAID controller's documentation or online resources to understand the specific configuration options available for your particular controller model.
Once you have finalized the desired RAID configurations, save the settings and exit the RAID controller settings interface. At this stage, the RAID controller will begin the process of initializing the array(s), which involves formatting the drives and building the necessary metadata for proper array operation. The initialization process may take some time, depending on the array size and the number of drives connected.
After the RAID initialization is complete, you can proceed with the installation of the operating system or configure the RAID arrays to be recognized by the existing operating system. This may involve installing specific drivers or utilizing the operating system's built-in RAID management tools to detect and configure the RAID arrays correctly.
In conclusion, the process of installing and configuring RAID hardware, specifically the RAID controller, is critical for setting up robust and reliable RAID arrays. By carefully selecting and installing the appropriate RAID controller, connecting the storage drives correctly, configuring the RAID settings, and initializing the arrays, you can harness the benefits of RAID technology such as improved performance, data redundancy, and fault tolerance.
Preparing Your Hard Drives: Formatting and Partitioning for RAID
In this section, we will explore the necessary steps to get your hard drives ready for RAID configuration. Formatting and partitioning your hard drives correctly is essential to ensure optimal performance and reliability when working with RAID arrays.
Formatting
Before setting up RAID, it is crucial to format your hard drives properly. Formatting involves preparing the drives by writing a file system structure that the operating system can understand and utilize. This process wipes out any existing data on the drives, so it is essential to back up any important files before formatting.
Partitioning
Partitioning divides your hard drives into separate sections, also known as partitions. With RAID, these partitions will be combined to form a single logical drive. Proper partitioning helps to organize your data and improve performance and data management in RAID setups.
Choosing the File System
When formatting your drives, you have to choose the file system that suits your needs. There are various file system options available, including NTFS, FAT32, and exFAT. Each file system has its advantages and limitations, so it is crucial to choose one that best fits your requirements.
Alignment Considerations
Aligning your partitions properly is crucial to attain optimal performance in RAID configurations. Misaligned partitions can lead to reduced performance and increased wear on the hard drives. It is important to ensure that your partitions are aligned correctly to minimize any negative impact on the RAID array.
Conclusion
Properly formatting and partitioning your hard drives is a vital step in preparing them for RAID configuration. By following these steps and considering the different aspects, such as file system selection and alignment, you can ensure optimal performance, reliability, and data management in your RAID arrays.
Building Your Data Storage Solution: A Step-by-Step Guide to Creating RAID Arrays

In this section, we will walk you through the process of building RAID arrays to enhance your data storage capabilities. By following this step-by-step guide, you will be able to create a reliable and efficient storage solution tailored to your specific needs.
- Choose the Right RAID Level: Selecting the appropriate RAID level is crucial in determining the performance, reliability, and available storage space of your arrays. We will explore different RAID levels and their features to help you make an informed decision.
- Identify Compatible Hardware: Before setting up your RAID arrays, it is important to ensure that your hardware components, such as hard drives and controllers, are compatible. We will guide you on how to check for compatibility and provide recommendations for hardware selection.
- Prepare Your System: Before beginning the array creation process, there are several preparatory steps to take. These include initializing your hard drives, updating firmware, and configuring your BIOS settings. We will outline these steps and guide you through the necessary preparations.
- Configure RAID Controller: Your RAID controller plays a vital role in managing the array. We will show you how to access and configure the RAID controller settings to create and manage your RAID arrays effectively.
- Create the RAID Array: Once your hardware and system are prepared, it's time to create the actual RAID arrays. We will walk you through the process of setting up the arrays using the RAID controller software or BIOS, explaining the configuration options and their implications.
- Monitor and Maintain Your RAID Arrays: After successfully creating the RAID arrays, it is important to monitor their performance and take regular maintenance measures to ensure data integrity. We will discuss monitoring tools, best practices, and troubleshooting techniques to help you effectively manage your arrays.
By following this step-by-step guide, you will be equipped with the knowledge and skills necessary to build your own RAID arrays and optimize your data storage solution. Let's get started!
Optimizing Performance and Troubleshooting: Tips and Tricks for RAID Maintenance
In this section, we will explore various strategies and techniques to enhance the performance of your RAID arrays and troubleshoot any issues that may arise during maintenance. By applying these tips and tricks, you can ensure your RAID system operates at its peak efficiency, delivering reliable and consistent data storage capabilities.
Maximizing Performance: Discover effective methods to optimize the performance of your RAID arrays. Explore different configurations and settings to fine-tune the read and write speeds, improve data access times, and reduce latency. We will delve into techniques such as striping, caching, and load balancing to distribute the workload effectively across multiple drives, ensuring the optimal utilization of your RAID system.
Troubleshooting Techniques: Learn how to identify and resolve common issues that may occur during RAID maintenance. From disk failures and data corruption to synchronization problems and degraded performance, we will guide you through step-by-step troubleshooting processes. Discover how to use diagnostic tools and utilities to diagnose and repair RAID array issues, ensuring data integrity and minimizing downtime.
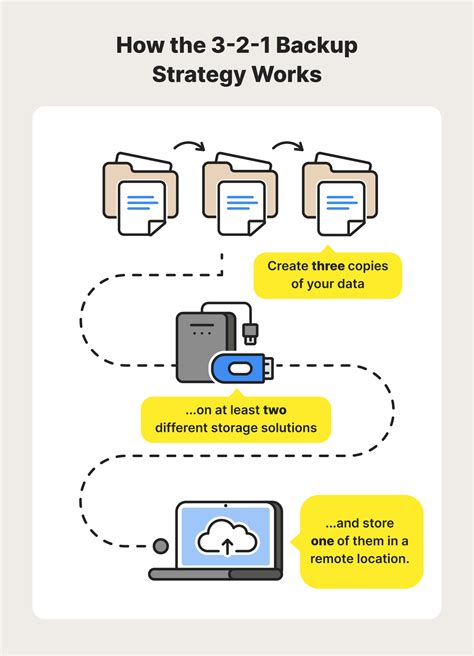
Data Recovery and Backup Strategies: Explore essential practices for data recovery and backup in the context of RAID maintenance. Learn how to implement effective backup solutions, ensuring you have reliable copies of your data, even in the event of a complete RAID failure. We will discuss RAID data recovery methods, including rebuilding arrays and restoring data from backups, helping you mitigate the potential impact of data loss.
Best Practices for RAID Maintenance: Gain insights into best practices for maintaining and managing your RAID arrays. From regular monitoring and proactive maintenance to firmware updates and drive replacement, we will cover the key tasks required to keep your RAID system in optimal condition. By following these best practices, you can minimize the risk of data loss, maximize system uptime, and extend the lifespan of your RAID setup.
Future-proofing Your RAID System: Explore strategies to future-proof your RAID system and adapt to evolving storage requirements. We will discuss considerations for scaling your RAID arrays, incorporating new technologies, and staying updated with the latest industry trends. By embracing future-proofing practices, you can ensure your RAID system remains relevant and capable of meeting your data storage needs in the long run.
FAQ
What is RAID and why should I use it?
RAID, or Redundant Array of Independent Disks, is a storage technology that combines multiple physical hard drives into a single logical unit. It offers benefits such as increased performance, data redundancy, and improved data availability.
Can I configure RAID on my Windows PC?
Yes, you can configure RAID on your Windows PC if your motherboard supports it. You will need compatible hard drives and RAID controller drivers for your operating system.
What are the different RAID levels supported by Windows?
Windows supports various RAID levels, including RAID 0, RAID 1, RAID 5, and RAID 10. Each level offers different benefits in terms of performance, data redundancy, and capacity.
How do I configure RAID on Windows?
To configure RAID on Windows, you need to access your BIOS settings and enable RAID mode. Then, install the necessary RAID controller drivers, create RAID arrays using the RAID management tool provided by your motherboard manufacturer, and initialize the arrays in Windows Disk Management.


