In the fast-paced world of technology, staying ahead of the competition is crucial. Whether you are an IT professional or a business owner, finding ways to optimize your resources and enhance productivity has become a necessity. One such solution that has revolutionized the way we utilize our hardware and software resources is virtualization.
Unlocking the true potential of your infrastructure
Virtualization is not just a buzzword; it is a game-changer that empowers organizations to maximize the capabilities of their hardware and software, eliminating the need for additional physical infrastructure. By creating virtualized environments, businesses can consolidate their resources, reducing costs while boosting agility and scalability.
However, harnessing the power of virtualization requires careful planning and configuration to ensure seamless integration into your existing Windows infrastructure.
Streamlining your operations with advanced virtualization services
When it comes to configuring virtualization services in a Windows Server environment, it is crucial to understand the various options and features available. From Hyper-V to VMware, there is a plethora of tools and technologies at your disposal. By implementing these services effectively, you can streamline your operations, enhance security, and simplify your IT management.
With our comprehensive guide, you will delve into the world of virtualization services in Windows Server, learning how to unleash the full potential of your IT infrastructure.
Expanding your knowledge and capabilities
Whether you are a beginner eager to explore virtualization or an experienced professional looking to expand your knowledge, this article aims to provide you with the necessary guidance and insights. We will navigate through the complexities of virtualization configuration, offering practical tips and best practices to ensure a seamless implementation that aligns with your organization's goals and requirements.
By the end of this article, you will be equipped with the knowledge and skills to leverage virtualization services in your Windows Server environment, opening doors to increased efficiency, flexibility, and innovation.
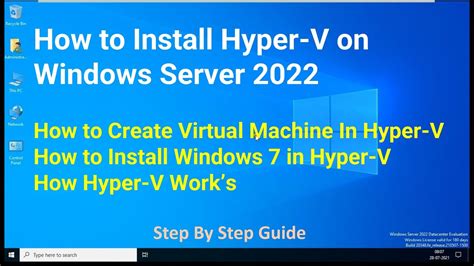
Installing Hyper-V Role in Microsoft Server

Setting up the Hyper-V role is an essential step in enabling virtualization capabilities on your Windows Server operating system. By installing the Hyper-V role, you gain access to a powerful hypervisor that allows you to create and manage virtual machines (VMs), providing a flexible and efficient solution for running multiple operating systems simultaneously.
To install the Hyper-V role, follow the step-by-step instructions below:
- Open the Server Manager console.
- Navigate to the "Manage" menu and select "Add Roles and Features."
- In the "Add Roles and Features Wizard" window, click "Next" to proceed.
- Choose the appropriate installation type for your server (either "Role-based or feature-based installation" or "Remote Desktop Services installation").
- Select the target server on which you want to install Hyper-V and click "Next."
- From the list of available roles, locate and check the box next to "Hyper-V."
- Review the information provided in the "Add features that are required for Hyper-V" window and click "Next."
- On the "Create Virtual Switches" screen, you can choose to create a virtual switch now or later. Make your selection and click "Next."
- Click "Install" to start the installation process.
- Once the installation is complete, click "Close" to exit the wizard.
Congratulations! You have successfully installed the Hyper-V role on your Microsoft Server, unlocking the full potential of virtualization technology. With Hyper-V, you can now create, manage, and customize virtual machines to meet your specific workload requirements.
A Step-by-Step Guide: Setting Up Your Virtualization Experience
Embark on a journey into the exciting world of virtualization, where you can create virtual environments and harness their power for enhanced efficiency and flexibility. This step-by-step guide will walk you through the process of configuring a virtualization service, enabling you to optimize your resources and streamline your operations without physical limitations.
Step 1: Install a Hypervisor
First things first, you need to select and install a suitable hypervisor, a software layer essential for creating and managing virtual machines. Ensure compatibility with your system's architecture and desired virtualization features. Once installed, you'll open the gateway to a multitude of virtualization opportunities.
Step 2: Create a Virtual Machine
Now that your hypervisor is set up, it's time to create your virtual machine (VM). Define its specifications, including allocated resources, operating system, and virtual hardware. This process offers you the freedom to customize your VM according to the specific needs of your applications or workloads.
Step 3: Configure Network Settings
A well-connected virtual environment requires proper network configuration. Determine the networking options that best suit your virtualization service setup, such as virtual switches, network adapters, or VLANs. Establish connectivity between virtual machines and the external network to utilize their full potential.
Step 4: Deploy Storage Solutions
Storage plays a crucial role in virtualization, ensuring data availability and efficient VM performance. Explore the various storage options available, such as direct-attached storage (DAS), network-attached storage (NAS), or storage area network (SAN) solutions. Configure and allocate appropriate storage resources to fulfill your virtualization service's storage requirements.
Step 5: Implement VM Backups and High Availability
Safeguarding your virtual machines from potential disasters or disruptions is paramount. Enable regular and automated backups to protect critical VM data and settings. Additionally, implement high availability solutions to minimize downtime and ensure uninterrupted access to your virtualized environments.
Step 6: Monitor and Optimize Performance
The journey doesn't end with configuration; it's vital to continuously monitor and optimize the performance of your virtualization service. Utilize monitoring tools to identify bottlenecks, optimize resource allocation, and ensure smooth operation. Regularly assess the virtualization environment to maintain its efficiency and maximize its benefits.
In conclusion, by following this comprehensive step-by-step guide, you'll be equipped with the knowledge and skills needed to configure a virtualization service successfully. Embrace the possibilities of virtualization, break free from physical limitations, and elevate your IT infrastructure to new heights of productivity and flexibility.
Creating Virtual Machines in Hyper-V Manager

In this section, we will explore the process of establishing virtual machines within the Hyper-V Manager tool. Virtual machines serve as virtual instances that mimic the functionality of physical computers, enabling efficient utilization of resources and flexibility in managing multiple operating systems on a single server.
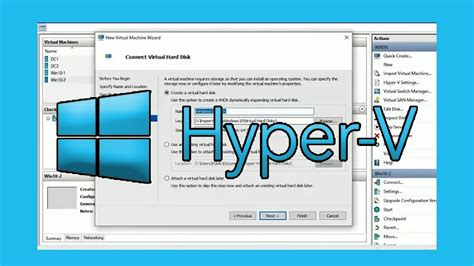
Firstly, launch the Hyper-V Manager application to access the virtualization environment. Once opened, navigate to the "Create Virtual Machine" option, which allows you to initiate the creation process. Within this option, you can specify various settings for the virtual machine, such as the operating system, memory allocation, and virtual hard disk configuration. These settings will determine the virtual machine's functionality and performance.
- Select the desired operating system for the virtual machine from a list of compatible options. Ensure compatibility between the virtual machine and the target operating system to optimize performance and ensure smooth operation.
- Allocate an appropriate amount of memory resources to the virtual machine. This allocation depends on the requirements of the operating system and the applications that will be running within the virtual environment.
- Configure the virtual hard disk settings, such as the storage capacity and the type of disk. Choose between fixed or dynamically expanding disks, considering the needs of the virtual machine and the available storage resources.
After configuring these parameters, proceed to specify the virtual machine's network settings. This step involves selecting a network connection type, such as a virtual switch, to establish connectivity between the virtual machine and the external network. Additionally, you can configure specific network adapters and set up virtual networks to meet your networking requirements.
Upon completing the necessary configurations, review the settings and options before finalizing the creation of the virtual machine. Double-check all parameters to ensure accurate setup and avoid potential issues during operation. Once satisfied, click the "Create" button to initiate the virtual machine's creation process.
In conclusion, the creation of virtual machines in Hyper-V Manager involves leveraging the tool's interface to specify operating system, memory, virtual hard disk, and network settings. By accurately configuring these parameters, administrators can create virtual instances that provide a reliable and efficient environment for running multiple operating systems and applications on a single server.
Setting up and Managing Virtual Machines
In this section, we will explore the process of establishing and controlling virtual machines, which are simulated computer systems that operate within a larger physical server environment. By leveraging virtual machines, organizations can efficiently utilize hardware resources, enhance flexibility, and streamline management tasks.
To begin, it is essential to understand the steps involved in setting up a virtual machine. Firstly, you need to determine the host server where the virtual machine will be created. This server should have adequate hardware specifications and run a compatible hypervisor, which is responsible for managing virtualization resources. Next, you will need to provision resources such as CPU, memory, storage, and networking for the virtual machine. Proper allocation of these resources ensures optimal performance and stability.
Once the virtual machine is set up, effective management is crucial to ensure its smooth operation. By regularly monitoring the virtual machine's performance metrics, administrators can identify any potential issues, troubleshoot them, and make necessary adjustments. Additionally, implementing backup and restoration strategies is essential to safeguard critical data within the virtual machine. By creating and maintaining backups, organizations can quickly recover from potential disruptions and prevent data loss.
- Creating and configuring virtual networks within the virtual machine environment
- Managing virtual machine snapshots, enabling easy restoration to a previous state if needed
- Implementing resource allocation and optimization techniques to maximize efficiency
- Exploring advanced features and capabilities provided by virtualization platforms
- Collaborating with other teams to ensure proper integration of virtual machines into the overall IT infrastructure
In conclusion, setting up and managing virtual machines is a crucial aspect of leveraging virtualization technology. By following the proper steps for deployment, allocating resources effectively, and implementing robust management practices, organizations can harness the power of virtual machines to enhance their operations and achieve operational excellence.
Setting Up Network Connectivity for Virtual Machines on Windows Server

In this section, we will explore the steps required to establish and configure network connectivity for virtual machines running on the Windows Server platform. By configuring networking settings effectively, you can ensure seamless communication and data exchange between virtual machines and the external network, enabling them to function as interconnected entities within your server environment.
Firstly, it is essential to understand the various networking options available when configuring virtual machines. Windows Server provides several methods to establish network connectivity, including virtual switches, network adapters, and network address translation (NAT) configurations. Each of these options serves specific purposes and caters to diverse networking requirements.
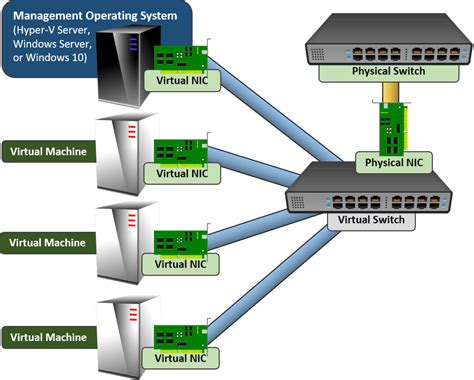
Once you have determined the appropriate networking method for your virtual machines, the next step is to create and configure virtual switches. Virtual switches act as intermediary components that facilitate network communication between virtual machines, physical host systems, and external networks. They can be created and customized to suit your specific network setup, ensuring optimal performance and security.
Additionally, you will need to configure network adapters for your virtual machines. Network adapters serve as virtual representations of physical network interfaces and enable virtual machines to connect to the corresponding virtual switches. By assigning the appropriate network adapter settings, such as the network connection type, IP address, subnet mask, and gateway, you can fine-tune network connectivity for each virtual machine and ensure seamless interaction with other networked systems.
Furthermore, for scenarios where external network access is required for virtual machines, it is imperative to set up network address translation (NAT). NAT allows virtual machines to share a single IP address with the host system while maintaining individual internal IP addresses. This configuration enables internet connectivity for virtual machines without exposing their internal network details to external networks.
By following the steps outlined in this section, you will possess the knowledge and skills to effectively configure network connectivity for virtual machines in your Windows Server environment. Properly establishing and managing networking settings will enhance the functionality, performance, and security of your virtualized server infrastructure, enabling seamless communication and data exchange between virtual machines and external networks.
How to Create Free Virtual Machine on Hyper-V with Free Windows 10?
How to Create Free Virtual Machine on Hyper-V with Free Windows 10? by WindowsChimp 111,625 views 3 years ago 10 minutes, 23 seconds
FAQ
What is virtualization service in Windows Server?
Virtualization service in Windows Server is a feature that allows multiple virtual machines to be created and run on a single physical server.
Why would I want to configure virtualization service in Windows Server?
Configuring virtualization service in Windows Server allows for the efficient utilization of hardware resources by running multiple virtual machines on a single physical server. This helps to reduce costs, increase flexibility, and simplify server management.
How can I configure virtualization service in Windows Server?
To configure virtualization service in Windows Server, you can use Hyper-V Manager, which is a built-in tool that allows you to create, configure, and manage virtual machines. You can also use Windows PowerShell commands for advanced configuration options.
What are some best practices for configuring virtualization service in Windows Server?
Some best practices for configuring virtualization service in Windows Server include ensuring that the physical server has enough resources to support the virtual machines, regularly monitoring and managing the virtual machines to optimize performance, and implementing appropriate security measures to protect the virtual machines and the host server.


