When it comes to data storage and protection, redundancy is key. RAID (Redundant Array of Independent Disks) offers a reliable solution for maximizing data availability and minimizing the risk of data loss. In the Linux environment, mdadm stands as a powerful tool for setting up RAID configurations, ensuring the integrity and performance of your storage system.
By creating a RAID array, you can combine multiple physical drives into a single logical unit, which provides enhanced fault tolerance and improved performance. Through the clever utilization of different RAID levels, such as RAID 0, RAID 1, and RAID 5, you can achieve various objectives, whether it's increased data transfer speeds or data redundancy.
In essence, mdadm acts as the bridge between your physical drives and the RAID functionality. It allows you to configure, manage, and monitor RAID arrays effortlessly, ensuring that your data remains safe and accessible.
This article will guide you through the steps required to set up RAID on your Linux system using mdadm. You will learn how to select suitable RAID levels depending on your requirements, initialize the array, and configure it for optimal performance and reliability. So let's dive right in and explore the world of RAID storage on Linux!
A Deeper Insight into mdadm and its Role in Configuring Redundant Arrays of Independent Disks (RAID)

Often regarded as a vital component of Linux-based systems, mdadm plays a crucial role in the setup and management of RAID configurations. Understanding mdadm and its functionalities is instrumental in comprehending the inner workings of RAID arrays and ensuring data redundancy and system stability without relying on costly specialized hardware.
An Insight into mdadm:
mdadm is a powerful software utility offered by the Linux operating system that enables users to create, configure, monitor, and manage multiple hard drives as a unified storage entity known as a RAID array. Leveraging mdadm, users can achieve enhanced reliability, improved performance, and flexible storage options without the need for dedicated RAID controllers.
The Role of mdadm in RAID Setup:
mdadm acts as the central controller for RAID configurations, offering a comprehensive set of tools and commands to create, monitor, and manage various RAID levels, including RAID 0, RAID 1, RAID 5, RAID 6, and RAID 10. It combines the capabilities of individual hard drives into an integrated system that provides redundancy, fault tolerance, and increased performance.
Creating RAID Arrays:
With mdadm, users can effortlessly create RAID arrays by combining multiple physical disks into a single logical volume. This process involves defining the RAID level, specifying the number of drives, and configuring additional parameters such as chunk size, data layout, and redundancy level.
Monitoring RAID Arrays:
Once configured, mdadm continuously monitors the status of RAID arrays, providing real-time information on drive health, potential failures, and overall array performance. It empowers users to identify and resolve issues promptly, minimizing the risk of data loss and system downtime.
Managing RAID Arrays:
mdadm offers an array of management operations, allowing users to add or remove drives from existing arrays, repair degraded arrays, perform RAID level migration, and expand storage capacity as per evolving requirements. These comprehensive management capabilities foster scalability, adaptability, and long-term viability for RAID configurations.
In conclusion, mdadm serves as a key component in the setup and maintenance of RAID arrays on Linux-based systems. Understanding its functionality and role empowers users to harness the benefits of software-based RAID configurations, ensuring system reliability, data redundancy, and optimized performance.
A Step-by-Step Guide to Set Up the mdadm Utility on Your Linux System
Are you looking to enhance the reliability and performance of your Linux system? One effective way to achieve this is by setting up RAID (Redundant Array of Independent Disks) using the mdadm utility. This step-by-step guide will walk you through the process of installing and configuring mdadm on your Linux system.
Before diving into the installation process, it's important to understand the benefits of using RAID and the mdadm utility. RAID allows you to combine multiple physical disks into a single logical unit, providing data redundancy and improved read/write performance. The mdadm utility, short for Multiple Device Administrator, is a command-line tool that enables you to manage and monitor RAID arrays on your Linux system.
- Firstly, open a terminal on your Linux system.
- Next, update the package repositories by running the command
sudo apt update. - Once the repositories are up to date, install mdadm by executing the command
sudo apt install mdadm. - After the installation is complete, you can start configuring your RAID arrays. Begin by identifying the disks you want to include in your RAID array. You can use the command
lsblkto list all your available disks. - Once you have identified the disks, create a new RAID array by running the command
sudo mdadm --create /dev/md0 --level=1 --raid-devices=2 /dev/sda1 /dev/sdb1. Make sure to replace/dev/sda1and/dev/sdb1with the appropriate disk names. - Now that your RAID array is created, you can format it with a file system of your choice. For example, you can use the command
sudo mkfs.ext4 /dev/md0to format the array as an ext4 file system. - Once the formatting is complete, create a mount point for your RAID array by executing the command
sudo mkdir /mnt/raid, or choose a different directory if desired. - Mount the RAID array to the specified mount point using the command
sudo mount /dev/md0 /mnt/raid. - To ensure that the RAID array is mounted automatically at system startup, you'll need to add an entry to the
/etc/fstabfile. Open the file with a text editor, such assudo nano /etc/fstab, and add the following line:/dev/md0 /mnt/raid ext4 defaults 0 0. - Finally, save the changes to the
/etc/fstabfile and exit the text editor.
By following these steps, you will successfully install and set up mdadm on your Linux system, allowing you to create and manage RAID arrays for enhanced data reliability and performance. Remember to adjust the commands according to your specific disk names and preferences.
Configuring RAID Levels for Optimal Data Redundancy: An Essential Guide

In this article, we will delve into the crucial task of configuring RAID levels to achieve optimal data redundancy using the mdadm tool in a Linux environment. By understanding the various RAID levels available and their unique characteristics, you can make informed decisions to protect your data effectively and improve system performance.
- RAID 0: Striped Data for Enhanced Performance
- RAID 1: Mirroring for Increased Redundancy
- RAID 5: Balance between Performance and Redundancy
- RAID 6: Enhanced Redundancy with Dual Parity
- RAID 10: Combining Striping and Mirroring for Ultimate Redundancy
Learn about RAID 0, a level that focuses on improving system performance by striping data across multiple disks. Discover how the absence of redundancy can affect data protection and the precautions necessary when implementing RAID 0 for specific use cases.
Explore RAID 1, a level that provides enhanced data redundancy by creating an exact copy of data on multiple disks. Discover the benefits of RAID 1, such as data availability and quick recovery, and gain insights into its limitations and proper implementation to guarantee optimal redundancy.
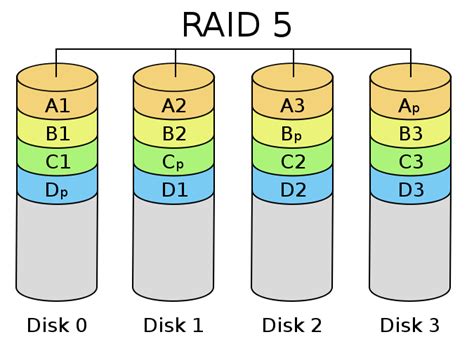
Understand RAID 5, a level that combines striping and parity information to achieve both enhanced performance and data redundancy. Learn about the distributed parity concept, the minimum number of drives required, and the considerations for optimal RAID 5 configuration.
Dive into RAID 6, a level that introduces an additional layer of redundancy by employing dual parity information. Explore the advantages of RAID 6 over RAID 5, the increased fault tolerance it offers, and the factors to consider when implementing RAID 6 for optimal data protection.
Discover RAID 10, a level that combines the benefits of striping and mirroring to provide the highest level of data redundancy. Learn about the structure of RAID 10, its performance characteristics, and the considerations involved in configuring RAID 10 to achieve optimal data protection and performance.
By understanding and properly configuring RAID levels using mdadm, you can ensure your data is backed up and protected against various failures, including disk failures, improving the overall reliability of your Linux system.
Monitoring and Managing Your RAID Array with mdadm
In this section, we will explore the essential aspects of effectively monitoring and managing your RAID array utilizing the mdadm tool. By maintaining a watchful eye on your array's performance, health, and potential issues, you can ensure the reliability and availability of your data storage system.
- Understanding RAID Array Monitoring
- Examining RAID Array Health
- Monitoring Array Rebuild and Recovery Processes
- Detecting and Resolving Array Degradation
- Responding to Failed Devices
- Managing Spare Devices in the Array
- Implementing Monitoring and Alert Systems
- Proactive Maintenance and Performance Optimization
By delving into these crucial aspects, you will gain comprehensive knowledge and practical strategies for effectively monitoring and managing your RAID array. This will enable you to promptly address any potential issues, minimize data loss risks, and ensure the continued functionality and performance of your storage system.
FAQ
What is RAID and why is it important?
RAID, or Redundant Array of Independent Disks, is a storage technology that combines multiple physical disks into a single logical unit to improve performance, reliability, or both. It is important because it provides redundancy and data protection, ensuring that if one disk fails, the data can still be accessed from the remaining disks.
What is mdadm and why is it used?
mdadm is a Linux utility used for managing and monitoring software RAID. It is used to create, manage, and monitor RAID arrays, handle disk failures, and rebuild failed disks. It provides an easy way to configure RAID on Linux systems.
How do I install mdadm on my Linux system?
To install mdadm on your Linux system, you can use the package manager specific to your distribution. For example, on Ubuntu or Debian, you can use the following command: sudo apt-get install mdadm
What are the different RAID levels and which one should I choose?
There are several RAID levels, including RAID 0, RAID 1, RAID 5, RAID 6, RAID 10, etc. The choice of RAID level depends on your specific requirements for performance, data redundancy, and storage capacity. RAID 0 offers improved performance but no redundancy, while RAID 1 provides full redundancy at the cost of storage capacity. RAID 5 and RAID 6 offer a good balance between performance, redundancy, and capacity. RAID 10 combines the advantages of RAID 1 and RAID 0.
How do I create a RAID array using mdadm?
To create a RAID array using mdadm, you need to first install mdadm if it is not already installed. Then, you can use the mdadm command to create an array with the desired RAID level, specify the devices to include in the array, and configure any additional options such as chunk size or layout. The command syntax would be something like: sudo mdadm --create /dev/md0 --level=1 --raid-devices=2 /dev/sda1 /dev/sdb1


