In today's rapidly evolving software development landscape, developers are constantly seeking new and efficient ways to streamline the development and deployment process. Containerization technology has emerged as a popular choice, offering a lightweight and portable solution for packaging applications and their dependencies.
In this article, we will explore the process of setting up a Laravel application using Docker containers on a Windows operating system, leveraging the power of containerization to create a robust and scalable development environment. This approach allows developers to easily replicate their application environment across different machines and ensures consistency throughout the development lifecycle.
We will dive into the intricacies of containerization and showcase how Docker, a leading containerization platform, can be utilized to build and manage Laravel applications efficiently. By utilizing Docker's unique features, developers can create isolated environments containing all the necessary components, such as the web server, database, and dependencies, required for running a Laravel application.
Benefits of leveraging Docker for Laravel development

When it comes to developing Laravel applications, integrating Docker into your workflow can bring numerous advantages. Docker, being a containerization platform, enables developers to create lightweight, reproducible, and isolated environments for running their applications. This section explores the benefits of utilizing Docker within the Laravel development process, highlighting the advantages it offers for developers.
| Enhanced Portability | Efficient Resource Utilization | Ease of Collaboration |
|---|---|---|
Docker allows for the encapsulation of the entire Laravel development stack, including dependencies, runtime, and configuration in a single container. This simplifies the deployment process since the container can be easily transferred across different environments, such as local development machines, staging servers, or production servers. | By utilizing Docker, developers can optimize resource utilization by isolating different components of the Laravel application stack into separate containers. This enables efficient allocation of resources, ensuring that each container only uses the necessary computational resources, such as CPU, memory, and storage, resulting in improved overall performance. | Collaborating with fellow developers becomes more seamless with Docker. Since the development environment is defined within a container, developers can easily share the container configuration with their teammates. This eliminates the setup and compatibility issues that often arise when working on projects in different development environments, promoting teamwork and faster development cycles. |
These are just a few of the benefits that Docker brings to Laravel development. By leveraging Docker, developers can streamline their workflow, increase project portability, optimize resource utilization, and enhance collaboration, ultimately leading to more efficient and effective Laravel development process.
Setting Up Docker on a Windows Machine
In this section, we will explore the process of installing Docker on a Windows operating system. Docker allows developers to deploy and run applications in containers, providing a lightweight and portable environment.
To get started with Docker on Windows, follow the steps outlined below:
| Step | Description |
|---|---|
| 1 | Ensure that your Windows operating system meets the minimum system requirements for Docker installation. |
| 2 | Download the Docker Desktop installer for Windows from the official Docker website. |
| 3 | Double-click on the installer file to start the installation process. |
| 4 | Follow the on-screen instructions to complete the installation. |
| 5 | Once the installation is complete, launch Docker Desktop from the Start menu. |
| 6 | Sign in to Docker with your Docker Hub account or create a new account if you don't have one. |
| 7 | Configure Docker settings according to your requirements, such as resource allocation and network options. |
| 8 | After configuring the settings, Docker will be up and running on your Windows machine. |
By following these steps, you will have successfully installed Docker on your Windows machine. Docker provides a convenient environment for running applications in containers, which can greatly simplify the development and deployment process.
Creating a Dockerfile for a Laravel Project
One of the crucial steps in setting up a Laravel project with Docker is to create a Dockerfile. This file acts as a blueprint or set of instructions for Docker to build an image that can be used to run your Laravel application.
Within the Dockerfile, you define the base image, dependencies, environment variables, and other configurations required for your Laravel project to run smoothly within a Docker container. This allows for consistency and portability across different development environments.
Base Image: The base image is the starting point for your Docker image. It provides the foundation and essential components for running your Laravel application. You can choose a base image that aligns with your project requirements, such as a specific version of PHP or a minimal Alpine Linux image.
Dependencies: In this section, you specify any additional packages or extensions that your Laravel project relies on. These dependencies can include PHP extensions, database drivers, or other libraries required for your application to work correctly.
Environment Variables: Environment variables are key-value pairs that can be accessed within your Laravel application. They allow you to configure various aspects of your application, such as database connections or API keys, without hardcoding sensitive information into your codebase. Defining these environment variables within the Dockerfile ensures consistent configuration across your development and deployment environments.
Configuration Files: Apart from environment variables, you may need to include additional configuration files required for your Laravel project. These files can include routes, database configurations, or other settings specific to your application. Including these files in the Dockerfile ensures that your container has the necessary configuration to run the Laravel project correctly.
Building the Image: Once you have created the Dockerfile, you can use the Docker build command to build your image. This command reads the instructions from the Dockerfile, downloads the necessary dependencies, and creates a reproducible image that encapsulates your Laravel project and its dependencies.
Using the Dockerfile: After successfully building the Docker image, you can then use it to create Docker containers for your Laravel project. These containers provide a consistent environment for running and testing your Laravel application, enabling seamless collaboration and deployment.
In conclusion, creating a Dockerfile for your Laravel project is an essential step in setting up your development environment. It allows you to define the necessary dependencies, configuration, and environment variables, ensuring consistency and portability across different development environments. By encapsulating your Laravel application within a Docker container, you can streamline your development workflow and easily deploy your application to various environments.
Configuring Docker Compose for Laravel
In this section, we will explore the necessary steps to configure Docker Compose for your Laravel project. By properly configuring Docker Compose, you will be able to streamline the development process and ensure consistency across different development environments.
- Step 1: Defining the Services
- Step 2: Configuring Environment Variables
- Step 3: Mounting Volumes
- Step 4: Configuring Networks
When configuring Docker Compose for Laravel, it is important to define the necessary services that will be used in your development environment. These services can include the web server, database server, and any other services required by your Laravel application. By properly defining these services, you can ensure that the different components of your application can communicate with each other seamlessly.
Additionally, configuring environment variables is an essential step in setting up Docker Compose for Laravel. These variables allow you to store sensitive information, such as database credentials, in a secure manner. By properly configuring environment variables, you can ensure that your application remains secure and easily deployable across different environments.
Another important aspect of configuring Docker Compose for Laravel is mounting volumes. This allows you to map directories on your host machine to directories inside the Docker containers. By properly configuring volume mounting, you can ensure that any changes made to your code on the host machine are immediately reflected inside the Docker containers, making the development process seamless and efficient.
Lastly, configuring networks is crucial when setting up Docker Compose for Laravel. Networks allow different Docker containers to communicate with each other. By properly configuring networks, you can ensure that your Laravel application can interact with other services, such as a database server, without any issues.
By following the steps outlined in this section, you will be able to effectively configure Docker Compose for your Laravel project, creating a streamlined and efficient development environment.
Building and running your Laravel application using containerization
In this section, we will explore the process of containerizing your Laravel application and running it using a containerization platform. By adopting containerization, you can easily package your application and its dependencies, ensuring it runs consistently across different environments.
A containerization platform allows you to encapsulate your application, its configuration, and its dependencies into a portable and isolated runtime environment. This eliminates the need for manual setup and configuration, making it easier to distribute and deploy your application.
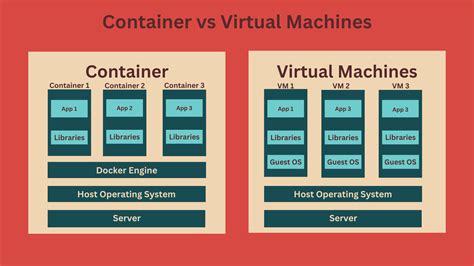
Containerization provides several benefits, including improved scalability, flexibility, and reproducibility. By encapsulating your Laravel application within a container, you can isolate its dependencies, ensuring that it can run seamlessly across different operating systems and environments.
In order to containerize your Laravel application, you will need to define a Dockerfile, which contains instructions for building a Docker image. This image includes your application code, its dependencies, and the necessary configuration files. Once the Docker image is built, it can be run as a container, providing an isolated and consistent runtime environment for your Laravel application.
| Benefits of containerization: |
|---|
| - Enhanced scalability |
| - Improved flexibility |
| - Increased reproducibility |
| - Easy distribution and deployment |
| - Consistent runtime environment |
Customizing the Docker Development Environment for Laravel
In this section, we will explore various ways to enhance and personalize the Docker development environment for your Laravel project. We will look into different customizations that can be applied to improve the efficiency and effectiveness of your development workflow, without relying on the default settings provided by Laravel, Docker, or the Windows operating system.
| Customization | Description |
|---|---|
| Optimizing Container Resources | Learn techniques for fine-tuning container resources allocation to ensure optimal performance and resource management within the Docker environment for your Laravel project. |
| Expanding Docker Functionality | Discover additional Docker features and tools that can be integrated into your Laravel development environment to enhance functionality, such as utilizing Docker Compose for managing multi-container setups. |
| Custom Docker Images | Create and utilize custom Docker images tailored specifically to your Laravel project's needs, taking advantage of pre-configured package installations and optimizing container size. |
| Integrating Environment Variables | Explore techniques for securely managing application configuration through environment variables, ensuring smoother deployment and facilitating collaboration across development teams. |
| Logging and Monitoring | Implement effective logging and monitoring solutions within the Docker environment to gain insights into the performance and stability of your Laravel application during development. |
| Automating Development Tasks | Discover how to configure automation tools and scripts within the Docker development environment to streamline common Laravel development tasks, such as database migrations and seeders. |
By customizing the Docker development environment for your Laravel project, you can optimize your workflow, improve collaboration, and ensure a seamless development experience. The customizations discussed in this section will empower you to tailor the environment to your specific requirements and leverage the full potential of Laravel and Docker in your development process.
Utilizing Docker Volumes for Long-lasting Data Storage
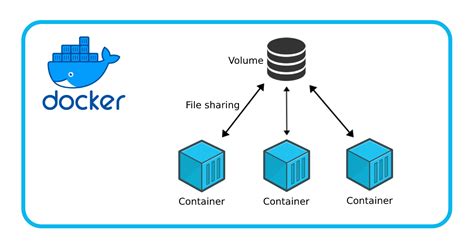
In the context of configuring Laravel with Docker on Windows, it is crucial to explore the concept of leveraging Docker volumes for persistent data storage. By employing Docker volumes, you can ensure that your data remains intact even if the container gets terminated or recreated.
When working with Docker, volumes serve as a means of storing data that needs to be accessible to multiple containers. Unlike bind mounts, which link host machine directories to container directories, volumes are managed by Docker and provide a more efficient, scalable, and portable way of managing data storage.
By utilizing Docker volumes, you can establish a reliable mechanism for preserving essential data such as application logs, database files, and user uploads. This enables seamless persistence of crucial information across container restarts and upgrades, facilitating the smooth functioning of your Laravel application.
- Advantages of Docker Volumes:
- Improved Data Management: Docker volumes offer a centralized and organized approach to storing data, making it convenient to manage and manipulate.
- Data Sharing: Volumes can be shared across multiple containers, allowing for efficient collaboration and seamless integration between various components of your Laravel project.
- Data Persistence: By leveraging volumes, your data becomes decoupled from the container's lifecycle, ensuring its preservation even when containers are recreated or upgraded.
- Scalability: Docker volumes facilitate the scaling of your application by enabling easy data sharing and replication across multiple containers.
- Creating a Docker Volume:
- Mounting a Volume to a Container:
To create a Docker volume, you can utilize the docker volume create command followed by a unique volume name. This will generate a volume that can be accessed and utilized by containers.
To make a Docker volume accessible within a container, you can include the --mount flag while running the docker run command. By specifying the volume name and the container path, you can effortlessly mount the volume to a specific location within the container's filesystem.
Overall, using Docker volumes provides an effective way to ensure the persistent storage of critical data in your Laravel application. By incorporating this approach into your container setup, you can maintain data integrity and encourage seamless collaboration across your project.
Working with Docker networks for Laravel project
In this section, we will explore the integration of Docker networks with a Laravel project. Docker networks provide a reliable and scalable way to connect and communicate between containers, ensuring the seamless functioning of your Laravel application.
When working with Docker networks, it is important to understand how they facilitate the communication between containers. By creating and configuring networks, you can establish secure connections and enable efficient data transfer among the different components of your Laravel project.
| Network Name | Network Description |
|---|---|
| frontend | This network serves as the bridge for web servers, allowing them to connect and communicate with the frontend components of the Laravel project. |
| backend | The backend network plays a crucial role in connecting the Laravel application with the database and other backend services required for its proper functioning. |
| cache | This network is responsible for connecting the caching services to ensure optimized performance and efficient utilization of resources in the Laravel project. |
By leveraging Docker networks, you can isolate and manage the different components of your Laravel project effectively. This allows for easier scalability, improved security, and enhanced performance of your application.
Next, we will delve into the process of configuring and setting up Docker networks for your Laravel project, ensuring a smooth development and deployment experience.
Scaling your application using containerization technology
In this section, we will explore how to effectively scale your application using containerization technology. Containerization allows you to distribute your application across multiple isolated environments, enabling easier scalability and improved performance. By leveraging the power of Docker, you can efficiently deploy and manage your Laravel application, ensuring seamless scalability and enhanced user experience. Let's dive into the key strategies and best practices for scaling your application with Docker.
Automated Scaling: Docker enables automated scaling by allowing you to easily replicate and distribute your application containers across different servers or clusters. With the ability to define desired scaling rules and policies, you can ensure that your application resources are dynamically allocated based on the current demand, effectively handling both high and low traffic scenarios.
Load Balancing: Implementing a load balancer with Docker can significantly enhance the scalability of your Laravel application. By distributing incoming requests across multiple application instances, the load balancer ensures that each container receives an equal share of the workload. This results in improved response times and enhanced fault tolerance, as the load can be quickly shifted from one container to another in case of failures.
Vertical and Horizontal Scaling: Docker offers flexibility in both vertical and horizontal scaling. Vertical scaling involves adding more resources (CPU, memory) to existing containers, enabling them to handle increased workloads. Horizontal scaling, on the other hand, focuses on adding more containers to the application setup. By horizontally scaling your Laravel application, you can handle larger traffic volumes and distribute the load more effectively across multiple containers.
Monitoring and Logging: As your application scales, monitoring and logging become crucial for detecting performance bottlenecks and ensuring the overall health of your system. Docker provides various tools and integrations that allow you to monitor container resource usage, track application logs, and analyze performance metrics. These features enable you to proactively identify and address any issues that may impact the scalability and performance of your Laravel application.
By implementing these strategies and leveraging the power of Docker, you can scale your Laravel application efficiently and effectively. The containerization technology provided by Docker empowers you to distribute and manage your application seamlessly, ensuring optimal performance and scalability as your user base expands.
Deploying your Application with Docker on Windows Server
In this section, we will explore the process of deploying your application built with Laravel using Docker on a Windows Server environment. We will discuss the steps involved in setting up the deployment environment, configuring the Docker containers, and ensuring a smooth deployment process.
| Key Considerations |
|---|
| 1. Containerized Deployment: Embrace the power of containerization to simplify the deployment process and ensure consistency across different environments. |
| 2. Windows Server Compatibility: Take into account the unique requirements and compatibility considerations when deploying your Laravel application on a Windows Server. |
| 3. Docker Image Selection: Choose the appropriate Docker image for running your Laravel application on Windows Server, considering factors such as version compatibility and required extensions. |
| 4. Container Configuration: Customize the Docker container configuration to meet the specific needs of your Laravel application, including database connections, environment variables, and other dependencies. |
| 5. Networking and Ports: Ensure proper networking setup and port configuration for accessing your deployed Laravel application on Windows Server. |
| 6. Deployment Workflow: Establish a streamlined deployment workflow that incorporates Docker commands and techniques for efficient updates and version control of your Laravel application on Windows Server. |
By following these guidelines, you will be able to successfully deploy your Laravel application using Docker on a Windows Server environment, allowing for scalable and efficient deployment processes.
FAQ
What is Laravel?
Laravel is a popular PHP framework used for web application development. It provides a clean, elegant syntax while offering various features and tools to simplify the development process.
Why should I use Docker with Laravel?
Using Docker with Laravel allows for better development environment isolation, easy deployment, and consistency across different machines. It helps in managing dependencies and ensures that the application runs smoothly in any environment.
How do I set up Laravel with Docker on Windows?
Setting up Laravel with Docker on Windows involves several steps. First, ensure that Docker Desktop is installed and running on your machine. Then, create a new Laravel project or clone an existing one. Next, create a Dockerfile and docker-compose.yml file in your Laravel project folder to define the Docker configuration. Build and run the Docker containers using the provided commands. Finally, access your Laravel application in a web browser using the defined port. Detailed instructions and example configurations can be found in the article.


