In this era of advanced technology and constant connectivity, the iPad has become much more than just a tablet. With its versatile capabilities and sleek design, it has become a powerful tool for communication. Gone are the days when an iPad was solely used for browsing, gaming, or media consumption. Now, you can transform your iPad into a handy device for making and receiving phone calls.
Have you ever wondered how to maximize the potential of your iPad and harness its full functionality for voice calls? Look no further! We have prepared a step-by-step guide that will walk you through the process of setting up your iPad for seamless and crystal-clear phone conversations. Whether you're a business professional looking to streamline your communication or a tech-savvy individual eager to explore new possibilities, this comprehensive guide is tailored to suit your needs.
Empower yourself with the knowledge and skills needed to unlock the full potential of your iPad as a calling device. From understanding the essential settings to optimizing the audio quality, this article will cover all aspects of setting up your iPad for voice calls. With easy-to-follow instructions and practical tips, you'll be able to seamlessly transition from traditional phone calls to utilizing your iPad's advanced features for communication.
Choosing the Perfect iPad Model for Making Calls

When it comes to selecting an iPad for making calls, there are several factors to consider. The right iPad model can provide you with a seamless calling experience, ensuring that you stay connected with your friends, family, and colleagues. In this section, we will explore the different iPad models available and guide you through choosing the ideal one for your calling needs.
1. Determine your calling requirements:
- Assess whether you primarily make calls via cellular network or apps like FaceTime, WhatsApp, or Skype.
- Consider if you need a large screen for video calls or if a smaller display would suffice.
- Evaluate your calling frequency and whether you require additional features like dual SIM capability or advanced audio quality.
2. Explore the available iPad models:
- iPad Pro: This high-end model offers powerful performance, advanced camera capabilities, and a range of screen sizes, making it suitable for professional communicators or those who prioritize video calls.
- iPad Air: Combining portability with impressive features, this model provides a balance between size, performance, and affordability, making it ideal for versatile calling needs.
- iPad: The standard iPad model offers a budget-friendly option with reliable calling capabilities, making it a suitable choice for those who prioritize essential communication features.
- iPad mini: If you prefer a compact device for calling purposes, the iPad mini offers a smaller form factor without compromising on communication features.
3. Consider additional features:
- Cellular connectivity: Look for iPad models with cellular capabilities if you require calling functionality outside of Wi-Fi networks.
- Storage capacity: Consider the amount of storage you need for saving call logs, contacts, and multimedia files.
- Accessories compatibility: Check if the desired iPad model is compatible with accessories like Bluetooth headsets or keyboards to enhance your calling experience.
By carefully assessing your calling requirements and researching the available iPad models, you can choose the perfect device that matches your needs, ensuring a seamless and efficient calling experience.
Activating Cellular Service on Your iPad
Discover the seamless and convenient way to enable your iPad for cellular service and experience the freedom of staying connected wherever you go.
When it comes to utilizing all the capabilities of your iPad, activating cellular service opens up a world of possibilities. By enabling cellular service on your device, you can make and receive calls, send text messages, surf the web, and access your favorite apps without the need for Wi-Fi or tethering to a smartphone.
To activate cellular service on your iPad, you'll need to follow a simple process that ensures you have a reliable and uninterrupted connection. Here's a step-by-step guide to help you get started.
Step 1: Check compatibility and availability. Before proceeding with activating cellular service on your iPad, make sure your device supports cellular connectivity and check if the service is available in your location. This will ensure that you have the necessary hardware and coverage to enable this feature.
Step 2: Choose a cellular service provider. Research and select a cellular service provider that offers a suitable plan for your needs. Consider factors such as coverage, data plans, and customer reviews to make an informed decision.
Step 3: Purchase a data plan. Once you've chosen a service provider, visit their website or contact their customer service to select and purchase a data plan that aligns with your usage requirements. They will provide you with a SIM card that is compatible with your iPad model.
Step 4: Install the SIM card. Locate the SIM card tray on your iPad and use the SIM card removal tool (or a small paperclip) to open it. Insert the SIM card into the tray, ensuring that it fits securely. Close the tray carefully to avoid any damage.
Step 5: Activate cellular service. Power on your iPad and go to the Settings app. Tap on "Cellular" or "Mobile Data" and select "Set Up Cellular Data." Follow the on-screen instructions to activate your cellular service. You may need to enter the SIM card details or contact your service provider for assistance.
Step 6: Test your connection. Once activation is complete, test your cellular connection by making a call, sending a text message, or accessing the internet without Wi-Fi. Ensure that everything is working smoothly and troubleshoot any issues, if necessary.
Congratulations! You have successfully activated cellular service on your iPad. Enjoy the convenience and freedom of staying connected on the go, whether you're at home, in the office, or exploring new places.
Configuring FaceTime for Making Calls

Establishing a seamless communication experience on your iPad involves setting up FaceTime, an innovative application for placing and receiving video and audio calls. This section will guide you through the process of configuring FaceTime, allowing you to effortlessly connect with your friends, family, or colleagues.
To start, access the settings menu on your iPad by tapping the gear-shaped icon. Look for the FaceTime option and tap on it to open the FaceTime settings. Here, you can enable FaceTime and sign in with your Apple ID, which serves as your unique identifier for making FaceTime calls.
Once signed in, you can customize your FaceTime preferences, such as choosing your default email address or phone number for receiving calls. You can also establish the caller ID to be displayed during outgoing calls, allowing recipients to easily identify your device.
Furthermore, FaceTime offers the flexibility to configure preferences for both video and audio calls. You can choose to enable or disable the camera, microphone, or speaker during calls, depending on your preferences and the environment in which you are placing the call.
Additionally, FaceTime provides the option to integrate with your Contacts app, making it simple and efficient to place calls to your saved contacts. By selecting the "Add Email" or "Add Phone" option, you can conveniently update your contact information for FaceTime calls.
Lastly, FaceTime boasts several additional features, including the ability to set your availability status, which informs your contacts whether you are available for a call or currently occupied. You can also adjust the ringing preferences, allowing you to customize the sound and vibration settings for incoming FaceTime calls.
By following these step-by-step instructions for setting up FaceTime on your iPad, you'll have a comprehensive understanding of the application's functionality, enabling you to effortlessly make and receive calls with ease.
Configuring Call Settings on Your iPad
When it comes to using your iPad for making and receiving calls, it's important to ensure that your device is properly set up. This section will guide you through the process of configuring various call settings on your iPad, allowing you to customize your calling experience to suit your preferences. By tweaking these settings, you can enhance the functionality and convenience of your iPad when it comes to handling calls.
1. Adjusting Call Audio:
One essential aspect of configuring your call settings is adjusting the audio settings. By fine-tuning the call audio, you can ensure crystal clear voice quality during your conversations. Explore options to adjust the volume, enable noise cancellation, or even customize the audio routing to external devices for a more immersive calling experience.
2. Personalizing Call Notifications:
Customize your call notifications to ensure that you never miss an important call again. Whether it's assigning unique ringtones to different contacts, enabling vibration alerts, or configuring Do Not Disturb settings during specific time periods, your iPad offers several options to tailor your call notifications to your liking.
3. Managing Blocked Contacts:
Unwanted calls can be a nuisance, but your iPad provides you with the ability to block specific contacts easily. Explore the settings to add contacts to the block list, preventing them from reaching you through calls or text messages. This feature ensures a more peaceful calling experience by eliminating unwanted interruptions from certain individuals.
4. Enabling Call Forwarding:
In situations where you can't directly answer calls on your iPad, call forwarding can come in handy. Learn how to enable call forwarding and divert incoming calls to another phone number or device. This feature ensures that you never miss important calls, even when you're away from your iPad.
5. Exploring Additional Call Settings:
Your iPad offers a range of additional call settings to further personalize your calling experience. These settings include options such as call waiting, caller ID, and enabling Wi-Fi calling. Dive into the settings menu to discover and configure these additional features to enhance the functionality of your iPad as a phone.
By following these steps and exploring the various call settings on your iPad, you can optimize your calling experience and make the most out of your device's capabilities. Take the time to adjust these settings according to your preferences, ensuring that your iPad is fully equipped to handle calls efficiently and conveniently.
Making Calls on Your iPad using Wi-Fi Connection

Discover the convenience of using Wi-Fi calling on your iPad for making and receiving calls without relying on traditional cellular networks. With Wi-Fi calling, you can stay connected wherever there is a stable Wi-Fi connection, in environments where cellular service might be limited or unavailable.
- Ensure your iPad is updated to the latest software version that supports Wi-Fi calling.
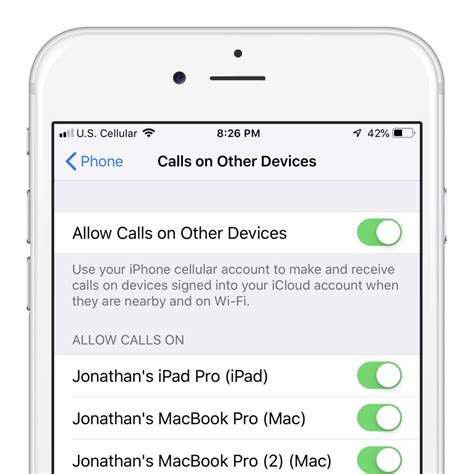
- Go to the Settings menu on your iPad and select "Phone" to access the Wi-Fi calling settings.
- Turn on Wi-Fi calling by toggling the switch to the "On" position.
- If prompted, enter your iCloud account details to activate Wi-Fi calling.
- Once enabled, you can add emergency addresses for accurate emergency services location tracking.
- Choose your preferred Wi-Fi calling settings, such as specified contacts or allowing calls from any number.
- Make sure your Wi-Fi connection is strong and reliable.
- To make a call using Wi-Fi, open the Phone app on your iPad and dial the desired number or select a contact from your address book.
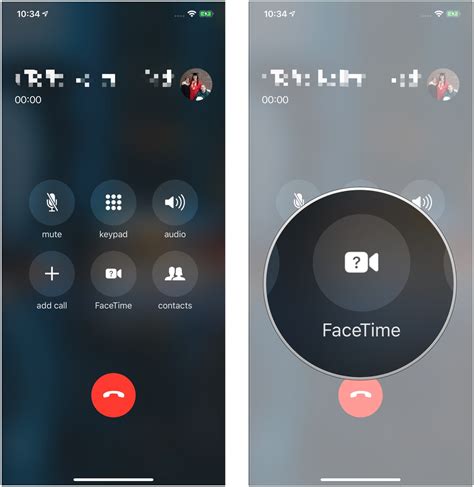
- During the call, you can use the speakerphone, mute, or add a second call. These options are available in the Phone app interface.
- Enjoy clear and uninterrupted conversations using Wi-Fi calling on your iPad, regardless of your physical location.
Wi-Fi calling offers a reliable and convenient method for staying connected through voice calls using your iPad. It expands the capabilities of your device and makes it more versatile, particularly in areas with limited or weak cellular coverage. Harness the power of Wi-Fi calling to enhance your communication experience on the iPad.
Exploring Communication Apps that Enhance Calling Features
Discovering innovative ways to broaden your communication experience on the iPad involves integrating various communication apps with enhanced calling features. By incorporating these apps into your device, you can expand your connectivity options and take advantage of advanced communication tools.
- Explore VoIP Applications: VoIP (Voice over Internet Protocol) apps allow you to make voice calls over the internet, offering an alternative to traditional phone calls. Discover popular VoIP apps like Skype, WhatsApp, or Viber that offer free or low-cost calling features, enabling you to connect with friends, family, or colleagues globally.
- Maximize Messaging Apps: Many messaging apps also incorporate voice and video calling functionalities, providing a comprehensive communication solution. Utilize apps such as Telegram, WeChat, or Facebook Messenger to seamlessly switch between messaging and calling features, ensuring efficient and convenient conversations.
- Investigate Collaboration Platforms: Collaborative communication platforms like Microsoft Teams, Slack, or Google Meet offer integrated voice and video calling features, enhancing teamwork and productivity. These apps enable you to have real-time conversations within the context of project management, document sharing, and scheduling, fostering effective collaboration.
- Discover Call Recording Apps: To maintain records of important conversations or for professional purposes, explore apps that facilitate call recording. Apps like TapeACall or Call Recorder allow you to record and store incoming and outgoing calls, ensuring you don't miss critical information and can refer back to conversations when needed.
By integrating these diverse communication apps into your iPad, you can customize your calling experience and optimize your device for enhanced connectivity. Experiment with different apps to find the ones that suit your communication needs best, ensuring you make the most of your iPad's calling capabilities.
Transferring Phone Calls from iPhone to iPad

As technology continues to advance, it becomes increasingly convenient to seamlessly transfer phone calls between different devices. In this section, we will explore the process of transferring phone calls from an iPhone to an iPad. By doing so, you can easily switch between devices without interrupting important calls or losing connection.
Transferring phone calls from your iPhone to your iPad involves setting up a seamless integration between the two devices. This allows you to answer incoming calls, make outgoing calls, and continue ongoing conversations on your iPad, providing you with more flexibility and convenience. By following a few simple steps, you can ensure a smooth transition and enjoy the benefits of utilizing both devices for your phone calls.
One of the key steps in transferring phone calls is to ensure that both your iPhone and iPad are connected to the same Wi-Fi network. This enables the devices to communicate with each other and facilitates the seamless transfer of calls. Additionally, you need to ensure that both devices are signed in with the same Apple ID, as this is essential for the synchronization of calls and other data between the two devices.
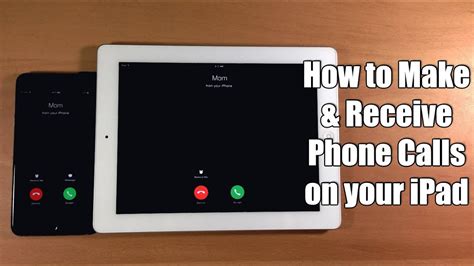
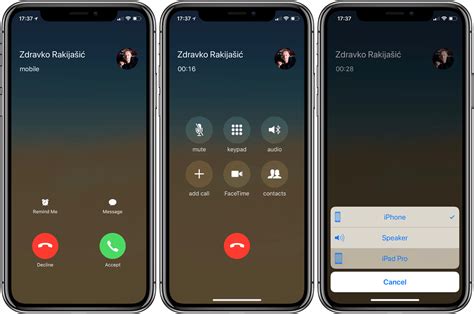
Once the initial setup is complete, you can easily transfer phone calls between your iPhone and iPad. When a call comes in on your iPhone, you will receive a notification on your iPad, allowing you to answer the call directly from the iPad. Similarly, if you are already on a call on your iPhone, you can transfer it to your iPad by simply tapping the "Transfer Call" option on the call screen. This way, you can seamlessly switch devices depending on your preference or convenience.
With the ability to transfer phone calls between your iPhone and iPad, you can enjoy the convenience of using both devices for your communication needs. Whether you prefer the larger screen and enhanced features of the iPad or the portability of the iPhone, transferring phone calls ensures that you can switch seamlessly between the two devices without any hassle.
Troubleshooting Common Calling Issues on Your iPad
In this section, we will address some of the common problems you might encounter while making calls on your iPad and provide potential solutions to help you resolve these issues. Whether you are experiencing difficulties with audio quality, call drops, or network connectivity problems, we've got you covered.
1. Poor Audio Quality:
If you are experiencing muffled or distorted sound during calls, there are a few things you can try to improve the audio quality. First, ensure that your iPad's volume is turned up and not on mute. You can also try using headphones or an external speaker to see if that resolves the issue. Additionally, checking your network connection and restarting your device might help resolve any underlying network-related issues affecting the audio quality.
2. Call Drops:
Call drops can be frustrating, but there are a few steps you can take to minimize this problem. Firstly, ensure that you have a stable network connection by checking your Wi-Fi or cellular signal strength. If the signal is weak, try moving to an area with better coverage or reconnecting to a different network. Additionally, closing any unnecessary apps running in the background and updating your iPad's software to the latest version can help reduce call drops caused by software-related issues.
3. Network Connectivity Issues:
If you are experiencing difficulties connecting to the network or constantly receiving an "No Service" error message, here are a few things you can try. First, toggle the Airplane Mode on and off, which effectively resets your iPad's network settings. If this doesn't work, try restarting your device and checking if your SIM card is properly inserted. It's also worth contacting your service provider to ensure that there are no network outages or restrictions on your account.
4. Inability to Make or Receive Calls:
If you are unable to make or receive calls on your iPad, there are a few troubleshooting steps you can follow. Start by verifying that your iPad is connected to a Wi-Fi or cellular network. If the problem persists, check if Do Not Disturb mode is enabled, as it could be preventing incoming calls. Additionally, ensure that your Contacts app has the necessary permissions to access your contacts, and that the contact you are trying to call is not blocked.
By following the troubleshooting steps mentioned above, you should be able to resolve most common calling issues on your iPad. If the problem still persists, it may be worth reaching out to Apple Support or consulting the iPad's user manual for further assistance.
iPad - Complete Beginners Guide
iPad - Complete Beginners Guide by AppFind 475,784 views 3 years ago 28 minutes
FAQ
Can I make phone calls on my iPad?
Yes, you can make phone calls on your iPad by setting it up properly. The step-by-step guide in the article will show you how to do it.
Do I need a cellular iPad to make calls?
No, you don't necessarily need a cellular iPad to make calls. The article provides instructions on setting up calls on both cellular and Wi-Fi only iPads.
Is it possible to receive calls on my iPad?
Yes, it is possible to receive calls on your iPad if you have set it up correctly. The article explains the process of setting up call forwarding and receiving calls on your iPad.
What are the advantages of using an iPad for calls instead of a phone?
There are several advantages of using an iPad for calls. Firstly, the larger screen size of the iPad provides a better calling experience. Additionally, using your iPad for calls can be more convenient if you are already using it for other purposes like browsing the internet or watching videos. The article will guide you on how to set up your iPad for calls effectively.


