In the vast realm of modern technology, where seamless connectivity and instantaneous data flow is the driving force behind efficient operations, one cannot underestimate the importance of an effective Domain Name System (DNS).
Imagine a world where every website you visit, every email you send, and every application you use, requires you to remember and type in a complex string of numerical IP addresses. Quite laborious, isn't it? Fortunately, the DNS comes to rescue, making your online experience smoother by translating user-friendly domain names into machine-understandable IP addresses. It's the backbone that enables your devices to communicate effortlessly over the complex web of interconnected networks.
When it comes to configuring a DNS on a Linux system, an open-source and immensely powerful option available is the Berkeley Internet Name Domain, commonly known as BIND. With its robust features and extensive customization capabilities, BIND empowers system administrators to take complete control over their network's DNS configuration. Today, we will embark on a step-by-step journey to discover the intricacies of setting up and fine-tuning BIND for optimal performance.
Whether you're a seasoned professional or an aspiring IT enthusiast delving into the depths of networking, this comprehensive guide will equip you with the knowledge and skills required to navigate the intricate world of DNS configuration on a Linux environment. From installation to advanced configurations, we will leave no stone unturned, ensuring you have a firm grip on the subject matter.
An overview of Domain Name System (DNS) and its role in facilitating communication between computers
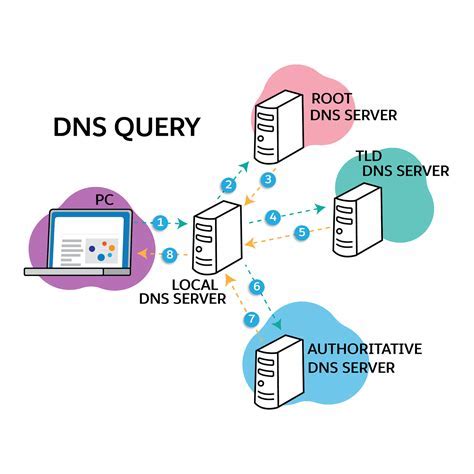
The Domain Name System (DNS) plays a crucial role in enabling communication between computers on the internet. It serves as the "phone book" of the internet, translating human-readable domain names into machine-readable IP addresses. By providing a hierarchical naming structure, DNS allows computers to locate and connect with each other over different networks.
DNS operates on a distributed database model, with numerous DNS servers worldwide working together to resolve domain names. These servers store various types of records containing information such as IP addresses, mail exchange servers, and other important data associated with domain names. When a computer needs to establish a connection with another computer, it queries the DNS system to obtain the corresponding IP address.
The DNS resolution process involves multiple steps. Firstly, the client's DNS resolver sends a query to its configured DNS server, which may be set by the user or assigned by the Internet Service Provider (ISP). If the requested domain name's IP address is not found in the local DNS cache, the resolver contacts the authoritative DNS server responsible for that specific domain. The authoritative server either directly provides the IP address or refers the resolver to another DNS server that may have the required information.
To facilitate efficient querying and reduce the load on DNS servers, DNS records are cached by resolvers for a specified period. Time-to-Live (TTL) values associated with each record determine how long the information should be cached before it is considered expired. This caching mechanism improves the overall performance and reliability of DNS.
| Benefits of DNS | Role in Communication |
|---|---|
|
|
Understanding the Functionality and Importance of BIND as a Name Server on Linux
In the realm of Linux server administration, having a comprehensive understanding of BIND and its role as a name server is fundamental for ensuring a smoothly operating system. BIND, otherwise known as Berkeley Internet Name Domain, serves as the backbone of the Domain Name System (DNS) architecture, facilitating the mapping of domain names to IP addresses. Acting as a critical component of network infrastructure, BIND enables efficient communication and accessibility across the internet.
With BIND serving as the primary resolver for numerous Linux distributions, it plays a crucial role in translating human-readable domain names into IP addresses comprehensible to machines. The significance of BIND cannot be overstated, as it is responsible for establishing the connection between users and web servers, enabling seamless web browsing, email exchange, and various other internet-based activities.
- Key Features of BIND:
- Highly configurable and customizable: BIND offers extensive flexibility and can be optimized based on specific network requirements.
- Supports different DNS record types: BIND is capable of handling various DNS record types, such as A (address), MX (mail exchange), CNAME (canonical name), and more, allowing for versatile DNS functionalities.
- Security-focused: BIND provides robust security features such as access controls, IP-based restrictions, and DNSSEC (DNS Security Extensions), ensuring the integrity and confidentiality of DNS queries and responses.
- Scalable: BIND can efficiently handle a large volume of DNS queries and can be configured to support recursive queries or act as an authoritative server.
A solid understanding of BIND's functionality is imperative for successful DNS configuration and management on Linux. By comprehending the significance of BIND as the core component of DNS infrastructure, administrators can effectively configure and troubleshoot DNS servers, ensuring reliable and efficient network connectivity.
Exploring the Versatility and Advantages of BIND: A renowned DNS Server Software

With its robust and flexible features, BIND has emerged as one of the most sought-after DNS server software options. This section delves into the manifold benefits offered by BIND, shedding light on why it is highly regarded within the networking and system administration community.
Unsurpassed Stability and Reliability: BIND boasts an unparalleled level of stability and reliability, guaranteeing the continuous operation of DNS services. Its well-tested codebase and extensive bug fixing make it a preferred choice for businesses and individuals alike.
Granular Configuration Options: BIND provides an extensive range of configuration options, allowing administrators to fine-tune their DNS setups to meet their unique requirements. Its highly customizable nature empowers administrators to exert granular control over DNS settings, ensuring optimal performance and security.
Support for Advanced DNS Features: BIND supports advanced DNS features such as DNSSEC (Domain Name System Security Extensions) and IPv6 (Internet Protocol version 6). The inclusion of these cutting-edge technologies ensures enhanced security, seamless migration to IPv6, and compliance with modern DNS standards.
Scalability and Load Balancing Capabilities: BIND enables efficient scaling of DNS infrastructure to accommodate growing network demands. Its built-in load balancing capabilities distribute DNS queries across multiple servers, optimizing response times and enhancing overall system performance.
Active Community and Timely Updates: BIND benefits from an active and vibrant community of developers and users who constantly contribute to its improvement and development. Frequent updates and patches ensure that BIND remains up-to-date with the latest DNS protocols and security measures.
Centralized DNS Management: BIND allows centralized management of DNS servers, facilitating streamlined administration and ease of use. This centralized approach simplifies the process of managing various DNS zones, minimizing errors and expediting troubleshooting procedures.
By exploring the numerous advantages offered by BIND, system administrators can leverage its capabilities to build resilient, secure, and high-performing DNS infrastructures that meet the demands of modern networks.
Preparing the Linux system for DNS configuration
In this section, we will discuss the preliminary steps required to set up the Linux environment for configuring a Domain Name System (DNS) server. Before starting the DNS setup process, it is crucial to ensure that the Linux system is adequately prepared and meets the necessary prerequisites.
Firstly, it is essential to verify that the Linux operating system is installed and running smoothly. Ensure that all the necessary system updates and patches are applied to guarantee a stable and secure environment for the DNS server setup.
Next, we need to validate that the network settings on the Linux machine are correctly configured. This involves ensuring that the system has a valid IP address and the appropriate network interfaces are enabled. Checking the network connectivity and confirming the ability to communicate with other devices on the network is also necessary.
Once the network settings are in order, it is recommended to disable any existing DNS services or resolvers that may interfere with the BIND DNS server setup. This ensures there are no conflicts that might hinder the smooth functioning of the DNS server.
Additionally, it is crucial to acquire the BIND software package from a reliable source or repository. Verifying the authenticity and integrity of the downloaded package is essential to prevent any security vulnerabilities or compromises in the DNS server setup.
Moreover, it is advisable to create a separate user account with appropriate privileges specifically for managing the DNS server. This enhances security by restricting access to the DNS server configuration files and limiting potential risks associated with administrative access.
Finally, setting up proper firewall rules and configuring the necessary port forwarding on the Linux system can help ensure only authorized network traffic is allowed to interact with the DNS server. This strengthens the overall security posture and protects the DNS infrastructure from potential malicious activities.
| 1 | Verify that the Linux system is installed and updated. |
| 2 | Confirm the correct configuration of network settings. |
| 3 | Disable any existing DNS services or resolvers. |
| 4 | Obtain the BIND software package from a reliable source. |
| 5 | Create a dedicated user account for DNS server management. |
| 6 | Configure proper firewall rules and port forwarding. |
Preparing Your Linux System for BIND Installation
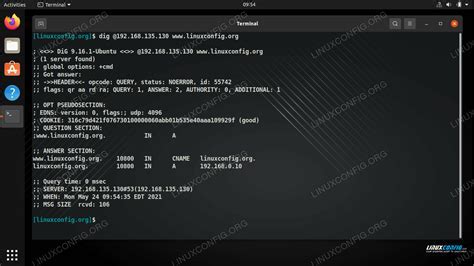
Before diving into the installation and configuration of BIND, it is crucial to properly set up your Linux system. This section will guide you through the step-by-step instructions to ensure your system is ready to install and configure BIND effectively.
Checking System Requirements
Start by checking if your Linux system meets the necessary requirements to install and run BIND. Ensure that the operating system is compatible and that you have the required memory, disk space, and CPU resources available. Verifying these prerequisites will help avoid any potential compatibility issues and ensure a smooth installation process.
Updating and Patching the System
Next, it is recommended to update and patch your Linux system to ensure you have the latest software versions and security updates. Keeping your system up to date will provide better stability and performance, as well as address any known vulnerabilities that might affect the functionality of BIND.
Installing Additional Dependencies
In some cases, you may need to install additional dependencies to support the installation and functioning of BIND. These dependencies might include libraries, packages, or other software components that are required for BIND to run smoothly. Research the recommended dependencies for your specific Linux distribution and install them before proceeding with the BIND installation.
Configuring Firewall and Security
Properly configuring your firewall is essential for protecting your DNS server from unauthorized access and potential attacks. Ensure that the necessary ports for DNS traffic (typically port 53) are open and properly configured. Additionally, consider implementing security measures such as access control, intrusion detection systems, and regular system auditing to enhance the overall security of your Linux system and BIND installation.
Verifying Network Connectivity
Before proceeding, it is crucial to verify that your Linux system has a stable network connection. Ensure that your system can communicate with other devices on the network and has access to the internet. This step is vital as BIND relies heavily on network connectivity to perform its DNS functions.
By thoroughly following these step-by-step instructions to prepare your Linux system for BIND installation, you will have a solid foundation for successfully setting up and configuring DNS using BIND.
Installation of BIND on the Linux Operating System
In this section, we will explore the process of installing the BIND software on your Linux system. By following this step-by-step guide, you will be equipped with the necessary knowledge and instructions to successfully set up and configure the BIND server.
Before diving into installation, it is important to note that BIND, also known as the Berkeley Internet Name Domain, plays a crucial role in translating human-readable domain names into IP addresses. By installing BIND, you will be enabling your Linux system to perform this vital function, allowing for seamless communication and accessibility across the internet.
To begin, we will demonstrate how to install BIND using the package management system available on your Linux distribution. Different Linux distributions may have different package managers, such as APT for Debian-based systems or YUM for Red Hat-based systems. By following the specific instructions provided here, you will be able to adapt the installation process to suit your system's package manager.
Once you have identified the package manager for your Linux distribution, we will guide you through the commands needed to download and install the BIND software package. We will also cover any additional dependencies or prerequisites that may need to be installed before BIND can be successfully installed and utilized.
After the installation is complete, we will show you how to verify that BIND is running correctly on your Linux system. This will involve using specific commands and tools to test the functionality and ensure that your newly installed BIND server is operational.
By following this comprehensive installation guide, you will be able to successfully set up and configure BIND on your Linux system. This will enable your system to efficiently and accurately resolve domain names, laying the foundation for a reliable and secure DNS infrastructure.
A comprehensive walkthrough for acquiring, configuring, and deploying BIND on a Linux-based server
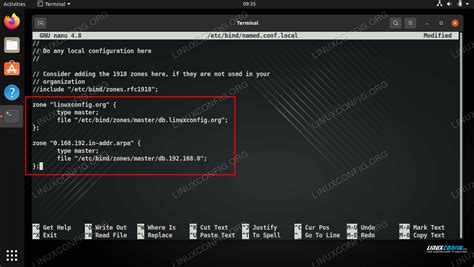
In this segment, we will embark upon a detailed exploration that encompasses the complete process of obtaining, setting up, and implementing BIND on a Linux server. Delving into the intricacies of this endeavor, we will navigate through the steps required to successfully procure the necessary packages, configure the BIND software, and execute a seamless installation on your Linux-based server.
To begin our journey, we will first focus on downloading the requisite BIND package for your Linux distribution. This will involve identifying the appropriate repository or source from which the software can be obtained, followed by employing the relevant commands or procedures to retrieve the necessary files. Upon completion, we will move on to the next stage of our guide.
Having obtained the BIND package, we will now shift our attention towards configuring the software to align with the specific requirements and preferences of your Linux server. Within this phase, we will elucidate the various configuration options available, detailing how each directive can be modified or customized to suit your unique circumstances. Furthermore, we will address potential stumbling blocks, offering recommendations and insights to ensure a seamless configuration process.
Once the BIND software has been successfully configured, we will progress towards initiating the installation process onto your Linux server. This section of the guide will furnish you with a step-by-step account of the installation procedures, elucidating the specific command sequences and parameters necessary for a smooth deployment. As we traverse through each key phase, we will provide detailed explanations and clarifications, allowing you to gain a comprehensive understanding of the process.
As we conclude this exhaustive guide, you will have acquired an all-encompassing comprehension of the steps required to effectively download, configure, and install BIND on your Linux server. Armed with this newfound knowledge, you will be empowered to confidently set up your own DNS system, ensuring optimal performance, security, and reliability for your network infrastructure.
Configuring the BIND Server
In this section, we will explore the essential steps for configuring the BIND server to enable efficient and secure DNS resolution on a Linux-based system. By delving into the configuration process, we can tailor the BIND server according to specific requirements, ensuring optimal performance and security.
First, we need to map the DNS zone to the corresponding BIND configuration file. This involves defining the zone name, its type (such as forward or reverse), and the file path for storing the zone data. By establishing this connection, the BIND server can effectively manage the DNS records for the specified zone.
Next, we will proceed to configure the authoritative name servers. These servers hold the authoritative DNS data for the specified zone and play a crucial role in providing accurate responses to DNS queries. We will define the IP addresses and names for the name servers, ensuring proper delegation and synchronization of DNS information across the network.
One vital aspect of configuring the BIND server is implementing security measures. We will explore techniques such as access control lists (ACLs), which allow us to restrict access to the DNS server based on various criteria, such as client IP addresses or network ranges. By applying ACLs, we can prevent unauthorized access and potential DNS-related security threats.
To ensure efficient DNS resolution, we will discuss the implementation of DNS caching. By configuring the BIND server to cache DNS responses, we can reduce the response time for subsequent DNS queries and enhance overall system performance. We will examine the different caching options and their impact on the DNS resolution process.
Lastly, we will cover advanced configuration settings, including options for DNS forwarding and dynamic DNS updates. DNS forwarding allows the BIND server to forward specific DNS queries to external DNS servers, enabling resolution for domains outside the server's authority. Dynamic DNS updates, on the other hand, facilitate the automatic modification of DNS records, providing flexibility in managing constantly changing IP addresses.
By following the step-by-step instructions in this guide, you will gain the knowledge and skills necessary to configure the BIND server effectively. The configuration process ensures reliable and secure DNS resolution on a Linux system, empowering you to optimize your networking environment.
Configuring the BIND server to meet your network requirements: A step-by-step guide

When it comes to setting up a reliable and efficient DNS server on your Linux system with BIND, one size does not fit all. Every network has its own unique requirements and specifications. This step-by-step guide will walk you through the process of configuring your BIND server to perfectly align with your specific network needs.
Analyzing your network requirements: Before diving into the configuration process, it is crucial to understand the specific requirements of your network. You need to consider factors such as the number of users, the types of services you want to provide, the security levels required, and any specialized configurations you might need.
Designing your BIND server architecture: Once you have a clear understanding of your network requirements, you can start designing the architecture of your BIND server. This involves determining the optimal placement of your server, choosing the appropriate hardware and software components, and deciding on the necessary redundancy and failover mechanisms.
Installing and setting up BIND: With your network requirements and server architecture in mind, it is time to install and set up BIND on your Linux system. This step includes downloading and installing the necessary packages, configuring the basic settings, and securing your server with appropriate access controls.
Configuring zone files: The heart of any DNS server lies in its zone files. This section will guide you through the process of creating, editing, and configuring zone files to accurately reflect your network's domain structure and resource records. You will learn how to define authoritative DNS servers, manage DNS caching, and handle reverse DNS lookups.
Implementing advanced features: Depending on your network requirements, you might need to implement additional advanced features in your BIND server configuration. This section will explore options such as DNSSEC for data integrity and authentication, implementing master and slave DNS servers for redundancy, and configuring dynamic updates for DNS record management.
Testing and troubleshooting: Once your BIND server is configured, it is essential to thoroughly test its functionality and troubleshoot any potential issues that may arise. This section will provide you with step-by-step instructions on how to perform various tests, interpret the results, and effectively troubleshoot common DNS server problems.
Monitoring and maintenance: A well-maintained DNS server requires ongoing monitoring and maintenance. In this section, you will learn how to monitor the performance and health of your BIND server, implement regular backups, apply necessary updates and patches, and effectively manage resource utilization.
By following this comprehensive step-by-step guide, you will be able to configure your BIND server to match your network requirements with precision and efficiency, ensuring reliable and secure DNS services for your Linux system.
Creating and Managing DNS Zones
In this section, we will explore the process of establishing and overseeing DNS zones. DNS zones serve as containers for specific domains, allowing efficient management and organization of domain names and their corresponding records.
Defining Zonal Boundaries
To create a DNS zone, the administrator must set boundaries by defining the start and end points of the zone. These boundaries determine the scope of the zone and the domains it encompasses. With zonal boundaries in place, it becomes easier to manage and maintain different domain names and associated records within the specified zone.
Allocating Resource Records
Once the DNS zone is established, the next step involves allocating the necessary resource records. Resource records contain information such as IP addresses, mail exchange servers, or other critical data related to the domain names within the zone. Proper allocation and management of resource records ensure the smooth functioning of the DNS system and accurate resolution of domain names.
Updating Zone Information
Periodic updates are essential to keep the DNS zone information up to date. This includes adding or removing domain names, modifying resource records, or making changes to the zone's configuration. By regularly updating the zone information, administrators can ensure the accuracy and reliability of the DNS system, enabling seamless communication across the network.
Monitoring and Troubleshooting
Effective management of DNS zones also involves continuous monitoring and troubleshooting. Administrators need to regularly monitor the performance and health of the DNS infrastructure, ensuring that the zones are functioning correctly. In case of any issues or inconsistencies, troubleshooting techniques should be employed to identify and resolve the problems, minimizing downtime and ensuring uninterrupted domain name resolution.
By understanding the process of creating and managing DNS zones, administrators can establish a robust and reliable DNS infrastructure, facilitating efficient domain name resolution and seamless network communication.
A comprehensive guide to creating and managing DNS zones using BIND
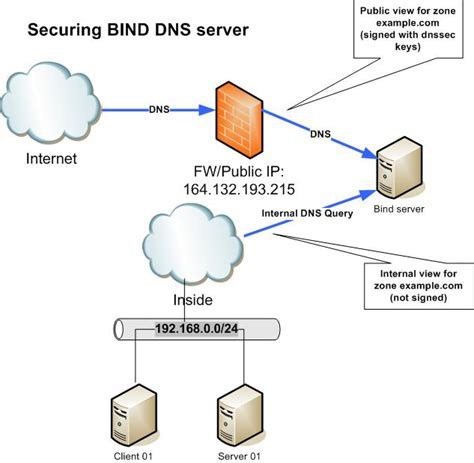
In this section, we will provide an extensive guide on the process of creating and managing DNS zones using BIND, an essential tool for network administrators. By understanding the fundamental concepts and steps involved in setting up DNS zones, you will gain the knowledge necessary to efficiently manage and configure your network's DNS infrastructure.
Throughout this guide, we will delve into the various components of DNS zone creation and management, covering topics such as zone files, record types, zone transfers, and troubleshooting techniques. By following these step-by-step instructions and best practices, you will be able to successfully create, configure, and maintain DNS zones tailored to your specific network requirements.
We will begin by discussing the basics of DNS zone creation, including the role of the zone file and its structure. You will learn how to define the essential record types such as SOA, NS, A, and MX, as well as how to organize and update the zone file effectively. Next, we will explore techniques for zone transfers, enabling the seamless replication and synchronization of DNS data between authoritative servers.
Additionally, this guide will cover advanced DNS zone management topics, including setting up multiple zones, implementing forward and reverse zones, and configuring DNS security features. We will also provide insights into troubleshooting common DNS zone issues using diagnostic tools and techniques.
By the end of this comprehensive guide, you will be equipped with the knowledge and practical skills necessary to confidently create, configure, and manage DNS zones using BIND. Whether you are a novice or an experienced network administrator, this guide will empower you to optimize your network's DNS infrastructure and ensure reliable and efficient communication across your organization.
FAQ
What is DNS and why is it important?
DNS stands for Domain Name System and it is an essential part of the internet infrastructure. It translates domain names (e.g., website.com) into IP addresses, allowing users to access websites or other resources easily.
Why should I set up DNS on Linux with BIND?
Setting up DNS on Linux with BIND allows you to have full control over your DNS infrastructure. It provides flexibility and scalability, making it suitable for small to large networks. Additionally, it is a versatile and widely used DNS software.
What are the steps to set up DNS on Linux with BIND?
The steps to set up DNS on Linux with BIND include installing BIND, configuring the named.conf file, creating zone files, configuring the zone files, starting the BIND service, and configuring clients to use the DNS server. Each step is explained in detail in the article.
Are there any prerequisites for setting up DNS on Linux with BIND?
Yes, there are prerequisites for setting up DNS on Linux with BIND. You need a Linux server with root access, a static IP address for the server, and basic knowledge of the Linux command line. It is also helpful to have an understanding of networking and DNS concepts.
Can I use BIND as a DNS server for both internal and external networks?
Yes, you can use BIND as a DNS server for both internal and external networks. By configuring different zone files, you can easily manage DNS requests for your internal network as well as for public-facing websites or services.


