Imagine a world without the hassle of manual IP address assignments, network conflicts, and connection disruptions. Sound appealing? Look no further, because today we will delve into the art of optimizing IP assignments through the powerful tool known as Dynamic Host Configuration Protocol (DHCP).
In this comprehensive guide, we will explore the ins and outs of configuring DHCP on the renowned Microsoft operating system. Gain insights into the intricacies of streamlining IP management, maximizing network performance, and enhancing user experience.
Prepare to unlock the potential of your network infrastructure as we navigate the depths of DHCP configuration, uncovering the secrets to seamless connectivity and simplified network administration. So, grab your digital map and embark on this transformative journey to become a DHCP guru!
Understanding the Working Mechanism of Dynamic Host Configuration Protocol (DHCP)

In the context of network configuration, the Dynamic Host Configuration Protocol (DHCP) plays a crucial role in automatically assigning IP addresses and network configuration parameters to network devices. In this section, we will delve into the inner workings of the DHCP protocol and gain a deeper understanding of its functionality.
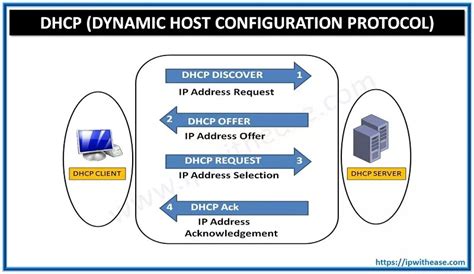
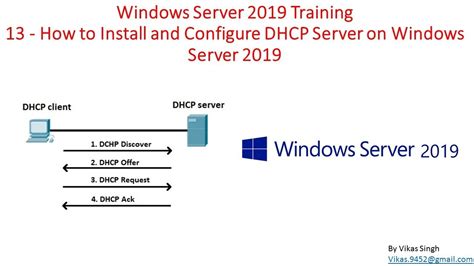
At its core, DHCP operates on a client-server model where the DHCP server dynamically allocates and manages IP addresses on a network. When a client device connects to the network, it sends out a DHCP discovery message, searching for a DHCP server. The server responds with a DHCP offer, providing the client with an available IP address to use. The client then sends a request to confirm the assignment, and the server sends an acknowledgment, finalizing the IP address allocation.
The DHCP protocol utilizes several key components and mechanisms to facilitate smooth IP address assignment. One important element is the DHCP lease, which specifies the duration for which a client can use the assigned IP address. The lease period helps in efficient address management and prevents IP address conflicts on the network.
Furthermore, DHCP employs different message types to facilitate communication between the client and server. These message types include DHCP Discover, DHCP Offer, DHCP Request, DHCP Acknowledgment, and more. Each message type serves a specific purpose in the DHCP process and contributes to the overall functionality of the protocol.
Additionally, DHCP allows for the configuration of various network parameters besides IP addresses. It can provide information such as subnet masks, default gateways, DNS server addresses, and more. This capability simplifies network configuration and reduces the manual effort required for setting up individual devices.
Understanding the mechanics behind the DHCP protocol is crucial for network administrators and IT professionals. It enables them to efficiently manage IP address allocation, maintain network integrity, and troubleshoot any related issues that may arise. By grasping the fundamentals of DHCP, one can optimize network performance and ensure seamless connectivity for all devices on the network.
Understanding DHCP and its Functionality
In this section, we will explore the concept of DHCP (Dynamic Host Configuration Protocol) and how it operates. DHCP serves as a vital component in computer networks, facilitating the automatic assignment of IP addresses and other network configuration information to devices.
Akin to a network's postal system, DHCP acts as the dispatcher, coordinating the delivery of IP addresses to devices on the network, allowing them to communicate and interact with each other. Just as a centralized post office is responsible for distributing mail to individual addresses, DHCP acts as a central authority, managing and allocating IP addresses to devices based on specific rules and parameters.
When a device connects to a network, it sends out a DHCP request, and DHCP server responds with a highly efficient and streamlined process. Through a series of steps, DHCP ensures that each device receives a unique IP address, thereby avoiding conflicts and ensuring smooth network communication.
To better understand how DHCP works, let's consider a simplified analogy:
| Analogy | DHCP Operation |
|---|---|
| Post office | DHCP server |
| House | Device on the network |
| Mail carrier | DHCP request |
| Mailbox | IP address |
Just as a mail carrier collects letters from various houses and delivers them to the respective recipients' mailboxes, the DHCP server receives DHCP requests from various devices and allocates unique IP addresses to each device. This ensures that data packets, similar to letters, are accurately routed to the intended recipient.
In conclusion, DHCP simplifies network administration by automating the IP address assignment process. Through an efficient and organized mechanism, DHCP ensures that devices on a network are easily identifiable and can seamlessly communicate with one another.
Installing DHCP Server on Windows Server

In this section, we will explore the essential steps to set up the Dynamic Host Configuration Protocol (DHCP) server on your Windows Server. The process involves installing the necessary components and configuring the server to distribute IP addresses and network configuration settings to client devices in the network.
To begin, we need to install the DHCP server feature on your Windows Server. This can be done through the Server Manager utility, which allows you to add or remove various roles and features.
Once the DHCP server feature is installed, you will need to configure the server by specifying the network settings and DHCP options. These settings determine how the server assigns IP addresses and other configuration parameters to client devices.
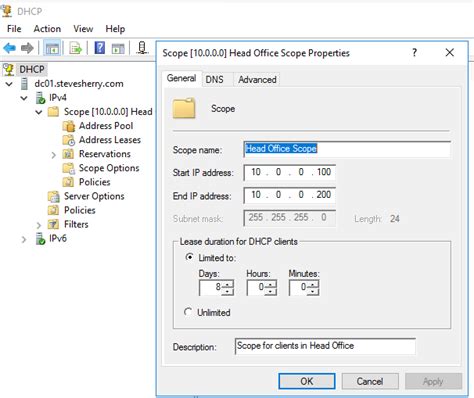
Firstly, you will need to define the available IP address range that the DHCP server can assign to clients. This can be done by specifying a starting and ending IP address within the subnet. Additionally, you can configure the server to exclude specific IP addresses from the range, ensuring they are not assigned to clients.
Next, you can configure the lease duration, which determines how long a client can keep an assigned IP address before it must be renewed. This setting can be adjusted based on your network requirements and the expected number of devices connecting to the network.
Furthermore, you have the option to configure additional DHCP options such as the domain name, DNS servers, and gateway address. These options provide important network configuration information to client devices, allowing them to connect and communicate effectively within the network.
After configuring the necessary settings, you can activate the DHCP server to start distributing IP addresses to client devices. The server will monitor the network, automatically assigning IP addresses to new devices and renewing leases for existing ones.
In conclusion, by following the steps outlined in this section, you will be able to successfully install and configure the DHCP server on your Windows Server. This will enable efficient management of IP addresses and network configuration within your network infrastructure.
Step-by-step guide to setup and deploy DHCP Server role on Windows Server
In this section, we will provide you with a detailed walkthrough on how to install and configure the DHCP Server role on your Windows Server. By following these step-by-step instructions, you will be able to easily set up and deploy a DHCP Server, which will allow for automatic IP address assignment and network configuration for devices on your network.
Before we begin, it's important to understand that a DHCP Server plays a crucial role in managing IP addresses within a network. Instead of manually assigning IP addresses to each device, the DHCP Server automates the process by leasing out and renewing IP addresses to connected devices.
To start the installation process, you will need to have administrative access to your Windows Server. Once you have logged in, follow the steps outlined below:
- Open Server Manager by clicking on the Windows icon in the taskbar and selecting Server Manager from the menu.
- In the Server Manager, navigate to the Manage menu and select Add Roles and Features.
- The Add Roles and Features Wizard will open. Click Next to proceed.
- On the Installation Type screen, select Role-based or feature-based installation and click Next.
- Choose the appropriate destination server and click Next.
- Scroll down and locate DHCP Server under the Roles category. Check the box next to it and click Next.
- On the Add features screen, click Next.
- Review the DHCP Server features and click Next.
- Finally, on the confirmation screen, click Install to begin the installation process.
Once the installation is complete, you will need to configure the DHCP Server settings based on your network requirements. This includes setting IP address ranges, configuring DHCP options, and setting up any necessary exclusions or reservations.
By following these steps, you will be able to successfully install and configure the DHCP Server role on your Windows Server, allowing for efficient and dynamic IP address assignment on your network.
Configuring DHCP Scope and IP Address Reservations

Setting up a network involves assigning IP addresses to devices connected to it. In this section, we will explore the process of configuring the DHCP scope and reserving specific IP addresses for devices in a network. This ensures efficient allocation of IP addresses and helps in managing network resources effectively.
Step 1: Defining the DHCP Scope
- Specify the range of IP addresses that can be dynamically assigned by the DHCP server.
- Set the subnet mask and default gateway to ensure proper communication within the network.
Step 2: Creating IP Address Reservations
- Identify devices that require static IP addresses for various reasons, such as printers, servers, or network devices.
- Reserve specific IP addresses within the DHCP scope for these devices.
- Assign the reserved IP addresses to the corresponding devices.
Step 3: Managing DHCP Lease Duration
- Set the lease duration based on the network requirements.
- Shorter lease durations allow for greater flexibility and efficient use of IP addresses, while longer lease durations provide stability for devices that need to maintain a constant connection.
Step 4: Monitoring and Troubleshooting
- Regularly monitor the DHCP server logs to identify any issues or conflicts.
- Resolve conflicts by either modifying the DHCP scope or manually assigning IP addresses.
- Ensure that the DHCP server is always up and running to avoid any disruptions in the network.
By carefully configuring the DHCP scope and IP address reservations, administrators can ensure seamless connectivity and efficient management of IP addresses in a network environment.
Defining IP Address Range and Reserving IP Addresses for Specific Devices
In the context of configuring Dynamic Host Configuration Protocol (DHCP) on a Windows Server, one important aspect is defining the specific IP address range and reserving IP addresses for particular devices. This allows for the efficient allocation of IP addresses and ensures that certain devices always receive the same IP address for consistent network connectivity.
- Step 1: Determine the IP address range that will be used for DHCP allocation. This range should be carefully chosen to accommodate the expected number of devices on the network, while also considering any future growth or additional devices that may be added.
- Step 2: Reserve specific IP addresses for important devices that require a consistent address, such as servers, printers, or network appliances. This ensures that these devices are always assigned the same IP address, making it easier to manage and access them on the network.
- Step 3: Access the DHCP server configuration settings, which can typically be done through the administrative tools or control panel of the Windows Server. Locate the section or option related to IP address range configuration.
- Step 4: Enter the start and end IP addresses for the defined range, ensuring that it falls within the appropriate subnet of the network. This will determine the pool of available IP addresses that can be assigned to devices.
- Step 5: Identify the devices that require reserved IP addresses and their corresponding MAC addresses. MAC addresses are unique identifiers for network devices, and they can usually be found on a sticker or label attached to the physical device.
- Step 6: Within the DHCP server configuration, locate the option or section for DHCP reservations. Add a new reservation entry for each device, specifying the reserved IP address and its corresponding MAC address. This ensures that the specific device always receives the reserved IP address when connecting to the network.
- Step 7: Save the DHCP server configuration changes and restart the DHCP service if necessary. This will apply the new IP address range and reservations, allowing devices to obtain IP addresses dynamically or receive their reserved addresses when connecting to the network.
By defining the IP address range and reserving specific addresses for important devices, the DHCP configuration on a Windows Server can efficiently manage the allocation of IP addresses and ensure consistent connectivity for devices on the network.
FAQ
What is DHCP?
DHCP stands for Dynamic Host Configuration Protocol, which is a network protocol that allows a server to automatically assign IP addresses and other important network configuration information to devices on a local network.
Why is it important to configure DHCP on a Windows Server?
Configuring DHCP on a Windows Server is important because it allows for centralized management and automation of IP address assignment, resulting in easier network administration and reduced manual configuration efforts.
Can I configure multiple DHCP scopes on a single Windows Server?
Yes, it is possible to configure multiple DHCP scopes on a single Windows Server. This allows for allocation of different IP address ranges and configuration settings to different subnets within the network.
What are some common troubleshooting steps for DHCP configuration on a Windows Server?
Some common troubleshooting steps for DHCP configuration on a Windows Server include checking network connectivity, verifying DHCP service is running, ensuring proper DHCP server authorization, checking DHCP lease duration settings, and reviewing event logs for any errors or warnings related to DHCP.
Why would I need to configure DHCP on a Windows Server?
Configuring DHCP on a Windows Server allows you to centrally manage and distribute IP addresses to devices on your network. This eliminates the need for manual IP configuration on each device, saving time and effort for network administrators.
What are the prerequisites for configuring DHCP on a Windows Server?
Before configuring DHCP on a Windows Server, you need to make sure that the server is assigned a static IP address. Additionally, you should have administrative access to the server and a good understanding of your network's IP addressing scheme.


