Are you tired of slow internet speeds and constant buffering? Do you wish to have more control over your network and improve the overall performance? Look no further! In this article, we will explore the world of DNS proxies and how they can revolutionize your browsing experience on a Linux system.
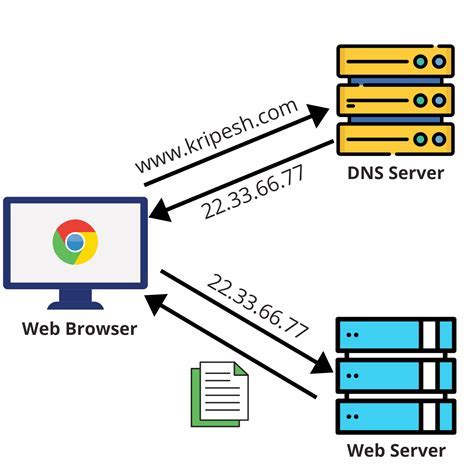
Imagine a scenario where you enter a website URL into your browser, and it takes ages to load. Frustrating, right? This delay is often caused by the time it takes for your computer to translate the human-readable web address into an IP address that the internet understands. This process, known as DNS resolution, can be optimized by using a DNS proxy, which acts as a middleman between your device and the internet.
By installing and configuring a DNS proxy on your Linux system, you can significantly improve your network's speed and efficiency. The DNS proxy intercepts your DNS requests, intelligently caching them to provide faster responses for subsequent visits. This means that popular websites and frequently accessed resources will load faster, while also reducing the load on your DNS server.
But that's not all! A DNS proxy also allows you to bypass geographical restrictions and access content that is blocked or restricted in your region. By rerouting your DNS requests through proxy servers located in different countries, you can enjoy unrestricted access to websites, streaming services, and other online content. It's like having a personal internet passport that opens doors to a world of possibilities!
In this step-by-step article, we will walk you through the process of installing and configuring a DNS proxy on your Linux system. We will provide clear instructions and helpful tips to ensure a smooth and successful setup. So, get ready to supercharge your internet experience and take control of your network like never before!
Understanding DNS Proxy and its Role

Every time you access a website or send an email, your device relies on the Domain Name System (DNS) to translate human-readable domain names, like www.example.com, into machine-readable IP addresses. This process, known as DNS resolution, allows your device to connect to the correct servers on the internet.
A DNS proxy servers as a mediator between your device and the DNS server, helping to improve performance and security. It acts as a cache, storing previously resolved DNS queries and their responses, allowing for faster subsequent resolutions.
Additionally, a DNS proxy can play a crucial role in filtering and blocking access to certain websites or types of content. By intercepting DNS requests, the proxy can enforce policies to restrict access to malicious or inappropriate sites, providing a layer of protection for devices on the network.
Understanding the role of a DNS proxy is important for network administrators and individuals looking to optimize their browsing experience or enhance security. By taking advantage of the caching capabilities and filtering options offered by a DNS proxy, users can enjoy faster browsing and improved protection against potential threats.
Requirements for Setting Up DNS Proxy
In order to successfully configure and use a DNS proxy on a Linux system, certain requirements must be met. These requirements ensure that the proxy functions properly and can effectively redirect DNS queries. Here are the key considerations for installing a DNS proxy:
- A Linux operating system installed and running on the target machine.
- Basic knowledge of the Linux command line interface and system administration.
- Access to the internet to download and install necessary software packages.
- Sufficient system resources, including CPU, memory, and storage, to run the DNS proxy service.
- Proper network connectivity to allow DNS traffic through the network.
- Administrative access or root privileges on the Linux machine to make system-wide configuration changes.
By ensuring that these requirements are fulfilled, you will be prepared to proceed with the installation and configuration process of a DNS proxy on your Linux system.
Step 1: Installing DNS Proxy Software

In this section, we will detail the first step of the process, which involves the installation of the necessary DNS proxy software on your Linux system. By following these instructions, you will be able to set up the foundation for configuring and utilizing a DNS proxy.
Firstly, you will need to download the appropriate DNS proxy software package compatible with your Linux distribution. Ensure that you choose a reliable and reputable source for the download to avoid any security risks. After completing the download, navigate to the directory where the package is located.
Next, proceed to extract the files from the package using the appropriate command in your Linux terminal. This process may vary depending on the specific package you have downloaded, so make sure to consult the documentation provided with the software.
Once the files are extracted, you can begin the installation process. In most cases, this can be achieved by running the installation command provided by the software package, either through a script or via the terminal. Pay attention to any additional instructions or prompts that may appear during the installation.
After the installation is complete, it is recommended to verify that the DNS proxy software is properly installed on your system. You can do this by checking the version number or running a test command to confirm its presence. This step will ensure that the software is ready to be configured and used in the subsequent steps.
By successfully completing the installation of the DNS proxy software, you have taken the first essential step towards setting up a functioning DNS proxy on your Linux system. The subsequent steps will elaborate on the configuration process and how to optimize the proxy according to your specific requirements.
Step 2: Setting Up DNS Proxy Configuration
In this section, we will walk you through the process of configuring the settings for your DNS proxy on the Linux system. By correctly setting up the DNS proxy configuration, you will be able to optimize and secure your network's DNS queries.
Before diving into the configuration steps, it is important to understand the significance of DNS proxy settings. DNS proxy acts as an intermediary between client devices and DNS servers, allowing for better performance, improved security, and efficient management of DNS queries. By customizing the DNS proxy settings, you can specify preferred DNS servers, enable caching, and control domain filtering.
To configure the DNS proxy settings, you will need administrative access to your Linux system. Begin by opening the terminal and entering the necessary commands to access the DNS proxy configuration file. The configuration file is typically located at /etc/dnsmasq.conf.
Once you have opened the configuration file, you can start customizing the settings according to your requirements. Some common configuration options include specifying the upstream DNS servers, enabling DNS caching, setting DNS forwarding rules, and enabling domain filtering. Make sure to consult the documentation or refer to your network administrator for specific configuration details.
After making the desired changes, save the configuration file and exit the text editor. To apply the new DNS proxy settings, you will need to restart the DNS proxy service on your Linux system. This can be done by running the appropriate command in the terminal, such as sudo service dnsmasq restart.
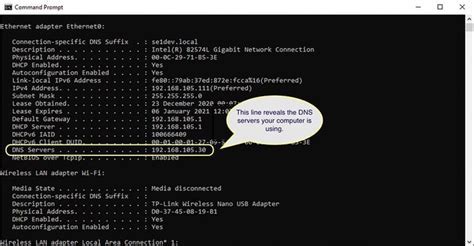
Finally, it is crucial to test the DNS proxy configuration to ensure proper functionality. You can do this by performing DNS queries on your client devices and verifying that the expected DNS resolution is taking place. Additionally, you can use command-line tools like nslookup or dig to directly query the DNS proxy server and verify the response.
By following these steps, you will successfully configure the DNS proxy settings on your Linux system. This will enhance the performance, security, and manageability of your network's DNS queries, ultimately improving the overall user experience.
| Next Step | Previous Step |
|---|---|
| Step 3: Setting Up DNS Filtering | Step 1: Installing DNS Proxy Software |
Step 3: Checking the Functionality of the DNS Proxy Setup

In this section, we will verify the successful implementation of the DNS proxy on your Linux system. By conducting a series of tests, we will ensure that the DNS proxy is functioning correctly and delivering the expected results.
To begin, we will test the basic functionality of the DNS proxy by querying a specific domain name and checking if the proxy correctly resolves its corresponding IP address. This will confirm whether the DNS proxy is intercepting DNS requests and forwarding them to the appropriate DNS server.
Next, we will test the caching feature of the DNS proxy. By repeating the previous domain name query, we will monitor the time it takes for the proxy to deliver the IP address. If the IP address is retrieved significantly faster than the initial query, it indicates that the DNS proxy successfully stored the resolved IP address in its cache. This ensures improved performance for subsequent requests.
Furthermore, we will perform a load test on the DNS proxy by sending a high volume of queries within a short period. This test will determine if the proxy can handle a large number of simultaneous DNS requests without any performance degradation or failures. By measuring the response times and ensuring consistent operation, we can validate the scalability and reliability of the DNS proxy.
Finally, we will examine the log files of the DNS proxy to check for any errors, warnings, or unexpected behavior. Analyzing the log files will provide insights into the functioning of the DNS proxy and enable troubleshooting in case of any issues or anomalies.
| Test | Expected Result | Status |
|---|---|---|
| Basic functionality | The DNS proxy correctly resolves the IP address of the queried domain. | Passed/Failed |
| Caching | The subsequent query for the same domain retrieves the IP address faster due to caching. | Passed/Failed |
| Load testing | The DNS proxy handles a high volume of simultaneous queries without performance issues. | Passed/Failed |
| Log analysis | No errors or anomalies found in the DNS proxy log files. | Passed/Failed |
Troubleshooting DNS Proxy Issues
Identifying and resolving issues that arise when using a DNS proxy on a Linux system can be challenging but crucial for optimal network performance. This section aims to provide troubleshooting techniques and strategies to help diagnose and fix common problems encountered while utilizing a DNS proxy.
1. Verifying DNS Proxy Configuration:
When encountering DNS proxy issues, the first step is to verify the configuration settings. Ensure that the DNS proxy is properly set up and configured on the Linux system, as any incorrect settings can lead to connectivity problems. Check if the DNS proxy is actively running and configured to serve as a middleman between client requests and the DNS server.
2. Checking Network Connectivity:
Inadequate network connectivity can also be a cause of DNS proxy issues. Confirm that the Linux system has a reliable and stable internet connection, as intermittent or slow connections can result in DNS lookup failures or delays. Test network connectivity by pinging external DNS servers or performing a traceroute to diagnose any potential network issues.
3. Resolving DNS Cache Problems:
DNS proxy servers often cache DNS responses to improve performance. However, stale or outdated cache entries can lead to conflicts and incorrect resolution of domain names. Clearing the DNS cache on the Linux system can help resolve such issues. Use the appropriate command to clear the DNS cache, ensuring that the latest DNS records are retrieved for accurate domain resolution.
4. Verifying DNS Server Accessibility:
If the DNS proxy is unable to access the configured DNS server, it will be unable to forward or resolve DNS queries. Ensure that the DNS server is operational and accessible from the Linux system. Test the connectivity to the DNS server using tools like nslookup or dig, which provide detailed information on DNS server responses.
5. Analyzing DNS Logs:
Examining DNS logs can provide valuable insights into any errors or issues occurring within the DNS proxy setup. Check the logs for any error messages, query failures, or unusual activities that may indicate problems. Analyzing DNS logs can help pinpoint the root cause of DNS proxy issues and guide the troubleshooting process.
6. Consulting Community and Documentation:
If troubleshooting efforts do not resolve the DNS proxy issues, it can be beneficial to consult relevant online communities or official documentation. Online forums or communities dedicated to DNS proxy servers and Linux networking often contain valuable insights, tips, and solutions shared by experienced users. Additionally, official documentation for the DNS proxy software may provide specific troubleshooting instructions or known issue resolutions.
By following these troubleshooting steps and utilizing available resources, network administrators can effectively diagnose and resolve DNS proxy issues on Linux systems, ensuring smooth and reliable DNS resolution for their network infrastructure.
FAQ
What is a DNS proxy and why would I need to install and configure it on Linux?
A DNS proxy is a server that sits between client devices and a DNS resolver, helping to speed up DNS queries and improve network performance. By installing and configuring a DNS proxy on Linux, you can reduce DNS response time, block unwanted websites, and monitor DNS traffic for security purposes.
How can I install a DNS proxy on my Linux system?
To install a DNS proxy on Linux, you can use a package manager like apt or yum to install a DNS proxy software such as Dnsmasq or BIND. Detailed step-by-step instructions for installing and configuring specific DNS proxy software can be found in the documentation provided by the respective software's developers.
Can I configure the DNS proxy to block specific websites?
Yes, most DNS proxy software allows you to configure blocking of specific websites. This can be done by adding the website's domain name or IP address to a blacklist maintained by the DNS proxy. When a client device tries to access a blocked website, the DNS proxy will respond with a blocked message instead of the actual IP address, effectively preventing access to the website.


