Deploying MySQL, an open-source relational database management system, within a Docker image allows for easy installation and portability across various operating systems. This article presents a comprehensive tutorial on how to set up and configure MySQL in a Docker container specifically designed for Windows environments. By following these step-by-step instructions, you will be able to quickly get your MySQL database up and running in a Dockerized environment without the need for complex installation procedures or troublesome configurations.
To accomplish this, we will utilize the powerful Docker platform, which enables the creation and management of lightweight containers. By isolating applications and their dependencies within these containers, developers can ensure consistent and reliable deployment across multiple platforms. With Docker, running MySQL becomes a hassle-free process, as it eliminates the need to install and configure the database system directly on your host machine.
Throughout this guide, we will explore the necessary steps to install Docker on your Windows operating system, configure Docker settings, pull the MySQL Docker image from the official repository, and finally run a container with a MySQL instance. Additionally, we will cover essential configuration options, such as setting a root password, accessing the MySQL shell within the container, and persisting data even after the container is stopped or removed.
If you are a developer working in a Windows environment and looking to streamline your MySQL deployment process, this tutorial will provide you with the knowledge and skills necessary to leverage Docker and its benefits effectively. Whether you are a beginner in containerization or an experienced professional, this guide will guide you through the process of setting up a Dockerized MySQL environment with ease and efficiency.
Introduction to Docker on the Windows Platform

Embarking on the journey of utilizing Docker on the Windows platform opens up a world of possibilities for streamlined application development, deployment, and management. This section will provide an overview of the fundamental concepts and benefits of Docker, tailored specifically for Windows users.
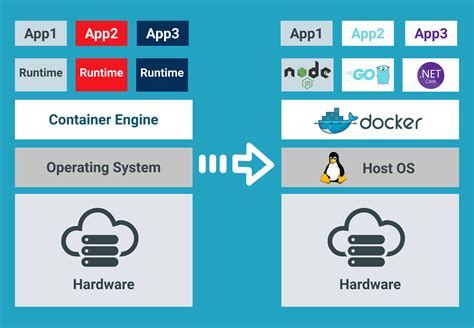
- Understanding Containerization: Dive into the concept of containerization, a lightweight and scalable method of virtualization that allows for isolating applications and their dependencies in a self-contained environment.
- Efficient Resource Utilization: Explore how Docker helps optimize the utilization of system resources by enabling the creation of isolated and reproducible containers, reducing infrastructure costs and improving overall efficiency.
- Simplified Development Workflow: Discover how Docker simplifies the development process by providing a consistent and portable environment, ensuring that applications work consistently across different development setups.
- Streamlined Deployment and Scaling: Learn how Docker facilitates seamless application deployment and scaling by abstracting away the intricate details of infrastructure dependencies and configurations.
- Container Orchestration: Get an overview of container orchestration platforms like Kubernetes, which can be seamlessly integrated with Docker for managing and scaling containerized applications.
- Windows-Specific Considerations: Explore the unique aspects of using Docker on the Windows platform, from understanding the different types of Windows containers to leveraging Windows-specific features and tools.
By familiarizing yourself with the fundamentals and advantages of Docker on the Windows platform, you will gain a solid foundation to embark on a successful journey towards utilizing containerization technology to enhance your development workflow and simplify application deployment.
The Advantages of using Docker on the Windows platform
In the world of software development, Docker has emerged as a powerful tool that simplifies the process of deploying and managing applications. Its flexibility, scalability, and portability make it an ideal choice for developers across different platforms. Docker for Windows provides a seamless environment for developing, testing, and running applications, allowing for faster and more efficient deployment processes. In this section, we will explore the various benefits of using Docker on the Windows platform.
1. Lightweight and Isolated
One of the key advantages of using Docker on Windows is its lightweight nature. Docker containers are designed to be small and efficient, allowing for rapid deployment and minimizing resource usage. With Docker, you can isolate different components of your application, ensuring that each part runs independently and does not interfere with others. This isolation promotes better stability and security, as issues in one container do not impact the entire system.
2. Portability and Compatibility
Docker provides a high level of portability, allowing you to build and package your application and its dependencies into a single container. This container can then be easily deployed on any Windows machine running Docker, regardless of the underlying hardware or operating system. This eliminates dependency issues and ensures consistent behavior across different environments. Additionally, Docker containers are compatible with other Docker tools and technologies, making it easy to integrate with existing workflows and systems.
3. Rapid Deployment and Scalability
With Docker, you can quickly deploy your application by simply running the pre-built container. This eliminates the need for manual configuration and reduces the time and effort required for deployment. Furthermore, Docker allows for easy scalability, enabling you to spin up multiple instances of your application in a matter of seconds. This makes it ideal for handling varying levels of traffic and load, ensuring smooth performance even during peak usage periods.
4. Simplified Development and Testing
Docker simplifies the development and testing process by providing a consistent environment across different stages of the application lifecycle. Developers can easily reproduce the exact same environment on their local machines as well as on production servers, minimizing the chances of compatibility issues. Moreover, Docker's ability to create snapshots of containers allows for easy debugging and rollback to previous versions, simplifying the overall debugging and testing processes.
5. Collaboration and DevOps Integration
Docker promotes collaboration and integration within development teams by providing a standardized way to package and distribute applications. Developers can easily share their Docker images, allowing for seamless collaboration and faster iterations. Additionally, Docker integrates well with DevOps tools and practices, enabling continuous integration and deployment workflows. This ultimately leads to increased efficiency, productivity, and agility within the development and operations teams.
Overall, Docker for Windows offers numerous benefits that enhance the development and deployment experience for software engineers. From its lightweight and isolated nature to its portability and compatibility, Docker simplifies the process of building, testing, and deploying applications on the Windows platform. It empowers developers to focus on their code and delivers a more efficient and streamlined development workflow.
Setting up Docker Environment on a Windows System

In this section, we will explore the step-by-step process of configuring and preparing your Windows system to utilize Docker technology efficiently. By following these instructions, you will be well-equipped to leverage the power of containerization for your development and deployment needs.
To begin, we will outline the necessary prerequisites for installing Docker on your Windows machine. We will then guide you through the process of downloading and installing Docker, showcasing various options and considerations along the way. Lastly, we will provide you with a checklist to ensure that your Docker environment is properly set up and ready to go.
By the end of this section, you will have a comprehensive understanding of the installation process, enabling you to use Docker effectively within your Windows environment. Let's dive in!
Step-by-step Guide: Setting up Docker Environment on your Windows Device
In this section, we will outline a comprehensive step-by-step guide to help you install and set up Docker on your Windows machine. Docker provides an efficient and scalable platform for containerized applications, enabling seamless deployment and management of software.
Step 1: Verify the System Requirements
Before proceeding with the Docker installation, ensure that your Windows device meets the necessary system requirements. Check for compatibility with your operating system version and architecture, available disk space, and virtualization technology support.
Step 2: Download and Install Docker for Windows
Next, download the Docker Desktop Installer package for Windows from the official Docker website. Follow the prompts to run the installer and complete the installation process. Make sure to choose the appropriate installation options and customize the settings according to your preferences.
Step 3: Launch Docker Desktop
Once the installation is complete, launch Docker Desktop from the Start menu or desktop shortcut. This will initialize Docker and configure the necessary components such as the Docker engine, container networking, and storage.
Step 4: Configure Docker Settings
After Docker Desktop is up and running, access the Docker settings to configure various preferences as per your requirements. Customize options related to resources, network, security, and proxy settings, among others, to optimize your Docker environment.
Step 5: Verify the Docker Installation
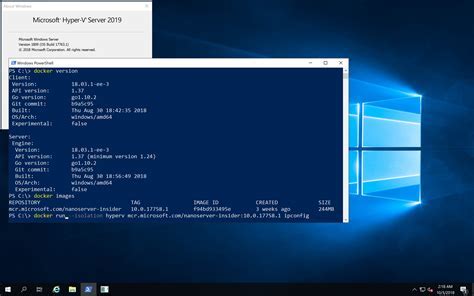
To ensure a successful installation, verify Docker functionality by opening a terminal or command prompt window and executing Docker commands such as 'docker version' or 'docker run hello-world'. If the commands execute without any errors, your Docker installation is ready for use.
Step 6: Update Docker and Install Additional Components
Regularly update your Docker installation to benefit from the latest features and security enhancements. Additionally, install any required additional components or dependencies to enable specific functionalities or support for different types of containerized applications.
Step 7: Explore Docker Usage and Resources
Now that your Docker environment is successfully set up on your Windows machine, take some time to explore the vast collection of Docker resources available online. Familiarize yourself with Docker concepts, commands, and best practices to leverage its full potential and unleash the power of containerization.
By following this step-by-step guide, you will be able to effortlessly install and configure Docker on your Windows machine, empowering you to efficiently manage and deploy containerized applications.
Building a Containerized Environment for Efficient Database Management

In this section, we will explore the process of constructing a self-contained environment to facilitate seamless and efficient handling of databases. By leveraging the power of containerization technologies, such as Docker, we can create an isolated and flexible space for running MySQL instances without the need for complex manual installations.
Through the utilization of containerization, we aim to address the challenges associated with managing multiple MySQL environments on different systems. By encapsulating the necessary dependencies and configurations within Docker containers, we can ensure consistent and reproducible setups across various operating systems.
By following the steps outlined in this section, you will be able to establish a Docker container specifically tailored to accommodate MySQL. This containerized environment allows for easy distribution, version control, and scalability, all while minimizing potential conflicts and compatibility issues.
Setting up a Containerized MySQL Environment on Windows
In this section, we will explore the process of establishing a self-contained and portable environment for running a MySQL database on a Windows machine. By leveraging the powerful capabilities of Docker, we can isolate our database setup within a single container, enabling efficient deployment and management of the MySQL instance.
Before we dive into the technical details, it's important to understand the advantages of utilizing a containerized approach. By encapsulating our MySQL environment within a Docker container, we can achieve enhanced portability, scalability, and ease of deployment. This means that our MySQL instance can be easily transferred across different Windows machines without worrying about compatibility issues or external dependencies.
Furthermore, containerization allows us to separate our MySQL setup from the underlying operating system, providing a consistent and reproducible environment regardless of the host machine's configuration. This isolation ensures that any changes or modifications made to the container, such as installing plugins or updating configuration files, do not impact the host machine or other containers running on the same system.
To begin the setup process, we will utilize Docker's robust image registry to locate and download a suitable MySQL image. Once the image is obtained, we can proceed to configure the container's parameters, including environment variables, volume mappings, and network settings. These configurations will define the behavior and characteristics of our MySQL instance, such as the database name, password, and network accessibility.
After finalizing the container's configuration, we will execute a command to create and start the MySQL container. Docker will handle the heavy lifting of setting up the necessary dependencies, initializing the database, and making it accessible for interaction. Additionally, we will explore various techniques for managing data persistence, ensuring that our MySQL database remains intact even if the container is stopped or removed.
By following this guide, you will gain the knowledge and skills required to set up a Docker container running MySQL on a Windows machine. This containerized approach offers numerous benefits, simplified management, and increased flexibility, making it an ideal choice for both development and production environments.
MySQL installation using docker compose | MySQL | Docker | Docker Compose | Installation
MySQL installation using docker compose | MySQL | Docker | Docker Compose | Installation by CodeWithRajRanjan 1,371 views 4 months ago 8 minutes, 2 seconds
FAQ
Is Docker required to install MySQL in a Windows environment?
No, Docker is not required to install MySQL in a Windows environment. You can install MySQL directly on a Windows machine by downloading the MySQL installer from the official MySQL website and following the installation instructions. However, using Docker allows you to easily run MySQL in a containerized environment, which provides benefits such as isolation and portability.
Can I use an existing MySQL database with a Docker container?
Yes, you can use an existing MySQL database with a Docker container. To do this, you would need to mount the directory containing the MySQL data files from the host machine into the Docker container. This way, the container can access and use the existing database files. You can specify the directory mount using the "-v" option when running the Docker container command.
What is Docker?
Docker is an open-source platform that allows you to automate the deployment and management of applications inside lightweight, isolated containers.
Why would I want to install MySQL in a Docker image?
Installing MySQL in a Docker image provides a containerized and portable solution for running MySQL. It allows you to easily deploy and manage MySQL instances without worrying about dependencies or compatibility issues.


