In today's era of constant virtual communication, a functional headset with a reliable microphone has become an indispensable tool for many individuals. However, it can be incredibly frustrating when your headset microphone experiences difficulties and fails to perform at its best. Before you find yourself in a state of despair or contemplate buying a new headset altogether, it's worth exploring some practical troubleshooting steps to rectify the issue.
One typical problem that users encounter is an unresponsive microphone that exhibits subpar performance. This can manifest as poor sound quality, muffled or distorted audio, or even complete silence during critical conversations. In such situations, it's crucial to remain calm and methodically assess the potential underlying causes.
One potential cause for your microphone woes could be a loose or damaged connection between your headset and the audio jack. This can occur due to wear and tear over time, accidental tugs on the cable, or even persistent twisting and bending. Additionally, the audio settings on your device may have been inadvertently altered, resulting in microphone dysfunction. By carefully examining and addressing these factors, you can often restore your headset microphone to its optimal functioning state.
Checking the physical connections
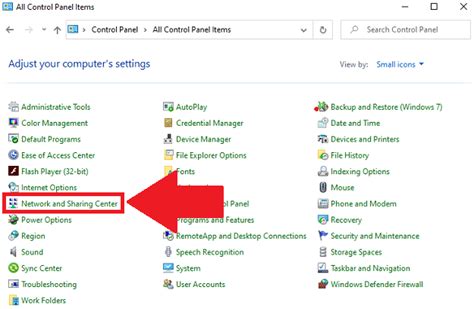
Ensuring the proper functioning of a headphone microphone involves examining the physical connections. This step focuses on investigating the physical elements that enable the microphone to function effectively.
Firstly, it is crucial to inspect the cable connecting the microphone to the headphone. Look for any visible signs of damage, such as cuts, frays, or kinks. These issues can disrupt the transmission of audio signals and result in a malfunctioning microphone. In case any damage is found, consider replacing the cable with a new one.
Another aspect to check is the connector plugs on both the headphone and the device it is connected to. Inspect them for dirt or debris that could hinder a secure connection. Wipe them gently with a clean cloth to remove any potential obstructions. Additionally, ensure that the plugs are properly inserted into their respective ports, as loose connections can lead to audio problems.
Furthermore, the positioning of the microphone may affect its performance. Make sure the microphone is securely attached to the headphone and positioned correctly. Adjust its placement and angle to ensure optimal audio capture. It may also be beneficial to try using the microphone on another device to determine if the issue lies with the headphone or the connected device.
By thoroughly examining the physical connections of the headphone microphone, you can identify and address any potential issues that may be causing it to malfunction. This step is essential in troubleshooting and resolving microphone-related problems effectively.
Cleaning the microphone port
Ensuring the optimal performance of your headphone microphone involves various troubleshooting steps, and one essential aspect to consider is the cleanliness of the microphone port. Dirty or blocked microphone ports can lead to poor audio quality, muffled sound, or even a complete lack of sound transmission.
In order to fix these issues and restore the microphone's functionality, it is important to carefully clean the microphone port. Here are some steps you can follow:
- Begin by removing any visible debris or dust particles from the microphone port using a soft brush or a can of compressed air. Be gentle while cleaning to avoid damaging the port.
- If the port is still not clean, you can moisten a cotton swab or a microfiber cloth with isopropyl alcohol. Gently rub the dampened end over the port, making sure not to apply excessive pressure.
- After cleaning with alcohol, use a dry cotton swab or cloth to remove any excess moisture from the port.
- Inspect the microphone port again to ensure it is free from any remaining debris or moisture.
By regularly cleaning the microphone port, you can prevent audio issues and maintain the best possible performance from your headphone microphone. Remember to exercise caution and avoid using any sharp objects or excessive force while cleaning to prevent damage to the port.
Adjusting the microphone settings on your device
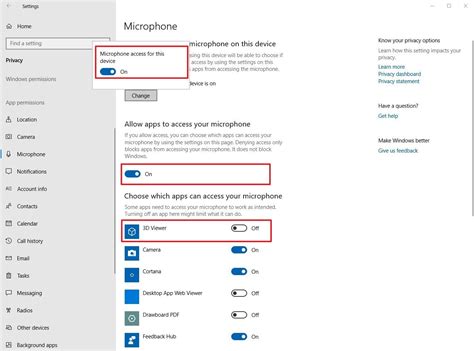
When dealing with issues related to the operation of the microphone on your device, it is crucial to explore the various adjustments that can be made to the microphone settings. By making necessary modifications, you can potentially enhance the performance and functionality of your device's microphone.
1. Checking the microphone sensitivity:
Adjusting the sensitivity of your microphone is one way to optimize its performance. This adjustment allows you to control the level of sound input the microphone picks up. If the microphone is too sensitive, it may result in background noise being captured. Conversely, if it is not sensitive enough, your voice or desired audio may not be adequately captured. Thus, finding the appropriate sensitivity level is important to ensure clear and accurate sound recordings.
2. Changing the microphone volume:
The microphone volume setting determines the level at which the microphone's output is amplified. By adjusting this setting, you can control the loudness or softness of the audio input that is picked up by the microphone. It is advisable to find the right balance between the mic volume and the overall audio playback volume to prevent distortions or audio quality issues.
3. Selecting the correct input device:
Ensuring that the correct input device is selected is crucial if you are using an external microphone. Some devices may have multiple input options, such as built-in microphones and external microphone jacks. By selecting the appropriate input device, you can ensure that the sound is being captured from the correct source, minimizing any potential problems with the microphone's functionality.
4. Verifying the microphone privacy settings:
Checking the privacy settings of your device is essential to guarantee that the microphone is allowed to function properly. In certain cases, the microphone may be disabled, or access to it may be restricted due to privacy settings. By reviewing and modifying the privacy settings related to the microphone, you can ensure that it is enabled and accessible for use.
In conclusion, adjusting the microphone settings on your device plays a vital role in troubleshooting and resolving microphone issues. By meticulously fine-tuning the microphone sensitivity, volume, input device, and privacy settings, you can optimize the functionality of your device's microphone and enhance the overall audio experience.
Updating the audio drivers
Ensuring that your headphone microphone functions properly requires constant attention to the various components that make up your audio system. One crucial element to consider is the audio drivers installed on your device. These software programs facilitate communication between your headphone microphone and the operating system, allowing for proper functionality.
Regularly updating your audio drivers can help resolve issues related to the headphone microphone not working correctly. Outdated or incompatible drivers can cause conflicts and prevent the device from functioning as intended. Updating the audio drivers ensures that your headphone microphone has access to the latest bug fixes, enhancements, and compatibility improvements.
Before proceeding with the driver update, it is essential to identify the specific audio hardware installed in your computer. This information can be found in the Device Manager, accessible through the Control Panel or by right-clicking on the Windows Start button and selecting Device Manager. Look for the audio device under the "Sound, video, and game controllers" section.
Once you have identified the audio hardware, visit the manufacturer's website to check for available driver updates. Look for a support or downloads section on the website, and enter your headphone microphone's model or the audio hardware's model to access the appropriate driver downloads. Download the latest driver version compatible with your operating system.
After downloading the driver file, double-click on it to start the installation process. Follow the on-screen instructions to complete the installation. It may be necessary to restart your computer after the installation is finished for the changes to take effect.
Updating the audio drivers can often resolve issues with the headphone microphone not working properly. However, if updating the drivers does not fix the problem, further troubleshooting may be required, such as checking hardware connections or adjusting audio settings.
Testing the microphone on another device
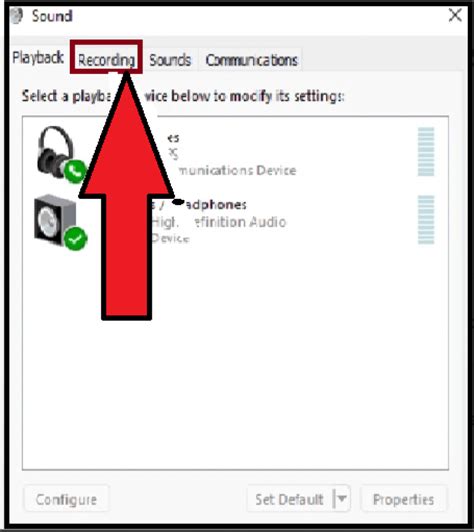
Verifying the functionality of your headphone microphone on another device can provide valuable insights into diagnosing and resolving any issues it may be experiencing. By connecting the headphones to a different device and performing tests, you can determine if the problem lies with the headphone microphone itself or if it is specific to the original device or its settings.
When testing the microphone on another device, ensure that both devices are compatible and properly connected. Use a device that supports the same type of headphone and microphone connection as the original device to eliminate any compatibility issues.
Step 1: Begin by disconnecting your headphones from the original device and connect them to the new device.
Step 2: Access the device's audio settings or preferences and locate the microphone input options.
Step 3: Make sure the microphone input is enabled and adjust the volume or gain settings if necessary.
Step 4: Open a voice recording or audio chat application on the new device.
Step 5: Speak into the microphone and observe if sound is being captured and transmitted properly.
Step 6: Test different settings or try using the headphone microphone in various applications to obtain a comprehensive understanding of its performance.
Remember, testing the headphone microphone on another device can help identify whether the issue lies with the microphone itself or the original device. Gathering this information will be useful in determining the appropriate solution to fix any problems you may be encountering.
Using an alternative headset equipped with a built-in microphone
When encountering issues with your current headset's microphone functionality, exploring alternative options that feature a built-in microphone can provide a potential solution. By employing a different headset equipped with this feature, you may be able to overcome the existing challenges and restore smooth microphone performance.
Consider opting for an alternative headset with a microphone, as it can bring about a change in the overall audio experience. This alternative may herald improved communication through clear and uninterrupted sound transmission during calls, online gaming sessions, or audio recordings. Here are a few steps to follow when choosing and utilizing a different headset equipped with a built-in microphone:
- Research available headset options in the market by consulting reputable tech sources, online reviews, and user experiences.
- Consider the particular features that would most suit your needs, keeping in mind factors like microphone sensitivity, audio quality, comfortability, and compatibility with your devices.
- Purchase the selected headset from a reliable retailer, ensuring that it meets your specific requirements and budget limitations.
- Once acquired, unpack the new headset and familiarize yourself with its components, ensuring that all necessary cables, connectors, and adapters are present.
- Consult the user manual or online instructions provided by the manufacturer to properly connect and set up the new headset with your device.
- Adjust the volume and microphone settings as needed, ensuring that the microphone is properly positioned for optimal sound pickup during usage.
- Test the performance of the new headset's built-in microphone by making a call, participating in a virtual meeting, or engaging in online gaming activities.
- Monitor the quality of audio recording or communication and make any necessary adjustments to ensure an optimal experience.
By implementing these steps, you can explore the possibility of resolving microphone-related issues by utilizing an alternative headset with a built-in microphone. Remember to choose a reliable and suitable option to enhance your audio experience and regain seamless communication capabilities.
Resetting your device's audio settings
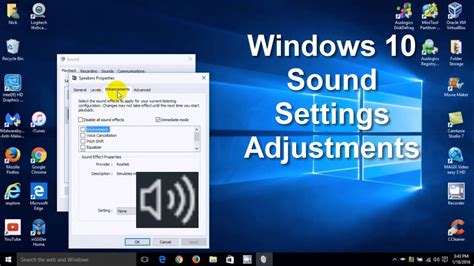
Restoring your device's audio settings to their default configuration can often resolve issues with a malfunctioning headphone microphone. By resetting the audio settings, you can eliminate any customized preferences or settings that may be causing the problem.
Resetting the audio settings reverts your device's sound configuration back to its original state. This can help to address any misconfigurations or conflicts that might be preventing the proper functioning of the headphone microphone.
Keep in mind that resetting audio settings can affect other sound-related functionalities on your device as well, so it's important to be aware of any other customized settings that may be impacted.
Here's how to reset your device's audio settings:
- Access your device's settings menu. This may be found in the system preferences or control panel, depending on your operating system.
- Look for the "Audio" or "Sound" section within the settings menu.
- In the audio settings, locate the option to reset or restore the audio configuration. It may be labeled as "Reset audio settings," "Restore defaults," or something similar.
- Select the reset option and confirm your choice if prompted.
- Wait for your device to apply the changes and reboot if necessary.
After resetting the audio settings, test your headphone microphone to see if the issue has been resolved. If not, you may need to explore other troubleshooting steps or consider seeking professional assistance.
Remember to make any necessary adjustments to your audio preferences and settings after performing the reset, such as volume levels or input/output device selection.
Checking for software conflicts
In this section, we will explore the possibility of software conflicts that may be causing issues with your headphones' microphone functionality. Sometimes, the problem lies not with the hardware itself, but with conflicting software or settings on your device.
1. Update your audio drivers: Outdated or incompatible audio drivers can lead to conflicts and affect the performance of your headphone microphone. Make sure to check for any available updates for your audio drivers and install them if necessary.
2. Disable unnecessary audio enhancements: Audio enhancements or special effects applied to your audio output can sometimes interfere with the proper functioning of the microphone. Disable any unnecessary enhancements or effects and check if it resolves the issue.
3. Check for conflicting applications: Certain applications or programs running in the background can conflict with your headphone microphone. Close any unnecessary applications and try using the microphone again to see if the issue persists.
4. Adjust privacy settings: Some operating systems have privacy settings that can restrict access to the microphone. Check your privacy settings and ensure that the microphone is allowed to be accessed by the applications you intend to use it with.
5. Test the microphone on another device: If possible, test your headphone microphone on another device to determine if the problem is specific to your current device or if it persists across multiple devices. This can help isolate the issue further and provide insights into whether it's related to software conflicts or the hardware itself.
By checking for software conflicts and resolving any conflicts or issues, you can improve the functionality of your headphone microphone and enjoy uninterrupted use.
Inspecting the headphone cable for damages
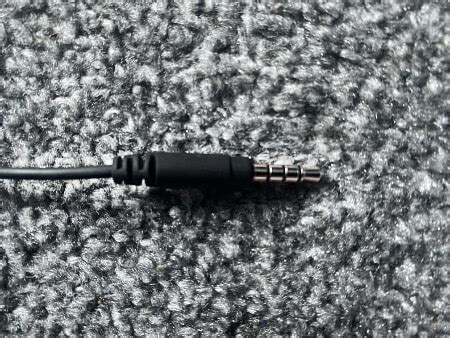
One important step in troubleshooting headphone microphone issues is to carefully examine the cable connecting your headphones to the device. By inspecting the cable for any signs of damage or wear, you can pinpoint potential problems and take the necessary actions to fix them.
Start by visually inspecting the entire length of the cable. Look for any visible tears, frays, or kinks that could be causing disruptions in the microphone function. Pay close attention to areas where the cable bends or experiences frequent movement, as these vulnerable spots are more susceptible to damage.
If you notice any physical damage, gently run your fingers along the cable to feel for any irregularities. Check for any areas where the cable feels weak or is significantly thinner, as this may indicate internal wire damage. It's essential to ensure that the wire connections are intact and not loose, as loose connections can disrupt the microphone's functionality.
Additionally, examine the cable connectors for any signs of corrosion, debris, or bent pins. Dirty or damaged connectors can interfere with the proper transmission of audio signals and degrade microphone performance. Cleaning the connectors with a soft cloth and removing any debris may help restore functionality.
Remember to test your headphones with another device to verify if the issue persists after inspecting the cable. If the problem persists, it may indicate a different underlying issue that requires further investigation or assistance from a professional technician.
Contacting the Manufacturer for Further Assistance
When it comes to resolving issues with your headphone microphone, reaching out to the manufacturer can often provide the most effective solution. By contacting the original equipment manufacturer (OEM), you can seek expert guidance and support tailored specifically to your device.
One of the initial steps to take when experiencing problems with your headphone microphone is to consult the user manual or documentation that came with your device. These resources usually include troubleshooting tips and contact information for technical support. It's important to carefully review and follow any suggested troubleshooting steps before reaching out to the manufacturer, as they can often provide quick and simple solutions to common problems.
If the issue persists or the user manual doesn't offer a suitable solution, contacting the manufacturer's customer support should be your next course of action. Many OEMs provide multiple avenues for customer assistance, such as phone helplines, online chat support, or dedicated support email addresses. Before contacting them, gather all relevant information about your device, including its model number, serial number, and any error messages or symptoms you've encountered. These details will help the manufacturer's support team in diagnosing and resolving the problem more effectively.
When communicating with the manufacturer, be prepared to provide a clear and concise description of the issue you're facing. Include specific details about when the problem started, any recent changes or updates made to your device, and any troubleshooting steps you've already attempted. Providing this information upfront can help the manufacturer's support team in identifying potential causes and offering targeted solutions.
While contacting the manufacturer for further assistance may require some additional time and effort, it can significantly increase your chances of resolving the problem with your headphone microphone. By leveraging the expertise and resources of the OEM, you can receive guidance tailored to your specific device and ensure a more satisfactory outcome.
Ultimately, reaching out to the manufacturer can be a valuable step in troubleshooting and fixing your headphone microphone, providing you with the necessary support for a successful resolution.
How to FIX Headphone Jack On PS4 Controller without Opening (Easy Method)
How to FIX Headphone Jack On PS4 Controller without Opening (Easy Method) by YourSixStudios 176,488 views 3 years ago 2 minutes, 26 seconds
Headphones Not Working? This Simple Cleaning Method Could Help! (iPhone, iPad, Android)
Headphones Not Working? This Simple Cleaning Method Could Help! (iPhone, iPad, Android) by Pete Johns - Studio Live Today 1,882,643 views 5 years ago 9 minutes, 17 seconds
FAQ
Why isn't my headphone microphone working?
There could be several reasons why your headphone microphone is not working properly. It could be due to a hardware issue, such as a loose connection or a damaged microphone. Another possibility is that the microphone is not properly configured in your device's settings. It's also worth checking if there are any software or driver updates available for your headphones.
How can I fix a headphone microphone that has low volume?
If your headphone microphone has low volume, there are a few steps you can take to try and fix the issue. First, make sure that the microphone is not obstructed by anything and is positioned correctly. You can also try adjusting the microphone volume in your device's settings. If that doesn't work, check if there are any audio enhancements or noise cancelling options enabled, as these can affect the microphone volume. Additionally, using a different audio port or trying the headphones on another device can help identify if the issue is with the headphones or the device.
What do I do if my headphone microphone is producing static noise?
If your headphone microphone is producing static noise, there are a few troubleshooting steps you can try. Start by checking if there is any dirt or debris in the microphone port and clean it gently using compressed air or a cotton swab. Ensure that all the connections are secure and not damaged. If the static noise persists, try using the headphones on another device to determine if the issue is with the headphones or the device itself. If it's the headphones, you may need to replace the microphone or contact the manufacturer for further assistance.


