Are you a Windows 10 user intrigued by the world of Kubernetes and eager to explore its capabilities? Look no further! This comprehensive article will walk you through the step-by-step process of installing and configuring Kubernetes on your Windows 10 operating system. By the end of this guide, you will have a fully functional Kubernetes environment up and running.
Whether you are a beginner or an experienced developer, this tutorial will provide you with clear and concise instructions to ensure a smooth and successful installation process. From setting up the necessary dependencies to configuring the networking components, we have got you covered every step of the way.
Why choose Kubernetes?
Imagine having the power to orchestrate complex containerized applications effortlessly. Kubernetes, a powerful container orchestration platform, makes this possible. With Kubernetes, you can efficiently manage and scale your applications, ensuring optimal performance and resource utilization. It offers a highly resilient infrastructure that automatically handles container deployment, scaling, and failure recovery.
Ready to dive into the world of Kubernetes on your Windows 10 machine? Let's get started!
Understanding the Core Concepts of Kubernetes

In this section, we will delve into the fundamental concepts and principles that underpin Kubernetes, a powerful container orchestration platform. By comprehending these core concepts, you will gain a deeper understanding of how Kubernetes manages and scales containerized applications, enabling efficient deployment, scaling, and management across a cluster of machines.
At its core, Kubernetes operates based on the principles of declarative configuration and automation. It allows you to define the desired state of your applications, their dependencies, and the desired resources required. Kubernetes then takes responsibility for managing the actual state, making the necessary changes to ensure the desired state is maintained.
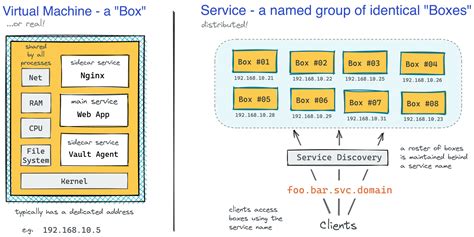
One of the key components of Kubernetes is the concept of a pod, which represents a group of one or more containers that are deployed together on a single host. Pods are the basic unit of deployment and scaling in Kubernetes, and they provide an isolated environment for containers to run within. By grouping containers into pods, Kubernetes can manage and schedule them based on resource availability and constraints.
Kubernetes also introduces the concept of a service, which provides a stable network endpoint to access a set of pods. Services enable communication between components within a Kubernetes cluster, allowing applications to discover and connect to the appropriate pods dynamically. By abstracting away the details of individual pod IPs and ports, services enable seamless scaling and load balancing.
Understanding Kubernetes involves grasping other crucial concepts such as labels and selectors, which enable grouping and selecting objects for operations and management. Additionally, the concept of a replica set allows for the desired number of pod replicas to be maintained at all times, ensuring high availability and fault tolerance.
By familiarizing yourself with the core concepts of Kubernetes, you will be well-equipped to leverage its full potential for containerized application management and orchestration.
System Requirements for Setting up Kubernetes on Windows 10
Before proceeding with the installation of Kubernetes on your Windows 10 machine, it is crucial to ensure that your system meets the necessary requirements. By meeting these requirements, you can ensure a smooth and successful installation process.
To begin, your Windows 10 operating system should have a compatible version that supports Kubernetes installation. Additionally, it is important to have sufficient system resources such as CPU, RAM, and disk space to handle the installation process and the subsequent operations of Kubernetes.
When it comes to the software side, you will need to have a compatible version of Docker installed on your Windows 10 machine. Docker plays a vital role in Kubernetes installation, as it provides the necessary containerization capabilities. Therefore, it is crucial to ensure that your Docker installation meets the required specifications for installing Kubernetes.
Furthermore, it is recommended to have a reliable internet connection during the installation process, as Kubernetes requires downloading various components and dependencies from online sources. A stable internet connection will ensure a seamless download process, minimizing any potential disruptions or delays.
Lastly, as Kubernetes is a complex and robust container orchestration platform, it is essential to have a good understanding of fundamental concepts and terminology before proceeding with the installation. Familiarizing yourself with Kubernetes concepts such as pods, nodes, and services will greatly facilitate the installation process and enable you to effectively utilize Kubernetes.
By ensuring that your system meets these system requirements, you will pave the way for a successful installation of Kubernetes on your Windows 10 machine and be ready to harness the power of container orchestration for your applications.
Setting up a Virtual Machine for Kubernetes

In order to create an environment suitable for running Kubernetes on a Windows 10 machine, we need to set up a virtual machine. This virtual machine will provide us with a separate and isolated environment where we can install and configure all the necessary components for Kubernetes.
Creating a virtual machine allows us to mimic the behavior of a physical computer, meaning we can allocate the required resources and run a different operating system within our Windows 10 environment. By doing so, we ensure that Kubernetes runs smoothly without any conflicts with the underlying system.
To set up a virtual machine, we will utilize virtualization software such as VirtualBox or VMware. These tools provide the ability to run multiple operating systems simultaneously, allowing us to create a dedicated environment for Kubernetes.
Once we have installed the virtualization software, we can proceed with creating a new virtual machine. We will need to allocate sufficient resources such as CPU, memory, and storage to ensure Kubernetes performs optimally within the virtual environment.
After setting up the virtual machine, we will need to install a compatible operating system. Typically, Linux distributions such as Ubuntu or CentOS are preferred for running Kubernetes. These operating systems provide the necessary dependencies and tools required for Kubernetes deployment.
Finally, we will need to configure the network settings for the virtual machine so that it can communicate with the Windows 10 host machine as well as other virtual machines within the Kubernetes cluster. Proper network configuration is essential for seamless communication between all the components of Kubernetes.
By setting up a virtual machine specifically for Kubernetes, we can ensure a smooth and efficient deployment of Kubernetes on our Windows 10 machine. This separation of environments provides us with the flexibility to experiment with Kubernetes without impacting our primary operating system.
Setting up Your Windows 10 Environment for Kubernetes Installation
In order to successfully install Kubernetes on your Windows 10 operating system, it is essential to first install a hypervisor and enable the Hyper-V feature. This section will guide you through the steps required to set up your Windows environment for Kubernetes installation.
- Install Hypervisor:
- Begin by opening the Control Panel on your Windows 10 system.
- Navigate to the "Programs" section and select "Turn Windows features on or off".
- In the "Windows Features" window, locate and check the option for "Hyper-V".
- Click "OK" to start the installation of the Hypervisor component.
- Follow the on-screen prompts and restart your computer if prompted.
- Enabling Hyper-V:
- Once your computer has restarted, open the "Control Panel" again.
- Select "Administrative Tools" and then choose "Hyper-V Manager".
- In the "Hyper-V Manager" window, click on the "Virtual Switch Manager" option.
- Create a new virtual switch by selecting "External" and providing a name for the switch.
- Configure the network settings for your virtual switch and save the changes.
- Verifying Hyper-V Installation:
- To confirm that Hyper-V is successfully installed and running, open the "Command Prompt" with administrative privileges.
- Type the command "
systeminfo" and press "Enter". - Check the output for the line "
Hyper-V Requirements : VM Monitor Mode Extensions: Yes". - If the output shows the above line, it means that Hyper-V is installed and enabled on your Windows 10 system.
With the hypervisor installed and Hyper-V enabled, you have now set up your Windows 10 environment to proceed with the installation of Kubernetes. The next step is to install Docker, which will be covered in the following section.
Installing Docker on Windows 10

Setting up Docker on your Windows 10 computer allows you to run and manage containers efficiently. This section of the article will guide you through the process of installing Docker on your Windows 10 operating system.
Before diving into the installation steps, it's important to understand the benefits of Docker and how it can enhance your development environment. Docker provides a lightweight and portable containerization platform that allows you to package and distribute applications with their dependencies, ensuring consistency across different environments.
To begin the installation, you need to download the Docker Desktop installer for Windows from the official Docker website. Once downloaded, open the installer and follow the on-screen instructions to complete the installation process.
After the installation is complete, Docker Desktop will be available in your system tray. Launch Docker Desktop to start the application and allow it to initialize. This might take a while, as Docker sets up the necessary components and tools for container management.
Once Docker Desktop is up and running, you can verify the installation by opening a command prompt and running the command docker version. This command will display the current version of Docker installed on your system, confirming that the installation was successful.
Congratulations! You have now successfully installed Docker on your Windows 10 operating system. With Docker set up, you can now proceed to the next steps to install and configure Kubernetes to create a powerful development environment.
Configuring Docker for Kubernetes
In this section, we will discuss the necessary steps to configure Docker to work with Kubernetes on your Windows 10 machine.
Before you can start deploying and managing Kubernetes clusters on your Windows 10 environment, you need to ensure that Docker is properly configured. Docker is an essential tool that allows you to package, distribute, and run applications as containers. Kubernetes relies on Docker for managing these containers within a cluster.
Here, we will provide a step-by-step guide on how to configure Docker for Kubernetes, ensuring that everything is set up correctly for efficient container management. The configuration process will involve checking Docker settings, enabling necessary features, and optimizing the Docker environment to work seamlessly with Kubernetes.
| Step | Description |
|---|---|
| Step 1 | Check Docker version |
| Step 2 | Enable Kubernetes support in Docker Desktop |
| Step 3 | Configure Docker resource allocation for Kubernetes |
| Step 4 | Optimize Docker networking for Kubernetes |
| Step 5 | Validate Docker configuration for Kubernetes |
By following these steps and configuring Docker properly, you will ensure that your Windows 10 environment is ready for installing and running Kubernetes. This will enable you to utilize the power of Kubernetes for managing containers and orchestrating large-scale applications effectively.
Get Started: Installing Kubernetes CLI on your Windows 10 system

Integrating Kubernetes into your Windows 10 environment requires installing the Kubernetes Command-Line Interface (kubectl). In this section, we will walk you through the step-by-step process of setting up kubectl on your Windows 10 machine.
- Verify System Requirements: Before proceeding with the installation, ensure that your Windows 10 system meets the necessary prerequisites for running kubectl.
- Download the Binary: To install kubectl, you will need to obtain the binary executable file from the official Kubernetes repository.
- Add kubectl to System Path: After downloading the kubectl binary, you need to add it to your system's PATH variable, allowing you to run kubectl commands from any location within the command prompt.
- Verify kubectl Installation: Once you have added kubectl to your system's PATH, verify the successful installation by running a simple kubectl command.
- Configure kubectl: Next, you will need to configure your kubectl environment, providing necessary details such as the Kubernetes cluster's connection information and authentication credentials.
- Test Connection to Kubernetes Cluster: After configuring kubectl, validate that you can successfully connect to your Kubernetes cluster using the provided connection details.
By following the above steps, you will have kubectl installed on your Windows 10 system, allowing you to interact with your Kubernetes cluster efficiently. With kubectl, you can manage and control various aspects of your Kubernetes deployments directly from your command prompt.
Deploying a Kubernetes Cluster on Windows 10
In this section, we will explore the process of setting up a Kubernetes cluster on Windows 10. By following these steps, you can create an environment that enables efficient and scalable container orchestration, without the need for complex configurations.
Firstly, we will delve into the requirements for deploying a Kubernetes cluster on your Windows 10 machine. Understanding these prerequisites is crucial for a seamless setup process. Then, we will guide you through the installation of the necessary software and tools, ensuring that you have the essential components for the cluster deployment.
Next, we will walk you through the configuration steps, where you will learn how to properly set up the Kubernetes cluster on your Windows 10 operating system. This involves establishing the network settings, defining the cluster parameters, and configuring the necessary security measures to ensure a stable and protected environment.
Once the cluster is successfully set up, we will discuss the post-deployment tasks to optimize the performance and functionality. These tasks include scaling the cluster size, managing pod deployment, and implementing monitoring and logging solutions to efficiently track and analyze the cluster's performance.
Lastly, we will provide you with some best practices and troubleshooting tips to overcome any potential challenges you may encounter during the deployment process. By following these recommendations, you can ensure a smooth and reliable Kubernetes cluster on Windows 10, empowering you to efficiently manage your containerized applications and streamline your development workflow.
Verifying the Installation and Checking Cluster Status

In this section, we will ensure that the installation of Kubernetes on your Windows 10 machine was successful by verifying the setup and checking the status of the cluster. It is important to ensure that all components are properly installed and functioning before proceeding further.
Verifying Kubernetes:
To verify Kubernetes installation, we will run a series of commands to check the existence and the version of key components. By doing so, we can confirm that Kubernetes is correctly installed and accessible on your Windows 10 machine.
Checking Cluster Status:
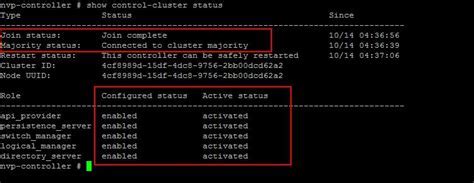
Once we have confirmed the installation of Kubernetes, we can proceed to check the status of the cluster. This step involves checking the health and availability of each node in the cluster, as well as the overall status of the system. By examining the cluster status, we can ensure that all nodes are functioning properly and ready to handle workload.
Accessing Kubernetes Dashboard:
In addition to verifying the installation and checking the cluster status via command-line tools, we will also explore how to access the Kubernetes dashboard. The dashboard provides a graphical interface for managing and monitoring your Kubernetes cluster. We will demonstrate how to access the dashboard and navigate its various features.
Troubleshooting Kubernetes Installation on Windows 10
In this section, we will address common issues that may occur during the installation of Kubernetes on a Windows 10 environment and provide solutions to resolve them. Understanding and troubleshooting these issues will help ensure a successful Kubernetes installation for your Windows 10 operating system.
[MOVIES] [/MOVIES] [/MOVIES_ENABLED]FAQ
What is Kubernetes?
Kubernetes is an open-source container orchestration platform that automates the deployment, scaling, and management of applications.
Why would someone want to install Kubernetes on Windows 10?
Installing Kubernetes on Windows 10 allows developers to run and test Kubernetes clusters locally, without needing a dedicated server or cloud environment.
What are the system requirements for installing Kubernetes on Windows 10?
To install Kubernetes on Windows 10, you will need a 64-bit version of Windows 10 with at least 4GB of RAM, Virtualization Technology enabled in BIOS, and Disk Hypervisor enabled in Windows features.
Can I use Docker for Windows with Kubernetes?
Yes, Docker for Windows provides a Kubernetes support option. By enabling Kubernetes in Docker settings, you can easily deploy and manage Kubernetes clusters on your Windows 10 machine.


