When it comes to managing and orchestrating complex applications, few tools come close to the power and flexibility of Kubernetes. This open-source container orchestration platform has become the de facto standard for automating the deployment, scaling, and management of applications across clusters of machines.
In this comprehensive tutorial, we will walk you through the process of setting up Kubernetes on your Linux system. We will explore the intricacies of installing and configuring this cutting-edge technology, providing you with the knowledge and skills necessary to deploy and manage your own distributed applications.
Throughout this guide, we will delve into various concepts and techniques, ensuring that you have a solid foundation to work with Kubernetes. We will take you through each step, carefully explaining the rationale behind the actions required, and providing helpful tips along the way. By the end, you will possess the confidence and expertise to harness Kubernetes' capabilities to their fullest potential.
So, fasten your seatbelts and get ready to embark on an exciting journey of discovery as we demystify the installation process and unveil the secrets of effectively deploying Kubernetes on your Linux server. By the time you reach the end of this tutorial, you will not only be proficient in setting up Kubernetes but also equipped with the skills to optimize its performance and leverage its advanced features.
Understanding Kubernetes: The Basics

In this section, we will explore the fundamental concepts of Kubernetes, a powerful container orchestration platform that enables efficient management and deployment of applications. By gaining a deeper understanding of Kubernetes, you will be able to harness its capabilities and leverage its benefits for your Linux-based server infrastructure.
- Containerization: Before diving into Kubernetes, it is essential to comprehend the concept of containerization. Containers provide a lightweight and isolated environment for running applications. They offer portability and consistency, ensuring that your applications run smoothly across different platforms.
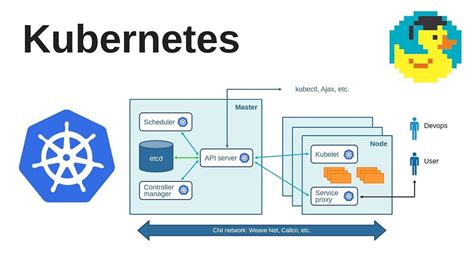
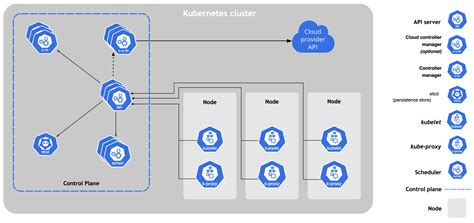
- Cluster: Kubernetes operates on a cluster of machines, which collectively form a single unit. A cluster typically consists of a master node and multiple worker nodes. The master node manages the cluster's overall state, while the worker nodes handle the execution of containers.
- Pods: Pods are the fundamental building blocks of Kubernetes. They encapsulate one or more containers that are tightly coupled and share resources. A pod represents a single instance of an application or a component of it. Containers within a pod can communicate with each other using a shared network and storage.
- Deployment: Kubernetes facilitates the deployment of applications by providing declarative configuration files. These files define the desired state of the application, including the number of replicas, desired resources, and health checks. Kubernetes automatically manages the deployment, ensuring the specified configuration is met continuously.
- Services: Services in Kubernetes enable communication between various components of an application. They provide a stable network endpoint for accessing the application, regardless of the underlying pod or node that hosts it. Services can be internal, accessible only within the cluster, or external, allowing external traffic to reach the application.
- Scaling and Load Balancing: Kubernetes offers horizontal scaling, allowing you to increase or decrease the number of replicas of an application based on demand. This ensures efficient resource utilization and maintains high availability. Load balancing automatically distributes network traffic evenly across multiple instances of an application.
By familiarizing yourself with these core concepts, you will lay a strong foundation for exploring and implementing Kubernetes on your Linux server environment. Let's delve deeper into the installation process and configuration in the subsequent sections!
Step 1: Preparing Your Linux Server for Kubernetes Installation
Before diving into the process of setting up Kubernetes on your Linux server, it is essential to prepare the server environment to ensure a smooth and successful installation. This step focuses on the necessary preparations that need to be completed before moving forward with the Kubernetes setup.
1. Update and Upgrade: Start by updating and upgrading the operating system and all installed packages on your Linux server. This ensures that you have the latest bug fixes, security patches, and improvements, providing a stable foundation for Kubernetes installation.
2. Configure Firewall Settings: Ensure that your server's firewall allows network traffic required by Kubernetes components to function correctly. Open the necessary ports or configure specific rules to allow communication between nodes in the cluster.
3. Enable Containerization: Kubernetes uses containerization technology to manage and deploy applications. Make sure to enable and set up your preferred container runtime, such as Docker or containerd, on your Linux server.
4. Allocate Sufficient Resources: Kubernetes requires a certain amount of system resources to operate efficiently. Check and allocate an adequate amount of CPU, RAM, and storage for your Linux server to support the Kubernetes cluster and the workloads it will handle.
5. Set Up Networking: Configure networking properly to ensure smooth communication between cluster nodes and external services. Set up DNS resolution, configure network interfaces, and assign IP addresses to each node to establish a reliable network environment for your Kubernetes installation.
6. Install and Configure Container Networking Interface (CNI): CNI plugins facilitate networking between containers in different pods and enable cross-node communication. Install and configure a compatible CNI plugin to ensure seamless networking within your Kubernetes cluster.
7. Secure Your Server: Implement appropriate security measures on your Linux server, including disabling unnecessary services, configuring secure remote access, and using strong passwords or SSH key-based authentication. This helps protect your server and the Kubernetes installation from potential security threats.
By following these preparatory steps, you set a solid foundation for the successful installation and operation of Kubernetes on your Linux server. Once these preparations are complete, you can proceed to the subsequent steps of the Kubernetes setup process.
Step 2: Setting up Docker on Your Linux Server

In this section, we will discuss the process of getting Docker up and running on your Linux server, which is an essential step in preparing the environment for installing Kubernetes. Docker is a versatile platform that allows you to package, distribute, and manage your applications in containers, providing a lightweight and portable solution.
Firstly, we will explore the steps to install Docker on your Linux system. You can choose from various installation methods depending on your Linux distribution. Once you have selected the appropriate method, we will guide you through the installation process, ensuring you have the latest version of Docker installed.
After successfully installing Docker, we will then proceed to configure Docker to start automatically on system boot. This will ensure that Docker is always available and ready for use whenever you need it.
Next, we will cover the basic Docker commands that you need to be familiar with. These commands will allow you to interact with Docker and manage containers effectively. We will explain how to pull Docker images from the Docker Hub, create containers from those images, and manage their lifecycle.
Furthermore, we will discuss some best practices for working with Docker, including managing container storage and networking. Understanding these concepts will enable you to optimize your Docker environment and ensure efficient resource utilization.
By the end of this section, you will have a solid understanding of Docker and how it functions on your Linux server. You will be ready to proceed to the next step in the installation process, which is deploying and configuring Kubernetes.
Step 3: Setting Up the Kubernetes Cluster
In this phase of the installation process, we will be laying the groundwork for the establishment of the Kubernetes cluster. This involves configuring the necessary components and ensuring their smooth integration to guarantee the reliable functioning of the cluster.
Initial Setup
The initial setup of the cluster entails defining the cluster's topology, including the number and configuration of the master and worker nodes. It is imperative to carefully plan and allocate resources to ensure optimal performance and scalability.
Networking
A crucial aspect of setting up the Kubernetes cluster is configuring the networking infrastructure. This entails defining the networking protocols, configuring network policies, and ensuring seamless communication between cluster components.
Storage
Efficient storage management is essential for a well-functioning Kubernetes cluster. During this step, we will configure the storage solution, such as persistent volumes or storage classes, to cater to the cluster's data storage requirements.
Security
To maintain the integrity and confidentiality of the cluster, we need to implement robust security measures. This involves setting up authentication and authorization mechanisms, configuring role-based access control (RBAC), and enabling secure communication channels within the cluster.
High Availability
In order to ensure continuous availability of the Kubernetes cluster, it is crucial to configure high availability mechanisms. This may involve setting up redundant master nodes, implementing load balancing techniques, and monitoring the cluster's health.
Cluster Verification
Once the initial setup and configuration are completed, it is essential to verify the proper functioning of the Kubernetes cluster. This involves running various tests and checks to ensure that all components are working correctly and that the cluster is capable of handling workloads.
By following these steps, you will successfully set up the Kubernetes cluster, paving the way for the deployment and management of containerized applications with ease.
Step 4: Setting Up Networking for Your Kubernetes Environment

In this step, we will focus on configuring the network settings for your Kubernetes deployment. Proper networking setup is crucial for your cluster to communicate effectively, ensuring seamless communication and data transfer between the various components.
Understanding Kubernetes Networking:
Before diving into the configuration process, it's important to have a basic understanding of how networking works in Kubernetes. Kubernetes relies on a network model that treats containers as first-class citizens. Each pod, which is the smallest unit of deployment in Kubernetes, gets its own IP address, enabling seamless communication between containers within the same pod.
Additionally, Kubernetes introduces the concept of services, which act as an abstraction layer for pods. Services provide a stable and accessible IP address for a group of pods, allowing external access to your applications running within the cluster.
Configuring Networking Components:
To set up networking in Kubernetes, you will need to configure several key components:
- Container Network Interface (CNI): This plugin manages the networking between containers and ensures they are all part of the same network.
- Pod Network: This network defines how the IP addresses are assigned to pods and how they communicate with each other.
- Service Network: This network defines the range of IP addresses for your services and how they communicate with the pods.
Each of these components plays a vital role in establishing a reliable and efficient network within your Kubernetes environment. Configuring them correctly is essential for seamless communication between your applications and services.
Choosing a Container Network Interface:
There are various Container Network Interface plugins available for Kubernetes, each with its own set of features and capabilities. Some popular options include Calico, Flannel, and Weave. It's important to evaluate your specific requirements and choose the one that best suits your needs.
Once you have selected a CNI plugin, you will need to install and configure it to enable communication between the containers within your cluster.
Defining and Configuring the Pod and Service Networks:
The next step is to define and configure the pod and service networks. These networks determine how pods and services communicate internally and externally.
You will need to assign a specific IP address range for your pod network to ensure each pod receives a unique IP address. Additionally, you will also need to define the service network range, which determines the IP addresses allocated to services within your cluster.
Verifying the Network Setup:
Once you have completed the network configuration process, it's crucial to verify that everything is working as expected. You can validate the networking setup by deploying a test application and ensuring it can communicate with other pods and services in the cluster.
Regularly monitoring and troubleshooting your Kubernetes network is essential to maintain the overall health and performance of your cluster.
By following these steps, you can properly configure the networking for your Kubernetes environment, enabling seamless communication and data transfer between your applications and services.
Step 5: Deploying and Running Applications on a Kubernetes Cluster
After successfully setting up your Kubernetes cluster, it's time to deploy and run applications on it. In this step, we'll explore the process of deploying and managing applications using Kubernetes.
Deploying applications in a Kubernetes cluster involves creating and configuring different resources such as pods, services, deployments, and ingress rules. These resources help in defining the desired state of your application and ensure that it runs reliably and efficiently.
One of the key benefits of using Kubernetes for application deployment is its ability to scale applications horizontally and automatically handle load balancing. Through the use of replica sets and horizontal pod autoscaling, Kubernetes can ensure that your application remains available and responsive even during high traffic periods.
Kubernetes also provides a powerful and flexible networking model that allows applications to communicate with each other within the cluster. By creating services and configuring ingress rules, you can expose your applications to the outside world and manage traffic routing efficiently.
In addition to deployment and networking, Kubernetes provides various advanced features for managing applications. You can configure health checks and probes to ensure the availability of your application, update deployments seamlessly without downtime, and roll back to previous versions if needed.
To deploy and run applications on Kubernetes, you'll need to define Kubernetes manifests in either YAML or JSON format. These manifests describe the desired state of your application, including the container images, resource requirements, and configuration settings.
Once the manifests are ready, you can use the Kubernetes command-line tool (kubectl) to apply them to your cluster. Kubernetes will then take care of creating the necessary resources and scheduling the application pods onto the cluster nodes.
- Create and configure different resources such as pods, services, deployments, and ingress rules
- Scale applications horizontally and automatically handle load balancing
- Utilize Kubernetes networking model for efficient communication within the cluster
- Configure health checks, seamless updates, and rollbacks for managing applications
- Define Kubernetes manifests in YAML or JSON format to describe application state
- Use kubectl to apply manifests and deploy application pods to the cluster nodes
FAQ
What is Kubernetes?
Kubernetes is an open-source container orchestration platform that automates the deployment, scaling, and management of containerized applications.
Why would I want to install Kubernetes on a Linux server?
By installing Kubernetes on a Linux server, you can create your own cluster to deploy and manage containerized applications, providing a flexible and scalable infrastructure for your applications.
What Linux distributions are supported for installing Kubernetes?
Kubernetes supports a wide range of Linux distributions, including Ubuntu, Debian, CentOS, Fedora, and Red Hat Enterprise Linux (RHEL). Make sure to check the official Kubernetes documentation for the specific requirements and instructions for each distribution.


