Discover a seamless and hassle-free method to effortlessly set up the powerful combination of XAMPP and Docker on your Windows 10 operating system. Revolutionize your development environment with this dynamic duo, without any complications or conflicts.
Experience the ultimate convenience as you embark on a journey towards enhanced productivity, efficiency, and versatility in your web development projects. Dive into the world of XAMPP and Docker, two essential tools embraced by professionals worldwide.
Unleash the power of XAMPP, the popular cross-platform web development solution that provides a comprehensive suite of Apache, MySQL, PHP, and Perl. Seamlessly integrate it with Docker, the leading container platform, to elevate your development process to new heights.
Discover the perfect equilibrium between XAMPP and Docker, as they harmoniously coexist on your Windows 10 machine. Avoid the frustration of choosing between these invaluable tools, as you unlock the potential for simultaneous usage, ultimately streamlining your workflow.
Prepare to embark on a journey of simplification and synergy, as we guide you through the step-by-step process of installing XAMPP and Docker simultaneously on your Windows 10 machine.
Please note: This guide assumes a basic level of familiarity with Windows 10 and the concepts of XAMPP and Docker.
Installing XAMPP on Windows 10

In this section, we will guide you through the process of setting up XAMPP, a powerful and popular web development stack, on your Windows 10 operating system. By installing XAMPP, you will have access to a local server environment that includes Apache, MySQL, PHP, and other essential tools for developing and testing websites.
- Download XAMPP: Visit the official XAMPP website and download the Windows version of the software. Choose the appropriate installer based on your system architecture (32-bit or 64-bit).
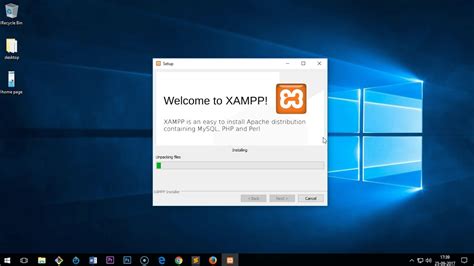
- Run the Installer: Once the download is complete, locate the installer file and run it. You may be prompted with a security warning, but rest assured that XAMPP is a trusted software package widely used by developers.
- Select Installation Options: During the installation process, you will be presented with a list of components that can be installed. Choose the components you need for your development environment, such as Apache, MySQL, PHP, and phpMyAdmin. You can also select additional tools and programming languages if desired.
- Choose Installation Location: Next, you will be asked to choose the directory where XAMPP will be installed. The default location is usually fine, but you can change it if necessary. Make sure you have enough disk space available for the installation.
- Complete the Installation: Once you have selected the installation options and location, click the "Next" button to start the installation process. This may take a few minutes to complete.
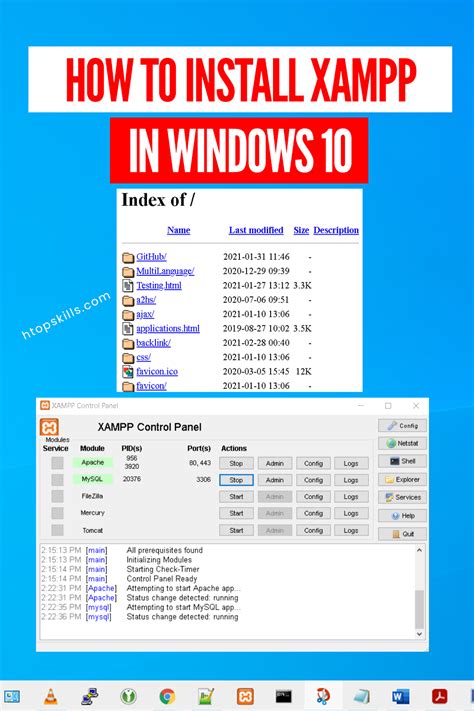
- Start XAMPP Control Panel: After the installation is finished, you can launch XAMPP by locating its shortcut on your desktop or by searching for it in the Start menu. The XAMPP Control Panel will appear, allowing you to start and stop the various components of the web server.
- Test the Installation: To verify that XAMPP is running correctly, open a web browser and type "localhost" or "127.0.0.1" in the address bar. If you see the XAMPP welcome page, congratulations! You have successfully installed XAMPP on your Windows 10 machine.
Now that XAMPP is installed and running, you can begin developing your websites locally and testing them before deploying to a live server. XAMPP provides an intuitive interface and a comprehensive set of tools to streamline your web development process, making it an indispensable tool for developers.
Step-by-Step Guide: Installing XAMPP on Windows 10
In this section, we will walk you through the process of setting up XAMPP on your Windows 10 operating system. We will provide a detailed step-by-step guide, ensuring that you can easily follow along and install XAMPP without any confusion.
Step 1: Downloading XAMPP
Before we can begin the installation process, you will need to download the XAMPP package from the official website. We will guide you through the download process and ensure that you have the latest version of XAMPP for your Windows 10 system.
Step 2: Installing XAMPP
Once the XAMPP package is downloaded, we will guide you through the installation process. You will need to follow the on-screen instructions, select the necessary components, and choose the installation directory. We will provide crucial information to help you make the appropriate selections.
Step 3: Configuring XAMPP
After the installation is complete, we will assist you in configuring XAMPP to ensure optimal performance. This step involves adjusting the necessary settings and configuring Apache, MySQL, and other components of XAMPP based on your requirements.
Step 4: Verifying Installation
Finally, we will guide you through the process of verifying the successful installation of XAMPP on your Windows 10 system. This step will involve testing the functionality of Apache server, MySQL database, and PHP scripts to ensure that everything is working correctly.
By following this step-by-step guide, you will be able to install XAMPP on your Windows 10 system effortlessly. Each step is explained in detail, providing you with the necessary information to successfully set up and configure XAMPP for your web development needs.
System Requirements and Preparations for XAMPP Installation on Windows 10

In order to successfully install XAMPP on your Windows 10 operating system, it is important to ensure that your system meets the necessary system requirements. Additionally, certain preparations need to be made to ensure a smooth installation process.
Before proceeding with the installation, ensure that your Windows 10 system meets the minimum hardware and software requirements. These requirements may include a specific processor speed, RAM, and available disk space. It is essential to check these specifications beforehand to avoid any compatibility issues during the installation process.
In addition to the system requirements, there are certain preparations that need to be made. These include creating a backup of any important files and data on your computer. While the installation process is generally safe, it is always a good practice to have a backup readily available in case of any unforeseen circumstances.
Furthermore, it is recommended to disable or temporarily turn off any antivirus software or firewall programs that may interfere with the installation process. Such security measures can often cause conflicts and hinder the installation process. Therefore, it is important to temporarily disable them during the installation of XAMPP.
Lastly, it is advisable to close any unnecessary programs or applications running in the background. This will help optimize system resources during the installation process and ensure a smoother installation experience.
| Basic System Requirements | Preparations |
|---|---|
|
|
Setting up Docker on Windows 10
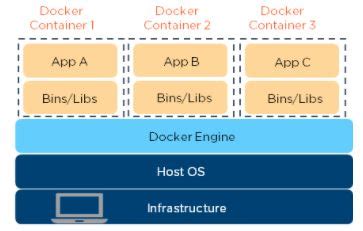
In this section, we will explore the steps to install and configure Docker on a Windows 10 operating system. Docker allows developers to build, package, and distribute applications using containers, providing a lightweight and portable environment for application deployment.
The first step in setting up Docker on Windows 10 is to download and install Docker Desktop, a user-friendly application that simplifies the installation process. Docker Desktop provides an integrated development environment (IDE) to manage and monitor containers on your machine.
Next, we need to enable the Hyper-V feature on Windows 10. Hyper-V is a virtualization technology that allows the creation of virtual machines, which will be used by Docker to run containers. This feature can be enabled through the Windows Features settings in the Control Panel.
Once Docker Desktop and Hyper-V are installed and enabled, we can launch Docker Desktop and verify the installation. Docker Desktop provides an interface to manage containers, view logs, and access various settings. It also includes a command-line tool called Docker CLI, which can be used to perform advanced operations and interact with the Docker engine.
Finally, we need to configure Docker settings according to our preferences. Docker Desktop allows customization of resource allocation, such as CPU and RAM, for containers. Additionally, Docker settings can be adjusted to control network preferences and enable features like Kubernetes integration.
In conclusion, installing Docker on Windows 10 involves downloading and installing Docker Desktop, enabling the Hyper-V feature, verifying the installation, and configuring Docker settings. Once set up, Docker provides a powerful platform for developing, testing, and deploying applications using containers.
Step-by-Step Guide to Setting Up Docker on Your Windows 10 Machine

In this section, we will walk you through the step-by-step process of installing and configuring Docker on your Windows 10 operating system, allowing you to utilize its powerful containerization capabilities. By following these instructions, you will be able to seamlessly integrate Docker into your development environment and enjoy its benefits.
Before diving into the installation process, it is important to understand the necessity and advantages of using Docker on your Windows 10 machine. Docker allows you to package and distribute applications as containerized units, ensuring consistent and reliable performance across various environments. This enables isolation and portability for your applications, simplifying the deployment process and reducing compatibility issues.
To begin, let's start by ensuring that your Windows 10 machine meets the necessary requirements for running Docker. You will need to have a compatible version of Windows 10, with at least 4GB of RAM and virtualization capabilities enabled in your BIOS settings. Additionally, make sure that any antivirus or security software does not interfere with Docker's functionality.
Next, we will download and install Docker Desktop for Windows, which provides an easy-to-use interface for managing Docker containers and images. Visit the official Docker website and locate the Windows version of Docker Desktop. Click on the download link and save the installation file to your desired location on your machine.
Once the download is complete, locate the installation file and double-click on it to initiate the installation process. Follow the on-screen instructions, accepting the license agreement and choosing the desired installation settings. During the installation, Docker may require administrative privileges, so make sure you have the necessary permissions.
After the installation is finished, Docker Desktop will launch automatically. You will be prompted to log in using your Docker ID or create a new one. This step is necessary to access Docker Hub, which is a cloud-based registry for sharing and discovering container images. Creating a Docker ID is free and only takes a few moments.
Now that Docker Desktop is up and running, you can start exploring its features and functionalities. The Docker Dashboard provides an overview of your containers and resources, while the integrated command-line interface (CLI) allows you to interact with Docker through commands and scripts. Take some time to familiarize yourself with the Docker ecosystem and its terminology.
Congratulations! You have successfully installed Docker on your Windows 10 machine. With Docker, you now have the ability to create, run, and manage containers effortlessly, empowering you to develop and deploy applications with ease. In the next section, we will cover the process of setting up XAMPP, a powerful tool for creating local development environments, complementing the functionality of Docker.
Run Docker in Windows - Setup, Docker Compose, Extensions
Run Docker in Windows - Setup, Docker Compose, Extensions 作成者: Raid Owl 47,701 回視聴 1 年前 16 分
Docker Desktop for Windows 10/11 Setup and Tips
Docker Desktop for Windows 10/11 Setup and Tips 作成者: Bret Fisher Docker and DevOps 48,415 回視聴 1 年前 17 分
FAQ
Can XAMPP and Docker be installed on Windows 10 simultaneously?
Yes, XAMPP and Docker can be installed and used simultaneously on a Windows 10 system.
Is it necessary to have administrative privileges to install XAMPP and Docker on Windows 10?
Yes, administrative privileges are required to install both XAMPP and Docker on Windows 10 as they involve making system-level changes and interacting with various services.
What is the benefit of installing both XAMPP and Docker on Windows 10?
Installing both XAMPP and Docker on Windows 10 offers the flexibility to develop and test web applications locally using XAMPP and to containerize and deploy applications using Docker.
Are there any compatibility issues if XAMPP and Docker are installed together on Windows 10?
No, there are no known compatibility issues between XAMPP and Docker when installed together on Windows 10. They can coexist and function independently without interfering with each other.
Can XAMPP be used in conjunction with Docker on Windows 10 for web development?
Yes, XAMPP can be used in conjunction with Docker on Windows 10 for web development. XAMPP provides a local development environment, while Docker enables containerization and deployment of applications.


