Imagine being transported to a world where every note, every beat, and every sound effect comes alive, enveloping you from all sides. This extraordinary experience is made possible through the correct setup and optimization of your audio equipment. Whether you're a music enthusiast or a dedicated gamer, having headphones that are finely tuned can elevate your audio experience to new heights.
Creating the perfect audio setup is not just about plugging in your headphones and pressing play. It requires a comprehensive understanding of the different factors that contribute to the overall sound quality. By calibrating your audio settings and enhancing the performance of your headphones, you can truly unlock their untapped potential, immersing yourself in a world of pristine sound.
Now, you might be wondering, how can one achieve that level of audio bliss? Fear not, for in this article, we will delve into the art of configuring headphones, sharing tips and tricks that will help you unleash the true power of your audio devices. From adjusting equalizer settings to optimizing sound positioning, we will explore every aspect that can transform your audio experience from ordinary to extraordinary.
Pairing with a Wireless Device

In this section, we will explore the process of connecting headphones to a Bluetooth-enabled device. Creating a wireless connection between your headphones and a compatible device offers the convenience of tangle-free listening and freedom of movement.
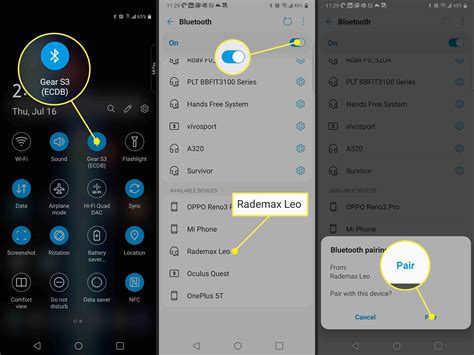
Before you begin, ensure that both your headphones and the Bluetooth device are charged and within close proximity. The specific steps for pairing may vary depending on the headphones and device models, but the general process remains similar. Here are the general steps to follow:
- Enable Bluetooth:
- Put Headphones in Pairing Mode:
- Search for Devices:
- Select Headphones:
- Confirm Pairing:
Activate the Bluetooth feature on your device by navigating to its settings menu. Look for the Bluetooth option and turn it on.
Most headphones have a dedicated pairing button or combination of buttons that need to be pressed to enter pairing mode. Refer to the headphone's user manual to identify the correct procedure for your specific model.
On your device, go to the Bluetooth settings menu and select the option to search for available devices. The device will scan for nearby Bluetooth devices, including your headphones.
Once the device discovers your headphones, they will appear in the list of available devices. Tap or click on the headphones' name to initiate the pairing process.
During the connection process, you may be prompted to confirm the pairing request on both the device and the headphones. Follow the on-screen instructions to complete the pairing.
After successful pairing, your headphones should be connected to the Bluetooth device, and you can start enjoying wireless audio playback. It's important to note that some headphones may allow you to pair with multiple devices simultaneously, while others require you to disconnect from one device before pairing with another.
Remember to consult the user manual of your specific headphones for detailed instructions, troubleshooting tips, and additional features that may enhance your wireless listening experience.
Connecting to a computer or laptop
A vital step in enjoying your audio experience is connecting your headphones to your computer or laptop. By establishing a seamless connection between your device and your headphones, you can immerse yourself in the world of crystal-clear sound and fully appreciate the richness of your favorite music or audio content.
Linking your headphones to a computer or laptop can be done through various methods:
1. Wired Connection: Utilize the provided audio cable to connect your headphones directly to the audio port on your computer or laptop. This traditional method ensures a stable connection and guarantees a reliable sound experience.
2. Wireless Connection via Bluetooth: If your headphones have Bluetooth capabilities and your computer or laptop supports this wireless technology, you can pair the devices effortlessly. Enable Bluetooth on your computer or laptop, activate pairing mode on your headphones, and establish the connection through the available device list.
3. Wireless Connection via USB Dongle: Some headphones come with a USB dongle that allows for wireless connectivity. Insert the dongle into an available USB port on your computer or laptop, follow the manufacturer's instructions for pairing, and enjoy a wire-free audio experience with your headphones.
4. Software Setup: Certain headphones require additional software or drivers to function optimally with your computer or laptop. Check the manufacturer's website for any necessary software downloads or installation instructions to ensure proper compatibility and performance.
Remember to consult the user manual that accompanies your headphones for detailed instructions specific to your model. Each headphone brand and model may have different procedures for establishing a connection with a computer or laptop, so it is essential to follow the provided guidelines.
By successfully connecting your headphones to your computer or laptop, you are paving the way for a personalized audio experience that suits your preferences and enhances your overall enjoyment.
Adjusting Volume and Audio Settings

Optimizing the sound output and audio controls are essential steps to enhance your listening experience with your personal sound devices.
Customizing Volume: Tuning the loudness of your audio is crucial to finding the perfect balance between quiet and loud environments. You can modify the intensity of the sound to match your preferences and avoid any potential discomfort or disturbance.
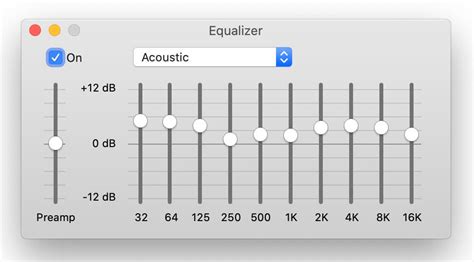
Managing Equalizer Settings: Fine-tuning the audio equalizer allows you to control the individual frequencies of the sound output. You can boost or lower specific frequency ranges to maximize the quality and clarity of the audio to suit different genres of music or optimize dialogue clarity in videos.
Balancing Stereo Sound: Adjusting the left-right balance on your headphones ensures that the audio is evenly distributed between the left and right channels. This adjustment can be beneficial for individuals with hearing imbalance or when the audio production requires more focus on one side.
Enabling Surround Sound: Some headphones offer virtual or actual surround sound capabilities, which enhance the spatial perception of the audio. Enabling this feature can provide a more immersive experience by simulating a multi-directional audio environment, showcasing the nuances and depth of the sound design.
Setting Sound Enhancements: Many audio devices come with additional sound enhancement features, such as bass boost or noise cancellation. These settings can be adjusted according to personal preferences to augment the audio quality or minimize external distractions for an uninterrupted listening experience.
Troubleshooting Connectivity Problems for Audio Devices
In this section, we will explore various common issues that may arise when trying to connect audio devices and provide troubleshooting steps to address them. Whether you are experiencing difficulty establishing a connection, facing intermittent disconnections, or encountering sound quality problems, this guide will help you identify and solve these issues.
- Check the cables and connectors: Ensure that all cables and connectors are securely connected to their respective ports. Inspect for any damages or loose connections that may impede proper audio transmission. If necessary, replace faulty cables or connectors.
- Verify device compatibility: Some audio devices may not be compatible with certain types of headphones. Consult the user manuals or manufacturer's website to confirm compatibility requirements.
- Update drivers and firmware: Outdated drivers or firmware can cause compatibility issues and affect audio performance. Check the manufacturer's website for any available updates and install them accordingly.
- Reset audio settings: Make sure the audio settings on your device are correctly configured. Adjust the volume levels, disable any unnecessary audio enhancements, and ensure the correct audio output device is selected.
- Test on different devices: Connect the headphones to multiple devices to determine if the issue persists across different platforms. This will help identify whether the problem lies with the headphones or the specific device being used.
- Adjust audio settings on the connected device: If using external audio devices such as TVs or computers, ensure that the audio output settings are configured correctly. Check the user manual for instructions on adjusting audio settings specific to your device.
- Scan for interference: Wireless headphones may encounter interference from other devices or wireless signals in the area. Move away from potential sources of interference such as Wi-Fi routers, cordless phones, or microwaves.
- Try a different audio source: If possible, test the headphones on a different audio source to determine if the issue is specific to the current source. This will help narrow down whether the problem lies with the headphones or the audio source.
- Reset or restart devices: Occasionally, a simple reset or restart can resolve connectivity issues. Power off all relevant devices, wait for a few seconds, and then power them back on.
- Seek professional assistance: If all else fails, and the problem persists despite troubleshooting attempts, it may be necessary to seek professional assistance. Contact the manufacturer's support or consult a technician who specializes in audio devices for further guidance.
Optimizing Audio Quality with Custom Equalizer Settings

In order to enhance your listening experience and tailor the sound output to your preferences, it is important to configure the equalizer settings on your audio device. By adjusting the equalizer, you can optimize the sound quality, making it more balanced and immersive.
When it comes to configuring equalizer settings, there are a few key factors to consider. Firstly, understanding the different frequency bands and their impact on the sound is crucial. Each frequency band corresponds to a specific range of sound, such as bass, mid-range, and treble. By adjusting the amplitude of these bands, you can either boost or attenuate certain frequencies, shaping the overall sound profile.
- Bass: By increasing the amplitude of the bass frequencies, you can add depth and richness to the low-end, resulting in a more powerful and dynamic audio experience.
- Mid-range: Adjusting the mid-range frequencies can have a significant impact on the clarity and presence of vocals and instrumentation. Boosting this range can make the sound fuller and more vibrant.
- Treble: Tweak the treble frequencies to enhance the high-end details and crispness of the sound. Increasing these frequencies can bring out finer nuances, such as cymbal crashes and vocal sibilance.
It is important to note that every individual's hearing preference may differ, and there is no one-size-fits-all equalizer setting. Experimenting with different combinations of amplitude adjustments is key to finding your ideal sound signature.
Moreover, some audio devices and applications offer pre-set equalizer profiles tailored for specific music genres or audio scenarios like movies or games. These presets can serve as a starting point and may provide a good foundation for further customization.
Remember that while equalizer settings can significantly improve sound quality, it is equally important to consider the quality of your audio source, headphones or speakers, and the environment in which you are listening. By combining all these elements, you can achieve an optimal sound experience that suits your preferences.
Personalizing controls and gestures on wireless earphones
In this section, we will explore ways to customize and personalize the various controls and gestures available on your wireless earphones. By tailoring these settings to your liking, you can enhance your overall listening experience and make the most out of your device.
Customizing Controls:
Wireless earphones often come with convenient control options that allow you to adjust the volume, play or pause music, skip tracks, and even answer calls. By personalizing these controls, you can optimize them to suit your preferences and specific usage patterns. Whether you prefer long or short presses, single or double taps, you can tailor the controls to match your needs.
Configuring Gestures:
In addition to controls, many wireless earphones offer various gesture-based features such as touch-sensitive surfaces or motion sensors. These gestures can enable you to perform actions like activating a voice assistant, adjusting the noise cancellation level, or even switching between different audio modes. By customizing these gestures, you can make your earphones more intuitive and responsive to your gestures.
Personal Profiles and Presets:
Some wireless earphones also provide the option to create personal profiles or presets. These profiles allow you to save your preferred audio settings, such as equalizer presets, volume levels, or ambient sound preferences. By creating and switching between multiple profiles, you can have different audio profiles for various activities or environments, ensuring that your earphones adapt seamlessly to your needs.
Third-Party Apps and Assistants:
For more advanced customization options, certain wireless earphones may offer compatibility with third-party apps or voice assistants. These apps enable you to access additional features and settings beyond what is available in the default software. Whether it is fine-tuning equalizer settings, creating custom gestures, or exploring advanced options, utilizing third-party apps or voice assistants can provide an even deeper level of personalization.
By taking full advantage of the customization options available, you can tailor your wireless earphones to match your unique preferences and improve your overall listening experience. Whether it is adjusting controls, configuring gestures, creating personal profiles, or exploring third-party options, personalization allows you to make your wireless earphones truly your own.
Extending Battery Life and Maintaining Sound Gadgets

In this section, we will explore strategies to enhance the lifespan of your audio accessories and ensure their optimal performance over time. By taking proper care and implementing a few key practices, you can effectively extend the battery life and maintain the overall quality of your headphones and other sound gadgets.
- 1. Proper Charging Routine
- 2. Managing Battery Usage
- 3. Storage and Protection
- 4. Cleaning and Maintenance
1. Proper Charging Routine
Establishing a consistent and appropriate charging routine for your headphones is crucial for maximizing their battery life. Avoid overcharging by disconnecting them from the power source once fully charged. Additionally, it is recommended to use the original charging cable and adapter supplied by the manufacturer to maintain compatibility.
2. Managing Battery Usage
Conserving battery life is essential for prolonged use. Optimize battery usage by reducing unnecessary features such as active noise cancellation or turning off Bluetooth when not in use. Lowering volume levels can also help extend battery life and maintain the sound quality of your headphones for longer periods.
3. Storage and Protection
Properly storing and protecting your headphones when not in use can significantly contribute to their longevity. Store them in a clean and dry environment to prevent dust and moisture accumulation. Utilize a protective case or pouch to shield your headphones from physical damage during transport or storage.
4. Cleaning and Maintenance
Regularly cleaning your headphones is crucial for maintaining their sound quality and overall performance. Use a soft, lint-free cloth to wipe away dirt and debris from the ear cups, headband, and cables. Avoid using harsh chemicals and ensure that your headphones are completely dry before use to prevent internal damage.
By implementing these practices and guidelines, you can effectively extend the battery life and ensure the longevity of your headphones, preserving their optimal sound quality and performance over time.
FAQ
How do I set up headphones if my device doesn't have a headphone jack?
If your device doesn't have a headphone jack, you can use a Bluetooth adapter or a USB-C to headphone jack adapter to connect your headphones wirelessly or through the USB-C port, respectively.
What should I do if my headphones are not producing any sound?
If your headphones are not producing any sound, there are a few troubleshooting steps you can try. First, make sure they are properly plugged in or connected wirelessly. Next, check if the volume on your device is turned up and not on mute. If these steps don't work, try using your headphones with a different device to see if the issue is with the headphones or the original device. If the problem persists, consider contacting the manufacturer for further assistance.


