How to Set Up Windows Boot from a Flash Drive

Are you tired of the traditional methods of starting your computer? Look no further, as we bring you an innovative way to kickstart your operating system. This step-by-step guide will unveil the secrets to launching your favorite Windows OS directly from a portable device.

Embark on a journey of convenience as we explore the possibilities of utilizing a USB flash drive for a hassle-free startup experience. Gone are the days of relying solely on your computer's hard drive, now you can harness the power of mobility and flexibility.

Discover the true potential of your system as we unlock the mysteries of this alternative booting process. No longer will you be confined to a single device or location–empower yourself with the freedom to access your Windows environment on any compatible computer.

Preparing the USB Flash Drive for Windows Boot
Preparing the USB Flash Drive for Windows Boot

Before you can start the process of booting Windows from a USB flash drive, it is crucial to properly prepare the flash drive. This involves a few important steps to ensure that the flash drive is formatted correctly and contains the necessary files to successfully initiate the booting process.

First, you need to select an appropriate USB flash drive: Choose a flash drive with sufficient storage capacity to accommodate the Windows operating system files and any additional software or drivers you may need. It is recommended to use a flash drive with at least 8 gigabytes (GB) of storage space.

Next, you should format the USB flash drive: Formatting will erase all existing data on the flash drive and prepare it for the Windows installation files. To format the flash drive, connect it to your computer and navigate to the "Disk Management" utility. Locate the flash drive, right-click on it, and select the "Format" option. Follow the on-screen instructions to complete the formatting process.

After formatting, you need to create a bootable USB: This involves copying the necessary Windows installation files onto the flash drive. To do this, you can use a software tool like Rufus, WinSetupFromUSB, or Windows USB/DVD Download Tool. Open the chosen tool and select the USB flash drive as the target device. Then, browse for the Windows ISO image file or insert the installation DVD and select the appropriate source. Follow the tool's instructions to create the bootable USB.

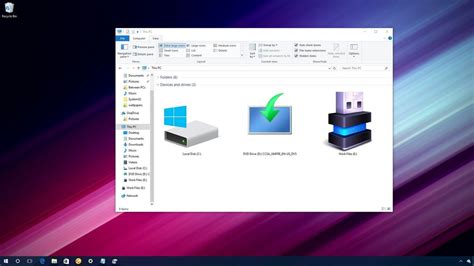
Finally, verify the bootable USB: Once the bootable USB is created, it is important to ensure that the files have been successfully copied and that the USB is ready for use. You can verify this by checking the contents of the USB drive and confirming that all the necessary Windows installation files are present. Additionally, double-check that the boot order in your computer's BIOS settings is configured to recognize the USB flash drive as a bootable device.

In conclusion, preparing the USB flash drive for Windows boot is an essential step in successfully installing Windows from a USB device. By selecting an appropriate flash drive, formatting it correctly, creating a bootable USB, and verifying its contents, you can ensure a smooth and efficient booting process.

Making the USB Flash Drive Bootable

In this section, we will explore the process of preparing your USB flash drive to function as a bootable device. By following these steps, you will be able to configure the necessary settings and ensure that the flash drive can initiate the startup process of your computer without relying on the internal hard drive.

1. Formatting the USB Flash Drive:

The first step is to format the USB flash drive so that it is compatible with the booting process. This involves erasing any existing data on the drive and configuring it to meet the specific requirements.

2. Creating a Bootable Partition:

Next, you will need to create a bootable partition on the flash drive. This partition will contain the necessary files and settings to initiate the boot process. It is crucial to follow the correct steps to ensure the partition is set up correctly and functions as intended.

3. Copying Bootable Files:

Once the bootable partition has been created, you will need to copy the required boot files to the flash drive. These files are essential for the computer to recognize the flash drive as a bootable device and configure the necessary settings to begin the startup process.

4. Configuring Boot Order:

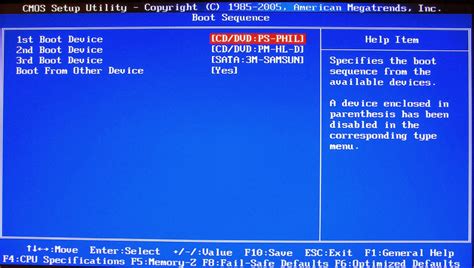
Finally, to successfully boot from the USB flash drive, you will need to configure the boot order settings in your computer's BIOS. This involves specifying that the USB flash drive should be prioritized over other devices during the startup process.

By following these steps, you can make your USB flash drive bootable and leverage its capabilities to initiate the Windows operating system installation or other tasks without relying on the internal hard drive of your computer.

Booting Windows Operating System Using a Portable Flash Storage
Booting Windows Operating System Using a Portable Flash Storage

Prepare to learn how to successfully initiate the Windows operating system by leveraging the convenience and portability of a USB flash drive. This section aims to provide you with a comprehensive step-by-step walkthrough on effortlessly launching the Windows OS using an easily transportable storage device.

  1. Acquire a suitable USB device(e.g., thumb drive, pen drive, or portable flash storage).
  2. Ensure the chosen USB flash drive possesses ample storage capacity and compatibility with the system requirements for your desired Windows version.
  3. Download the required Windows ISO image for installation. Extract the ISO file to access the necessary installation files.
  4. Insert the USB flash drive into an available USB port on your computer system.
  5. Open the Disk Management utility on your computer to format the USB drive and create a bootable partition.
  6. Format the USB drive by selecting the appropriate file system format(e.g., FAT32, exFAT, NTFS).
  7. Once the formatting process is complete, open the command prompt and run the DiskPart utility to make the USB drive bootable.
  8. Assign the USB drive a desired drive letter and label via the DiskPart utility.
  9. Copy the extracted Windows installation files to the root directory of the USB flash drive, ensuring all files and folders are correctly transferred.
  10. Eject the USB drive safely from your computer system to avoid damage or data corruption.
  11. Insert the bootable USB flash drive into the target computer you wish to install Windows on.
  12. Access the computer's BIOS or UEFI settings to prioritize booting from the USB drive.
  13. Save the changes made in the BIOS or UEFI settings and restart the computer to initiate the Windows installation process.
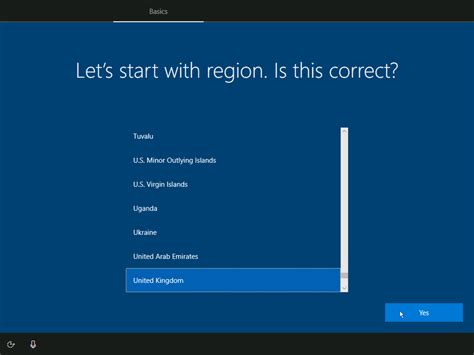
  14. Follow the on-screen instructions provided by the Windows installation wizard to complete the setup process.
  15. Once the installation is finished, remove the USB flash drive from the computer and reboot the system.
  16. Congratulations! You have successfully booted the Windows operating system using a USB flash drive.

By following these step-by-step instructions, you can take advantage of the flexibility and convenience offered by booting Windows from a USB flash drive, allowing you to install or troubleshoot the operating system on various systems easily.

Powerful DIY: Build Medicat Windows Rescue USB! Step By Step Tutorial 2023

Powerful DIY: Build Medicat Windows Rescue USB! Step By Step Tutorial 2023 by The IT-Unicorn 48,488 views 11 months ago 7 minutes, 49 seconds

FAQ

What is the advantage of booting Windows from a USB flash drive?

Booting Windows from a USB flash drive has several advantages. It allows you to carry your operating system with you wherever you go, making it convenient for troubleshooting or working on different computers. It also provides a portable and secure way to access your files and programs without relying on the computer's internal hard drive.

Can I use any USB flash drive to boot Windows?

No, not every USB flash drive can be used to boot Windows. To successfully boot Windows from a USB flash drive, it needs to meet certain requirements. It should have sufficient storage capacity, generally at least 16GB or more, and should be formatted to a compatible file system like FAT32 or NTFS. It's also important to make sure the USB flash drive is bootable, which means it can be used to start up a computer.

What software do I need to create a bootable USB flash drive for Windows?

To create a bootable USB flash drive for Windows, you will need a software tool that can properly format the USB drive and copy the necessary Windows installation files. There are several popular tools available, such as Rufus, UNetbootin, and Windows USB/DVD Download Tool. These tools are easy to use and usually provide step-by-step instructions to guide you through the process.

Can I use a Mac computer to create a bootable USB flash drive for Windows?

Yes, you can use a Mac computer to create a bootable USB flash drive for Windows. Although the process may vary slightly from using a Windows computer, there are software tools available for Mac that can perform the same task. For example, tools like Etcher or Boot Camp Assistant can help you format the USB drive and create a bootable Windows installation.

Is it possible to boot Windows from a USB flash drive on any computer?

In most cases, yes, it is possible to boot Windows from a USB flash drive on any computer. However, there are a few factors to consider. Firstly, the computer's BIOS or UEFI settings must support booting from USB devices. Secondly, the USB flash drive should be properly recognized by the computer's hardware. If these conditions are met, you can usually boot Windows from a USB flash drive on any compatible computer.
Rate article
Bio-Famous.com
Add a comment

How to Set Up Windows Boot From a Flash Drive

In this comprehensive guide, we will unveil a simple yet effective method to set up your personal computer to launch its operating system using an external storage device. By following our step-by-step instructions, you will gain the knowledge and confidence necessary to maneuver this seamless process without any technical hurdles or complications.

Discover how to conveniently establish a connection between your computing machine and a compact, portable gadget, enabling you to eliminate the dependency on traditional booting procedures. Harness the power of your USB flash drive or any other similar device to transform the way your computer starts up, providing you with the flexibility and convenience you have always desired.

Throughout this expertly crafted article, we will walk you through the entirety of the configuration process, ensuring that you comprehend each critical step involved. No longer will you be constrained by the confines of a fixed internal hard disk to load your operating system. Equip yourself with the necessary knowledge to harness the potential of external storage, empowering you to gain control over your computer's booting mechanism.

Creating a Bootable Device: A Step-by-Step Guide

Creating a Bootable Device: A Step-by-Step Guide

In this section, we will walk you through the process of setting up a device that allows you to start your computer using an external storage device.

  • Step 1: Selecting the desired method
  • Step 2: Choosing an appropriate storage medium
  • Step 3: Preparing the external device
  • Step 4: Configuring the BIOS settings
  • Step 5: Booting up from the USB drive

By following these steps, you'll be able to effectively boot your computer using a USB flash drive, allowing for easy installation or troubleshooting of your Windows system.

Overview: Advantages of Running Windows from a Portable Storage Device

When it comes to optimizing your computing experience, having the ability to operate Windows directly from a portable storage device can be a game-changer. This innovative approach offers unparalleled convenience, flexibility, and security for users who are constantly on the move or seeking a reliable backup solution. By leveraging the power of a USB flash drive or similar external storage medium, Windows can be seamlessly booted and accessed from any compatible device, eliminating the need for a fixed installation on a computer's internal hard drive.

Preparing the Portable Storage Device for Windows Startup

Preparing the Portable Storage Device for Windows Startup

When setting up your portable storage device to enable Windows Startup, there are a few essential steps you need to follow. These actions will ensure that your storage device is properly configured and ready for use.

  • 1. Formatting the Portable Storage Device:
  • 2. Creating a Bootable USB Solution:
  • 3. Selecting the Correct Windows Boot Image:
  • 4. Copying the Necessary Files:
  • 5. Verifying the Bootable USB Drive:

In order to prepare your portable storage device for Windows Startup, it is important to format the device correctly. This involves erasing any existing data and adjusting the filesystem to meet the requirements of the Windows operating system.

After formatting, you will need to create a bootable USB solution. This process involves installing the necessary boot files onto the storage device, allowing it to initiate the Windows Startup process. It is crucial to select the appropriate boot image to ensure compatibility with your system.

Once the bootable USB solution is created, it is essential to copy the required files onto the storage device. These files consist of the Windows operating system files and any additional drivers or software that may be needed during startup.

Finally, it is crucial to verify the bootable USB drive before attempting to use it for Windows Startup. This involves checking the integrity of the files and ensuring that the device is properly recognized by the system.

Creating a Portable Disk with Windows Install Files for Booting Purposes

One of the essential steps in configuring a system is to establish a mobile storage device that contains all the necessary Windows installation files. This disk enables users to easily boot and install Windows on their computers without the need for a physical disk. In this section, we will explore the process of creating an easily portable USB flash drive that is equipped with the required Windows installation files.

Modifying the Sequence of Booting in BIOS to Prioritize USB Startup

Modifying the Sequence of Booting in BIOS to Prioritize USB Startup

In order to configure your computer to boot from a USB device, it is imperative to adjust the booting order within the BIOS settings. By rearranging the boot order, you can ensure that the USB port is given priority over other bootable options.

To start the process, access the BIOS menu by restarting your system and pressing the designated key, which may vary depending on your computer's manufacturer. This will grant you access to a range of settings, including the boot order configuration.

Once you are within the BIOS settings, locate the boot menu or boot options section. Within this section, you will find a list of devices and their current booting order. Here, you can modify the priority by either rearranging the sequence or selecting the USB device specifically.

To change the boot order, simply move the USB device to the top of the list or select it as the first boot option. This will instruct your computer to check for bootable files on the USB device before moving on to other options.

After making the necessary adjustments, save the changes and exit the BIOS menu. Your computer will now prioritize booting from the USB device whenever it is connected during the startup process.

It is important to note that the steps outlined above may vary slightly depending on your computer's BIOS version and manufacturer. Therefore, it is recommended to consult your computer's user manual or the manufacturer's website for specific instructions tailored to your system.

Starting the Installation of the Windows Operating System Using a Portable Storage Device

In this section, we will explore the process of initiating the installation of the Windows operating system by utilizing a portable storage device. By following these steps, you can easily begin the installation procedure without the need for traditional installation media.

  • Prepare the USB device: Format the portable storage device and ensure that it is in the correct file system format for the Windows operating system installation.
  • Create a bootable USB: Use specialized software to create a bootable USB device, which will allow you to start the installation process.
  • Change the boot order: Adjust the boot order settings in the computer's BIOS or UEFI to prioritize booting from the USB device.
  • Connect the USB device: Insert the USB device into the appropriate USB port on your computer.
  • Restart the computer: Restart your computer and wait for the boot menu to appear.
  • Select the USB device: From the boot menu, choose the USB device as the primary boot option.
  • Begin the installation: Follow the on-screen prompts to start the installation process of the Windows operating system from the USB device.

By following these steps, you can easily initiate the installation of the Windows operating system using a portable storage device. This method provides a convenient and efficient way to install Windows without the need for traditional installation media.

Completing the Windows Installation and Initial Startup

Completing the Windows Installation and Initial Startup

Once the setup process and necessary configurations have been accomplished, it is time to proceed to the final steps of installing Windows and starting up the system for the first time.

During this phase, the user will finalize the installation by performing essential tasks that include setting up user accounts, configuring system preferences, and installing any required drivers.

Upon completion of these steps, the system will be ready to boot into the Windows operating system. The initial startup provides an opportunity for the user to familiarize themselves with the new environment and customize various settings to suit their preferences.

It is crucial for the user to ensure that all necessary updates and security patches are installed to guarantee optimum performance and address any known vulnerabilities.

Furthermore, this phase also marks the point at which the user can install essential software applications and transfer personal files to the newly installed Windows system.

By carefully completing these final steps, the user can enjoy a seamless and efficient Windows experience, tailored to their needs and preferences.

Troubleshooting: Common Issues and Solutions

In this section, we will address common problems that may arise when attempting to configure the operating system to start up using a portable storage device. We will provide solutions and suggestions for overcoming these challenges, allowing you to successfully utilize alternative methods for launching your computer.

  • The device is not recognized by the computer:
  • Ensure that the portable drive is properly connected to the system and try using different USB ports. Additionally, check if the device drivers are up to date, as outdated drivers can cause compatibility issues.

  • The computer does not boot from the USB drive:
  • Firstly, verify that the BIOS settings have been correctly modified to prioritize the USB boot option. If the issue persists, explore the option of disabling Secure Boot or enabling Legacy Boot mode in the BIOS settings. It is also recommended to try using a different USB drive or recreating the bootable USB media.

  • Error messages during the boot process:
  • Common error messages like "Invalid system disk" or "No bootable device" often indicate that the USB drive was not properly created or the boot files are corrupt. To resolve this, recreate the bootable USB drive using a reliable tool and ensure that the appropriate boot files are present.

  • The operating system installation fails:
  • If the installation process encounters errors or fails to complete, verify the integrity of the installation files and try using a different USB drive or source to create the bootable media. You can also attempt to install the operating system on another computer to determine if the issue lies with the computer hardware.

By following the troubleshooting steps mentioned above, you can address common issues encountered when setting up the computer to boot from a USB flash drive. These solutions will assist you in overcoming obstacles and ensure a smooth startup process, enabling you to enjoy the benefits of using a portable storage device for booting your system.

FAQ

How can I setup Windows boot using a USB flash drive?

In order to setup Windows boot from a USB flash drive, you will need to modify the boot order in your computer's BIOS settings and create a bootable USB using Windows Media Creation Tool or Rufus.

What is the benefit of booting Windows from a USB flash drive?

Booting Windows from a USB flash drive allows you to carry your operating system wherever you go and use it on any computer. It can also come in handy when you need to troubleshoot or repair your computer's operating system.

Can I use any USB flash drive to setup Windows boot?

Yes, you can use any USB flash drive that meets the minimum storage requirements for Windows installation. Typically, a USB flash drive with at least 8GB of storage space is recommended.

Are there any risks involved in setting up Windows boot from a USB flash drive?

There are minimal risks involved in setting up Windows boot from a USB flash drive. However, it is important to ensure that you have a reliable and secure USB flash drive, and that you follow the instructions carefully to avoid any potential data loss or system issues.

Is it possible to revert back to booting Windows from my computer's internal hard drive after setting up Windows boot from a USB flash drive?

Yes, it is possible to revert back to booting Windows from your computer's internal hard drive. You can simply change the boot order in the BIOS settings to prioritize the internal hard drive over the USB flash drive.
Rate article
Bio-Famous.com
Add a comment