Modern laptops are often equipped with a variety of ports and connectors, providing users with the ability to connect different devices and peripherals. One common challenge users face is figuring out how to connect headphones with a built-in microphone to a laptop that features two separate audio jacks.
This article aims to guide you through the process of setting up your headset with a microphone on a laptop equipped with dual audio ports. It will provide you with step-by-step instructions, ensuring a successful and hassle-free connection.
Whether you're a gaming enthusiast, a remote worker, or simply someone who enjoys listening to music, having the ability to connect your headphones with a built-in microphone is essential. By following the instructions below, you'll be able to make the most out of your headset's capabilities and enjoy a seamless audio experience.
Understanding the Different Types of Audio Jacks on a Laptop

In the realm of laptop audio connections, it is crucial to grasp the distinctions between various types of audio jacks. Familiarizing yourself with these differences enables you to select the appropriate audio jack for your headphones or other audio devices, ensuring seamless connectivity and optimal audio performance.
1. 3.5mm TRS Jack: This is the most commonly used audio jack found on laptops. It features three separate sections, namely the tip, ring, and sleeve. The tip carries the left audio channel, the ring handles the right audio channel, and the sleeve serves as the ground connection.
2. 3.5mm TRRS Jack: Often referred to as a “four-pole” jack, the TRRS jack contains an additional ring segment, making it compatible with devices that feature both audio output and input capabilities, such as headphones with built-in microphones.
3. 6.35mm Jack: Also known as the “quarter-inch” jack, the 6.35mm audio jack is commonly used in professional audio equipment. It is larger than the 3.5mm jacks and is typically found in audio interfaces or studio-grade headphones.
4. USB Audio: Some laptops offer USB audio connectivity, which allows for the use of USB headphones or external audio devices. USB audio provides a digital connection, resulting in potentially better audio quality compared to analog jacks.
5. HDMI Audio: Although primarily used for video transmission, HDMI also carries audio signals. Some laptops may feature an HDMI port that enables the connection of external devices, such as speakers or monitors with built-in speakers, to deliver audio output.
By understanding the different types of audio jacks on a laptop, you can determine the compatibility requirements of your audio devices and select the appropriate jack for an optimal audio experience.
Identifying the Audio Ports on Your Laptop
When it comes to connecting headphones with a microphone to your laptop, it's essential to be familiar with the audio ports available. These ports are used to connect your headphones and microphone to the laptop, allowing you to enjoy audio and communicate with others effectively. Understanding the different types of audio jacks on your laptop is crucial in ensuring successful setup.
| Port | Description |
|---|---|
| Headphone Jack | The headphone jack, also known as the audio or headphone out port, is used for connecting headphones or external speakers to your laptop. This port allows you to listen to audio output from your laptop. |
| Microphone Jack | The microphone jack, also known as the audio in port, is used for connecting an external microphone to your laptop. This port enables you to record audio or engage in voice communication. |
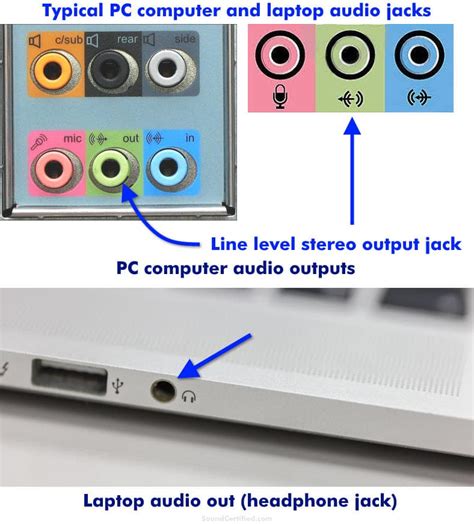
Identifying these audio ports on your laptop might vary depending on the make and model. Most laptops feature separate jacks for headphones and microphones. However, some laptops may have a combined audio jack that supports both headphones and microphones. It's essential to determine which type of audio port your laptop has in order to proceed with the setup process.
Locating the audio ports on your laptop can be relatively straightforward. Look for small round or square-shaped ports on the sides or front panel of your laptop. These ports are typically labeled with icons representing headphones or microphones. Additionally, you may find color-coded ports, where the green port indicates the headphone jack, and the pink port represents the microphone jack.
Once you have identified the headphone and microphone jacks on your laptop, you can proceed with connecting your headphones with a microphone accordingly. Whether you have separate audio jacks or a combined one, understanding the ports' functionality is essential for successful setup and optimal audio experience.
Choosing the Ideal Headset with Built-in Microphone for Optimal Laptop Compatibility

When it comes to finding the perfect audio accessory to enhance your laptop experience, selecting the right headset with a microphone is crucial. A well-suited headset with a built-in microphone can greatly enhance your communication capabilities, multimedia enjoyment, and overall productivity. In this section, we will explore the key considerations to keep in mind while choosing a compatible headset for your laptop.
1. Functionality: Select a headset that offers a seamless integration of both audio and microphone functions, enabling you to effortlessly switch between listening to your favorite tunes and engaging in crystal-clear conversations or video conferences. Ensure that the headset is equipped with a microphone that has excellent noise-cancellation capabilities for clearer audio transmission.
2. Connector Type: Determine the type of audio jack on your laptop. Most laptops today come with either a single 3.5mm audio jack or separate jacks for audio output and microphone input. Verify whether your chosen headset has the appropriate connector to match your laptop's audio jack configuration.
3. Wired or Wireless: Consider whether you prefer a wired or wireless headset. Wired headsets are typically more affordable, offer excellent audio quality, and don't require charging. However, if you prioritize mobility and freedom of movement, a wireless headset would be a more suitable choice, provided your laptop supports Bluetooth connectivity.
4. Comfort and Design: Since you may be using your headset for extended periods, prioritizing comfort is essential. Look for a lightweight and adjustable design that fits snugly over your ears without exerting excessive pressure. Additionally, consider the build quality and durability of the headset to ensure it can withstand everyday wear and tear.
5. Brand and Reviews: Research various brands and read customer reviews to gain insights into the overall performance and reliability of different headset models. Opting for reputable brands with positive reviews can increase the likelihood of a satisfactory user experience.
By carefully considering these factors, you can confidently choose a headset with a built-in microphone that seamlessly integrates with your laptop's audio capabilities, allowing you to enjoy enhanced audio quality and efficient communication.
Connecting your Headset to your Laptop
In this section, we will explore the process of connecting your headset to your laptop. Whether you are using it for gaming, virtual meetings, or simply to enjoy some music, ensuring a proper connection is essential for optimal performance. We will guide you through the steps, providing you with a seamless experience.
- Identify the audio jacks on your laptop
- Insert the audio and microphone connectors of your headset into the respective jacks
- Ensure the connectors are securely inserted
- Adjust the headphone and microphone settings on your laptop
- Test the headset to ensure proper functionality
Before starting the process, it is crucial to identify the audio jacks on your laptop. These jacks come in various shapes and colors, distinguishing them from each other. The headphone jack is commonly green and is used for audio output, while the microphone jack is usually pink and is used for audio input. Locate these jacks on your laptop.
Once you have identified the jacks, insert the audio and microphone connectors of your headset into the respective jacks. Make sure you insert them all the way into the jacks to establish a proper connection. Check for any resistance or loose connections.
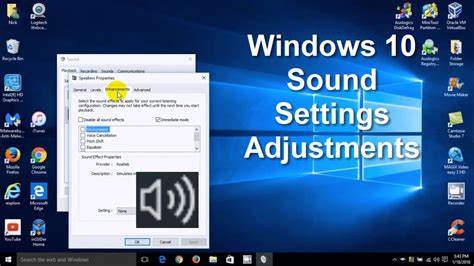
After inserting the connectors, adjust the headphone and microphone settings on your laptop. Access the sound settings menu and ensure that the correct audio input and output devices are selected. Adjust the volume levels and any additional settings to your preference.
Finally, test your headset to ensure proper functionality. Play some audio or record your voice to verify that the sound is coming through the headphones and the microphone is capturing your voice accurately. Make any necessary adjustments until you are satisfied with the results.
By following these steps, you will successfully connect your headset to your laptop, allowing you to enjoy music, communicate with others, or immerse yourself in your favorite games with enhanced audio quality.
Adjusting the Audio Settings on Your Laptop

In this section, we will explore the various steps involved in customizing the sound settings on your laptop to enhance your audio experience. By making adjustments to the audio settings, you can optimize the sound quality and ensure that it meets your preferences and requirements.
1. Volume Control: The volume control setting allows you to adjust the overall audio output of your laptop. You can increase or decrease the volume level using the volume control buttons or slider. It is essential to find a suitable volume level that is comfortable for you and provides clear and audible sound.
2. Equalizer: The equalizer setting enables you to modify the audio frequencies to suit your taste. By adjusting the equalizer, you can enhance specific elements of the sound, such as bass or treble, and create a more personalized audio profile. Experiment with different equalizer presets or customize the settings according to your preferences.
3. Sound Effects: Many laptops offer sound effects options that allow you to enhance the audio output for specific scenarios. These effects may include presets like "music," "movie," or "gaming," which are designed to optimize the sound for different types of media. Explore these options to find the sound effect that suits the content you are consuming.
4. Audio Enhancements: Some laptops provide additional audio enhancement features like virtual surround sound or noise cancellation. These enhancements are designed to provide a more immersive and superior audio experience. Enable or adjust these enhancements based on the content you are listening to and your personal preferences.
5. Communication: If you plan to use headphones with a microphone for video calls or online gaming, it is crucial to check the communication settings on your laptop. Ensure that the correct audio input and output devices are selected to ensure proper communication and clear audio transmission.
6. Test and Adjust: After making any changes to the audio settings, it is advisable to test the output using different media types to gauge the impact of your adjustments. Fine-tune the settings further if necessary to achieve the desired audio quality. Remember to consider the limitations of your laptop's audio hardware when making adjustments.
By following these steps and exploring the various audio settings on your laptop, you can optimize the sound quality and tailor it to your liking. Experiment with different configurations and enjoy an enhanced audio experience while using your headphones with a microphone on a laptop with two audio jacks.
Troubleshooting Common Issues with Headsets and Microphones
When using headsets and microphones on your laptop, you may encounter various issues that can hinder your communication or audio experience. In this section, we will discuss some common problems that users often face and provide troubleshooting tips to help you resolve them.
1. No sound or microphone not working: If you are not getting any audio output or your microphone is not picking up any sound, there are a few possible causes. First, check if the volume is turned up and not muted. Ensure that your headphones and microphone are securely plugged into the correct audio jacks. You may also need to update your audio drivers or check the audio settings on your laptop.
2. Poor audio quality: If you are experiencing distorted or low-quality audio while using your headphones and microphone, try adjusting the audio settings on your laptop. You can also check for any physical damage to the headphone or microphone cables that might be affecting the audio quality. Additionally, using a separate audio interface or external sound card can sometimes improve the audio performance.
3. Echo or feedback: Hearing an echo or experiencing feedback during calls or recordings can be frustrating. One possible reason could be that the microphone is too close to the speakers or that the volume is too high. Adjusting the microphone sensitivity or moving it further away from the speakers can help resolve this issue. You can also try using headphones with better noise-canceling capabilities.
4. Compatibility issues: Not all headsets and microphones are compatible with every laptop or operating system. Before purchasing a new headset or microphone, ensure that it is compatible with your specific laptop and operating system. Additionally, check for any software updates or drivers that may be required for proper functionality.
5. Physical damage: If your headphones or microphone are not working despite troubleshooting, there may be physical damage to the cables or connectors. Inspect the cables for any visible signs of damage, such as frayed wires or bent connectors. If necessary, consider replacing the damaged cables or seeking professional assistance.
By following these troubleshooting tips, you can effectively resolve common issues that may arise while using headphones and microphones on your laptop. Remember to always refer to the user manual or contact the manufacturer for specific troubleshooting instructions related to your particular headset and microphone model.
Configuring Sound Preferences for Headphone and Microphone on Windows

In this section, we will explore the process of adjusting the sound preferences on a Windows computer to optimize the performance of headphones and microphone. By configuring the sound settings properly, you can enhance the audio experience and ensure clear and accurate communication through the microphone.
Configuring sound preferences involves customizing various settings such as audio output, input, and volume levels. These settings can be accessed through the sound control panel or sound settings in the Windows operating system. By making the right adjustments, you can achieve a balanced and immersive audio experience while using headphones and ensure that your microphone is working optimally for seamless communication.
One of the important settings to consider is configuring the audio output. This involves selecting the appropriate playback device or headphones to ensure that the audio is directed to the desired output source. By choosing the correct output device, you can avoid audio playing through speakers instead of headphones and enjoy a more personalized listening experience.
Furthermore, adjusting the input settings is crucial to optimize the performance of the microphone. You can select the microphone or recording device from the available options and make necessary adjustments to the microphone volume and sensitivity. Properly configuring the input settings can significantly enhance the clarity and quality of your voice during voice calls, online meetings, or gaming sessions.
Additionally, it is essential to check the sound levels and ensure that they are set appropriately for headphones and microphone. You can adjust the volume levels to your desired preference to avoid discomfort or audio distortion. It is also recommended to perform a test recording or microphone check to verify the sound quality and make any further adjustments if necessary.
In summary, configuring the sound preferences on a Windows computer plays a crucial role in optimizing the performance of headphones and microphone. By customizing the audio output, input settings, and volume levels, you can enhance the audio experience and ensure clear communication. Following the steps mentioned in this section will help you set up the sound preferences effectively and enjoy a personalized and immersive audio experience.
Configuring Sound Preferences on Mac OS for Headphone and Microphone
In this section, we will explore the steps to customize the sound settings on a Mac OS computer to ensure optimal performance and compatibility for headphones and microphones. By adjusting these preferences, you can enhance your audio experience and make seamless use of your headphone and microphone devices without encountering any issues.
Step 1: Access Sound Preferences
Start by accessing the Sound preferences on your Mac OS computer. You can do this by clicking on the Apple menu in the top-left corner of your screen and selecting "System Preferences." From the System Preferences window, choose the "Sound" option.
Step 2: Select Output and Input Devices
Within the Sound preferences window, navigate to the "Output" tab to configure the settings for your headphones. Identify your headphone device from the list of available options and select it as the default output device. This will ensure that the audio output is directed to your headphones rather than the built-in speakers.
To configure the settings for your microphone, switch to the "Input" tab. Locate your microphone device from the list and set it as the default input device. This will enable your computer to recognize and utilize the microphone for audio input.
Step 3: Adjust Volume and Balance
To optimize the audio volume, utilize the "Output volume" slider under the Output tab. Adjust the slider to reach a comfortable listening level while testing it with an audio source.
For maintaining the right balance between the left and right audio channels, use the "Balance" slider present under the "Output" tab. Slide it to the preferred position to achieve an even distribution of audio between the left and right sides of your headphones.
Step 4: Enhance Audio Quality
If you want to enhance the audio quality of your headphones further, consider exploring additional sound settings and options available in the Sound preferences. This includes adjusting the equalizer settings, enabling sound effects, or configuring any available audio enhancements.
By following these steps, you can easily configure your sound preferences on Mac OS for optimum performance of your headphones and microphone. Enjoy an immersive audio experience and clear communication during your digital activities!
[MOVIES] [/MOVIES] [/MOVIES_ENABLED]FAQ
Can I use headphones with a microphone on a laptop with two audio jacks?
Yes, you can use headphones with a microphone on a laptop with two audio jacks. However, you would need to make sure that you have the appropriate connectors to plug in both the headphone and microphone jacks.
What do I need to set up headphones with a microphone on a laptop with two audio jacks?
To set up headphones with a microphone on a laptop with two audio jacks, you would need a headset that has separate connectors for the headphone and microphone. You may also need an adapter or splitter if your laptop has a different audio jack configuration.
Do I need any additional software to set up headphones with a microphone on a laptop with two audio jacks?
In most cases, you do not need any additional software to set up headphones with a microphone on a laptop with two audio jacks. The laptop's operating system should be able to recognize the headphone and microphone inputs automatically. However, you may need to adjust the audio settings in your operating system to ensure that the correct input and output devices are selected.
Is it possible to use headphones with a microphone on a laptop with only one audio jack?
If your laptop has only one audio jack, it may be possible to use headphones with a microphone by using a headset that has a combined headphone and microphone connector. Alternatively, you can use a USB headset or an audio adapter that splits the combined jack into separate headphone and microphone jacks.


