So, the time has come to bid farewell to your beloved technological companion. Whether you're upgrading to the latest cutting-edge device or simply moving on to different horizons, it's crucial to ensure that your trusty iPhone is prepared for its new owner. After all, a well-prepared device not only guarantees a smooth transition but also enhances its resale value.
Giving attention to every detail, you need to go beyond simply erasing your personal data. With an array of sensitive information stored on your phone and countless apps tailored to your preferences, it’s imperative to dig deeper and clean the device on a fundamental level.
Think of it as hitting the reset button, but with an added layer of security. By wiping out every trace of personalization, you give your iPhone a fresh start while safeguarding your privacy. After all, wouldn't you want a little peace of mind before passing your device into the hands of another?
Erase your personal data

Safeguard your valuable information and protect your privacy by securely erasing all personal data from your device before selling it or passing it on to someone else. Taking the time to wipe your iPhone clean ensures that your personal information remains confidential and reduces the risk of unauthorized access to your data.
1. Back up your data: Before erasing your iPhone, make sure to back up all your important files, photos, contacts, and app data. You can use iCloud or iTunes to create a backup.
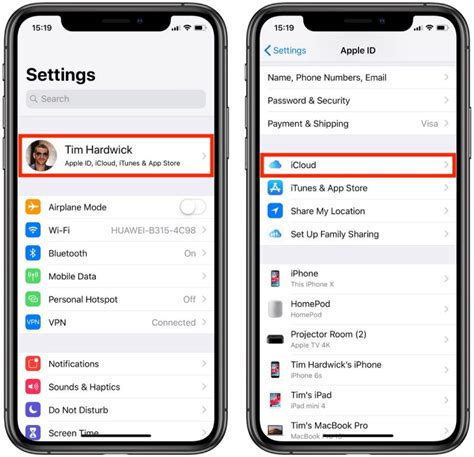
2. Sign out of iCloud and other accounts: To dissociate your iPhone from your iCloud account, go to "Settings," tap on your name, and select "Sign Out." Don't forget to sign out of other accounts like iTunes, App Store, and any other services that may be linked to your device.
3. Disable Find My iPhone: To prevent potential difficulties for the new owner, disable the "Find My iPhone" feature. Head to "Settings," tap your name, select "Find My," and turn off "Find My iPhone."
4. Reset your iPhone to factory settings: Go to "Settings," tap "General," and select "Reset." Choose "Erase All Content and Settings" to initiate the process of restoring your iPhone to its original factory settings.
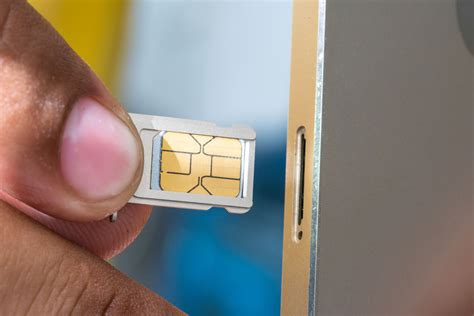
5. Remove your SIM card: Don't forget to remove your SIM card from the iPhone before handing it over. The SIM card contains personal information and should be kept secure or properly disposed of.
6. Perform a final check: Ensure that all your personal data has been completely erased by going through your iPhone's settings and storage. Confirm that no traces of your data remain and that everything is in its default state.
By following these steps, you can confidently sell or pass on your iPhone, knowing that your personal data is protected and your device is ready for a fresh start.
Secure Your Valuable Data
Ensure the safety of your precious information by backing up your essential files before transferring ownership of your smartphone. Taking this precautionary step will allow you to preserve all your significant data securely.
Protecting your valuable files is crucial when preparing your device for sale. By creating a backup, you can safeguard your important data, including photos, videos, contacts, and documents. Backing up your content will provide you peace of mind, knowing that your memories and essential information will not be lost during the transition.
There are various methods for backing up your files, such as using cloud-based storage solutions like iCloud or Google Drive, or connecting your device to a computer and utilizing software like iTunes or Finder. Whichever method you choose, ensure that the backup process is completed successfully and that you have verified the presence of all your data.
Before proceeding with the sale of your iPhone, take some time to organize your content, deleting any unnecessary files and ensuring that everything you wish to keep is included in the backup. This will help streamline the process, making it easier to transfer your data to your new device or to provide a clean slate for the next owner.
Remember, backing up your important files is an essential step in preparing your iPhone for sale. By taking the time to secure your valuable data, you can ensure a smooth transition and avoid the loss of any irreplaceable information. Investing a little effort upfront will greatly benefit you in the long run.
Removing your SIM card

When preparing your device for sale, one important step is to remove the SIM card. The SIM card, also known as a subscriber identity module, is a small card that stores your unique information and allows your phone to connect to a cellular network.
Removing the SIM card ensures that your personal information and data are not accessible to the buyer. It also allows you to use the SIM card in a new device or transfer it to another person if needed.
To remove the SIM card from your device, follow these steps:
| Step 1: | Locate the SIM card slot on your device. It is usually located on the side or top of the phone, depending on the model. |
| Step 2: | Use a SIM card ejector tool or a small paperclip to gently push the SIM card tray out of the device. Insert the tool into the small hole next to the SIM card slot and apply slight pressure. |
| Step 3: | Once the tray is ejected, carefully remove the SIM card from the tray. Be cautious not to damage the card or the tray. |
| Step 4: | If desired, you can clean the SIM card and tray with a soft, lint-free cloth to remove any dust or debris. This will ensure a proper connection when the SIM card is inserted into another device. |
| Step 5: | Keep the SIM card in a safe place or insert it into your new device if you have one. Make sure to store it in a secure location to prevent loss or damage. |
Remember, removing the SIM card is an important step in preparing your device for sale. By taking this precautionary measure, you can protect your personal information and ensure a smooth transfer of your SIM card to another device if needed.
Unlink the device from your Apple ID
Detaching your device from your Apple ID is an essential step when preparing your iPhone to be sold. By unlinking your device, you ensure that the new owner can set it up with their own Apple ID and have full control over the device. This process entails disconnecting your device from iCloud, removing it from the Find My app, and signing out of your Apple ID on the device.
Disconnect from iCloud: Begin by opening the Settings app on your iPhone and tapping the name at the top. Scroll down and select "iCloud." In the following menu, locate and tap "Sign Out" at the bottom. Confirm this action by entering your Apple ID password. By disconnecting from iCloud, you disable access to features such as iCloud Drive, iCloud Photos, and iCloud backups.
Remove from the Find My app: After signing out of iCloud, return to the main Settings menu. Scroll down and tap "Find My." Here, toggle off "Find My iPhone" to disable the device's location tracking and remote erase capabilities. You may be prompted to enter your Apple ID password again for security verification.
Sign out of your Apple ID: To complete the unlinking process, go back to the main Settings menu and select "iTunes & App Store." Tap your Apple ID at the top and then choose "Sign Out" from the pop-up menu. Confirm the action by entering your Apple ID password once more. This step ensures that the new owner will not have access to your Apple ID and associated services.
By following these steps to unlink your device from your Apple ID, you can sell your iPhone with peace of mind, knowing that your personal information is removed, and the new owner can set up their own Apple ID. Remember to erase all data and settings from your device before selling it to protect your privacy further.
Disable Find My iPhone

Ensure the security of your device by deactivating the Find My iPhone feature before selling it. By disabling this feature, you can prevent unauthorized access to your personal information and allow the new owner to set up their own iCloud account.
Step 1: Launch the Settings app on your device.
Step 2: Scroll down and tap on your Apple ID, displayed at the top of the menu.
Step 3: Select "Find My" from the list of options.
Step 4: Tap on "Find My iPhone" to access its settings.
Step 5: Toggle off the switch next to "Find My iPhone".
Step 6: You will be prompted to enter your Apple ID password. Provide the required information to confirm the action.
Step 7: Once the feature is disabled, a confirmation message will appear on the screen.
Note: It is important to disable Find My iPhone before resetting your device to its factory settings. This ensures that the activation lock is removed, allowing the new owner to use the device without any issues.
By following these simple steps, you can easily disable Find My iPhone and ensure a smooth transition of ownership without compromising your personal data.
Factory Resetting your iPhone: Ensuring Privacy and Optimal Performance
Protecting your personal data and maintaining your iPhone's performance are crucial aspects when preparing it for sale. Factory resetting your iPhone is an essential step that ensures all your personal information is completely removed, making it ready for a new owner. By performing a factory reset, you can also optimize your iPhone's performance, allowing it to function as smoothly as possible. This section will guide you through the process of securely resetting your iPhone, granting you peace of mind and ensuring a seamless transition to its new user.
To initiate the factory reset process, follow the steps below:
- Backup your data: Before proceeding with the factory reset, it is essential to back up all your important data such as photos, videos, contacts, and documents. This ensures you do not lose any valuable information that you may need in the future.
- Disable Find My iPhone: It is crucial to disable the Find My iPhone feature to prevent any complications during the factory reset process. This feature ensures your iPhone remains secure and can be tracked in case of loss or theft. Visit the iCloud settings on your iPhone and disable the Find My iPhone feature.
- Erase all content and settings: Open the Settings app on your iPhone and navigate to the "General" tab. Scroll down and select "Reset." From the available options, choose "Erase All Content and Settings." A confirmation prompt will appear, and upon verification, all your personal data, settings, and applications will be permanently removed from the device.
- Set up as a new iPhone: After the factory reset is complete, your iPhone will initiate the setup process. Follow the on-screen instructions to set it up as a new iPhone. This includes connecting to a Wi-Fi network, signing in with your Apple ID, and customizing settings according to your preferences.
- Additional considerations: Before selling your iPhone, it is crucial to remove the device from your Apple ID account. Sign out of iCloud, iTunes, and the App Store by navigating to the "Settings" app, tapping on your name, and selecting "Sign Out." Additionally, it is advisable to remove the SIM card, clear any fingerprints or Face ID data, and thoroughly clean the device for a presentable appearance.
By following these steps, you can securely factory reset your iPhone, protecting your privacy and ensuring optimal performance. Remember to take appropriate measures to safeguard your personal data before proceeding with the reset. With a clean slate, your iPhone will be ready to find a new owner and provide them with an excellent user experience.
Clean and Sanitize the Device

As you prepare to part ways with your trusty companion, it's crucial to ensure that your device is thoroughly cleaned and sanitized. This step not only enhances its overall appeal but also ensures that the new owner receives a device in pristine condition.
- Start by powering off the device and unplugging any accessories.
- Gently wipe the exterior of the device using a microfiber cloth to remove dust, fingerprints, and smudges.
- For more stubborn stains, consider using a mild cleaning solution specifically designed for electronic devices. Remember to apply the solution to the cloth and not directly to the device.
- Pay close attention to the charging port, speakers, and buttons. Use a soft-bristled brush or a cotton swab slightly dampened with isopropyl alcohol to remove any debris or dirt buildup.
- Take special care when cleaning the display. Avoid abrasive materials and opt for a screen cleaning solution or a mixture of distilled water and isopropyl alcohol applied to a microfiber cloth.
- Don't forget about the accessories! Clean chargers, cables, and cases using a damp cloth, ensuring they are free from dirt or grime.
- After the cleaning process, allow the device and its accessories to dry completely before proceeding.
- Finish off by sanitizing the device. Use disinfectant wipes or a solution recommended for electronic devices to gently wipe the surfaces. Pay attention to high-touch areas such as the screen, buttons, and sides.
- Dispose of any used cleaning materials properly and ensure that the device is completely dry before packaging it for sale.
By following these cleaning and sanitization steps, you will be able to present your device in its best condition, making it more appealing to potential buyers and ensuring a smooth and satisfactory sale experience.
Package your iPhone securely
Ensuring the safe and secure packaging of your iPhone is crucial when preparing it for sale. Proper packaging can protect your device from damage during shipping and leave a positive impression on potential buyers. Here are some important steps to efficiently package and protect your iPhone:
1. Clean and wipe down: Begin by cleaning your iPhone thoroughly with a soft cloth to remove any fingerprints, dirt, or smudges. Make sure to remove any personal stickers or decals attached to the device.
2. Remove SIM card and personal data: Safely eject the SIM card from your iPhone and store it in a safe place. It is essential to erase all personal data from the device by performing a factory reset. This will ensure that your personal information remains secure.
3. Gather original accessories: Collect all the original accessories that came with your iPhone, such as cables, chargers, and headphones. These accessories add value to your sale and should be included in the package.
4. Find a suitable packaging box: Select a sturdy and appropriately sized box to accommodate your iPhone and accessories. Make sure the box provides enough padding and space to prevent any movement during shipping.
5. Wrap your iPhone: Wrap your iPhone in bubble wrap or a soft cloth to provide an additional layer of protection. This will protect it from scratches and minor impacts during transit.
6. Secure everything in place: Place the wrapped iPhone along with its accessories inside the box. Fill any empty spaces with bubble wrap, packing peanuts, or crumpled paper to prevent shifting. Ensure everything is tightly secured and cannot move within the box.
7. Seal and label: Close the box securely using packing tape, ensuring all seams are sealed tight. Label the package clearly with the recipient's address and your return address to avoid any confusion during delivery.
8. Consider additional insurance: If your iPhone holds significant value, you may want to consider purchasing additional insurance or using a reputable shipping service that covers the device's worth. This will provide peace of mind in case of any unforeseen circumstances.
By following these packaging guidelines, you can ensure that your iPhone arrives safely to its new owner, maintaining its condition and value throughout the process.
Advertise the Availability of Your iPhone

Once you have prepared your previously-owned Apple smartphone for its next owner, it's time to let potential buyers know that it is available for sale. By effectively advertising your iPhone, you can increase its visibility and attract more interested buyers. Here are some key steps to successfully advertise your device:
- Create an appealing and accurate product description: Highlight the unique features, specifications, and condition of your iPhone. Be honest and transparent about any wear and tear, as well as any accessories or extras included.
- Take high-quality photos: Capture your iPhone from different angles to give potential buyers a clear view of its condition. Show the front and back, as well as any notable details or accessories.
- Set a competitive price: Research the market value of similar iPhones in similar condition to determine a fair and reasonable price. Consider factors such as age, storage capacity, and any additional features.
- Select the right platform: Choose online marketplaces or platforms that have a large user base and are popular for selling electronics. Platforms like eBay, Craigslist, or social media marketplaces can be effective options.
- Write an engaging listing title: Craft a concise and catchy title that includes relevant keywords, such as the iPhone model, storage capacity, and condition.
- Provide detailed information: In the listing description, include all the necessary information, such as the iPhone model, storage capacity, color, carrier compatibility, and any notable features or defects.
- Highlight the selling points: Emphasize the unique selling points of your iPhone, such as a recent battery replacement, unlocked status, or any additional accessories included.
- Communicate your preferred contact method: Clearly state how potential buyers can contact you, whether it's through email, phone, or messaging within the platform.
- Keep your listing up to date: Regularly check and update your listing to ensure accuracy and availability. Remove the listing promptly once the iPhone is sold.
- Be responsive and professional: Respond to inquiries in a timely manner and provide helpful and honest answers. Maintain a professional manner throughout the selling process.
By efficiently advertising your iPhone for sale and providing accurate information, you can attract genuine buyers and increase your chances of a successful transaction. Remember to prioritize safety and security by following reliable online selling practices and meeting potential buyers in public places when completing the sale.
[MOVIES] [/MOVIES] [/MOVIES_ENABLED]FAQ
Why is it important to back up the iPhone before selling it?
Backing up the iPhone is important before selling it because it ensures that all your important data and settings are saved. If you have a backup, you can easily restore your personal information to a new iPhone or iPad later. It also helps to transfer data to a new device or recover it if something goes wrong during the selling process.
Can I remove my SIM card from the iPhone before selling it?
Yes, you should remove your SIM card from the iPhone before selling it. Removing the SIM card is necessary to ensure that no personal information or contacts are accessible by the new owner. To remove the SIM card, you can use a SIM card removal tool (usually provided with the iPhone) or a small paperclip. Insert the tool or paperclip into the small hole next to the SIM card slot on the side of the iPhone and gently push to pop out the SIM card tray.
What steps should I take to prepare my new iPhone for sale?
To prepare your new iPhone for sale, you should start by backing up your data. Connect your iPhone to iTunes or iCloud and make a complete backup. Then, sign out of iCloud and iTunes, and erase all content and settings on your iPhone. Remove the SIM card and any personal accessories. Finally, clean the iPhone thoroughly and reset it to factory settings.
Do I need to remove my personal data from the iPhone before selling it?
Absolutely! It is essential to remove all your personal data from the iPhone before selling it. To do so, make sure to back up your data, sign out of iCloud and iTunes, erase all content and settings, and reset the iPhone to factory settings. This will ensure that your personal information and data are deleted and the iPhone is ready for the new owner to set up as their own.


