Are you looking to streamline your development process by leveraging the power of Docker on your Windows machine? Look no further! In this article, we will walk you through the step-by-step process of setting up Docker with a synchronized folder on your Windows operating system.
Imagine a seamless workflow where you can effortlessly share files and folders between your host machine and the Docker container. With the ability to synchronize directories, you can easily make changes to your codebase on your local machine and instantly see the updates within your Docker environment.
By utilizing this advanced feature, you can accelerate your development cycle, simplify collaboration, and ensure consistency across different environments. Whether you are a seasoned developer or just starting with Docker, this guide will provide you with all the information you need to successfully launch your Docker container with a synchronized folder on your Windows system.
Understanding Docker and its Advantages

In today's fast-paced digital world, it is crucial for businesses and developers to efficiently manage and deploy their applications. Docker, a powerful and versatile containerization platform, has emerged as a popular solution for achieving this goal.
Docker provides a lightweight and isolated environment, known as a container, that encapsulates an application and all its dependencies. These containers can be easily deployed across different operating systems and environments, enabling seamless collaboration and consistency in software development and deployment.
One of the key advantages of Docker is its ability to ensure application portability and scalability. By packaging an application with its dependencies into a container, Docker enables developers to build once and run anywhere. This means that an application developed on one machine can be easily deployed on another without worrying about compatibility issues.
| Benefits of Docker |
| 1. Resource Efficiency: |
| Docker containers are lightweight and share the host system's operating system kernel, which leads to efficient resource utilization and reduced overhead compared to traditional virtualization. |
| 2. Isolation and Security: |
| Docker provides strong isolation between containers, ensuring that applications are isolated from each other and the host system. This enhances the security of applications and reduces the risk of conflicts. |
| 3. Easy Deployment and Scalability: |
| Docker simplifies the deployment process by automating the packaging of applications along with their dependencies. It also allows for easy scaling of applications by spinning up multiple containers to handle increased demand. |
| 4. Version Control and Collaboration: |
| Docker enables version control of application images, making it easier to track changes and roll back to previous versions if needed. It also promotes collaboration by providing a standardized environment for developers to work on shared projects. |
| 5. Continuous Integration and Delivery: |
| With Docker, continuous integration and delivery become more streamlined. Developers can containerize their applications and easily test, build, and deploy them in automated workflows, ensuring faster and more reliable software delivery. |
Overall, Docker revolutionizes the way applications are developed, deployed, and managed. Its benefits in terms of portability, resource efficiency, security, scalability, collaboration, and continuous integration make it a valuable tool for modern software development.
Setting up a Shared Directory for Docker in Windows
In this section, we will delve into the process of configuring a cooperative folder for your Docker environment on a Windows operating system. By creating a shared directory, you can effortlessly exchange files between your host machine and Docker containers, promoting seamless collaboration and efficient data management.
Step 1: Begin by identifying a suitable location on your Windows machine where you wish to establish the synchronized folder. This location will act as the bridge between the host and the Docker container.
Step 2: Once you have determined the desired folder path, it is necessary to configure Docker to recognize and utilize this synchronized folder during runtime. This involves modifying the Docker settings to enable seamless file access and transfer.
Step 3: After adjusting the Docker settings, you will need to utilize specific Docker commands to enable the synchronization feature for your designated folder. These commands will create the necessary links between the host machine and Docker containers, guaranteeing the exchange of files while ensuring compatibility and accessibility.
Step 4: Validate the successful setup of the shared directory by conducting tests and attempting file transfers between your Windows system and Docker containers. By establishing reliable synchronization, you can streamline your workflow and enhance collaboration between team members.
This section will equip you with a detailed understanding of the steps involved in setting up a seamless shared folder for Docker on a Windows environment. By following these instructions diligently, you will be able to leverage the full potential of Docker's synchronized folder feature, enabling efficient data exchange and collaboration within your development environment.
Launching Docker with Synchronized Folder: Step-by-Step Guide

In this section, we will walk you through a detailed step-by-step guide on launching Docker with a synchronized folder. By following these instructions, you will be able to seamlessly integrate your local file system with Docker containers, enabling efficient sharing of data and resources.
- First, ensure that you have Docker installed on your system. Having Docker properly installed and configured is the prerequisite for launching it with a synchronized folder.
- Next, select a directory or folder on your local machine that you want to synchronize with Docker. This could be any folder where you store your project files, code, or data.
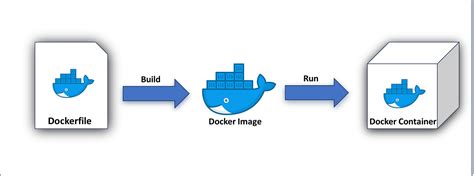
- Once you have chosen the folder, create a Dockerfile in that directory. The Dockerfile will contain the instructions required to build your Docker image.
- In the Dockerfile, specify the base image you want to use, along with any additional dependencies or configurations necessary for your application.
- After creating the Dockerfile, open a terminal or command prompt and navigate to the directory where your Dockerfile is located.
- Now, it's time to build your Docker image. Use the command
docker build -t your_image_name .This will build the Docker image using the instructions provided in your Dockerfile. - Once the image is built, you can launch a Docker container using the synchronized folder. Run the command
docker run -v /path/to/folder:/path/in/container your_image_name, replacing/path/to/folderwith the path to your local folder and/path/in/containerwith the desired path inside the container. - Now you have successfully launched Docker with a synchronized folder! Any changes made to files or resources in the synchronized folder on your local machine will be reflected in the Docker container, allowing for seamless collaboration and development.
By following these step-by-step instructions, you can take full advantage of Docker's containerization capabilities while leveraging synchronized folders to enhance your development workflow in a Windows environment.
Syncthing - The Based Way to Sync Your Files
Syncthing - The Based Way to Sync Your Files Mental Outlaw দ্বারা 1,44,006টি ভিউ 5 মাস আগে 15 মিনিট
FAQ
Can I launch Docker with synchronized folder in Windows?
Yes, it is possible to launch Docker with a synchronized folder in Windows. This allows you to easily share files between your local machine and the Docker container.
How can I synchronize a folder with Docker in Windows?
To synchronize a folder with Docker in Windows, you can use the Docker volume or bind mount feature. This allows you to map a folder on your host machine to a folder inside the Docker container.
What are the benefits of synchronizing a folder with Docker in Windows?
Synchronizing a folder with Docker in Windows has several benefits. It allows you to easily share files between your local machine and the Docker container, making it convenient for development and testing. It also ensures that any changes made in the synchronized folder are immediately reflected in the Docker container.
Are there any limitations or considerations when synchronizing a folder with Docker in Windows?
Yes, there are a few limitations and considerations to keep in mind when synchronizing a folder with Docker in Windows. Firstly, file permissions might differ between the host machine and the container, so you need to ensure that file permissions are properly set. Secondly, performance can be impacted if you have a large number of files or if the files are constantly changing. Finally, it is important to note that synchronized folders are typically not supported in Docker for Windows when using Docker Toolbox.


