When it comes to accessing the internet on your iPad, having a reliable and fast Wi-Fi connection is crucial. By connecting your iPad to a wireless network, you can enjoy the benefits of internet browsing, downloading apps, streaming videos, and much more. In this article, we will discuss the simple steps you can take to establish a secure Wi-Fi connection on your iPad.
Setting up a Wi-Fi connection
Before we dive into the process of connecting your iPad to a Wi-Fi network, make sure you are in an area with a functioning wireless network. This could be your home, office, a public place, or any other location that provides Wi-Fi access. Once you are in a suitable location, follow these steps:
- Open the Settings app: Look for the "Settings" icon on your iPad's home screen and tap on it to launch the app.
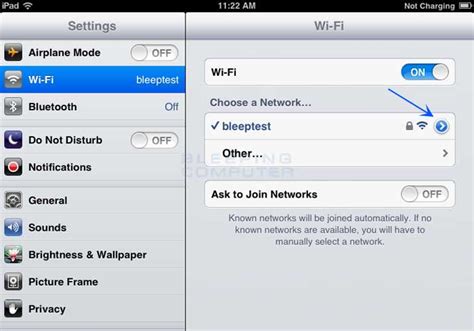
- Select Wi-Fi: In the left-hand menu of the Settings app, locate the "Wi-Fi" option and tap on it to enter the Wi-Fi settings.
- Turn on Wi-Fi: At the top of the Wi-Fi settings, you will find a toggle switch. Make sure it is switched to "On" to enable Wi-Fi connectivity on your iPad.
- Choose a network: Once Wi-Fi is turned on, your iPad will start scanning for available networks. A list of accessible networks will be displayed. Select the desired network you want to connect to.
- Enter the password: If the selected network is password-protected, you will be prompted to enter the password. Carefully type in the password, taking note of uppercase and lowercase letters, as well as any special characters.
- Connect to the network: After entering the correct password, tap on the "Connect" button to establish a connection with the chosen Wi-Fi network.
Voila! Your iPad is now connected to a Wi-Fi network, and you can start enjoying the benefits of wireless internet access. Remember, once you have connected to a network, your iPad will automatically reconnect whenever it is in range of that network.
Troubleshooting common issues
If you encounter any difficulties during the Wi-Fi connection process, consider the following troubleshooting tips:
- Check your network name and password: Make sure you are entering the correct network name (also known as SSID) and password. These details are case-sensitive, so double-check for any typing errors.
- Restart your iPad: Sometimes, a simple restart can resolve Wi-Fi connectivity issues. Power off your iPad, wait for a few seconds, and then turn it back on.
- Move closer to the router: If you are unable to establish a connection, try moving closer to the wireless router. Sometimes, distance can affect the signal strength, and being nearer to the router can improve connectivity.
By following these steps and considering the troubleshooting tips, you can easily enable Wi-Fi on your iPad and stay connected wherever you go.
Access Wireless Network Settings on Your Tablet

In order to connect your tablet to a wireless network, you need to access the Wi-Fi settings on your device. These settings allow you to manage and configure your tablet's wireless connections. By accessing these settings, you can easily connect your tablet to a Wi-Fi network and enjoy high-speed internet access.
- Start by opening the settings menu on your tablet. This menu can usually be accessed by tapping on the gear icon.
- In the settings menu, look for the "Network & Internet" or "Connections" option. This option is where you can find all the wireless network settings.
- Once you've found the "Network & Internet" or "Connections" option, tap on it to open the network settings page.
- Within the network settings page, you will see various options related to wireless networks. Look for the option that says "Wi-Fi" or "Wireless & Networks" and tap on it.
- Upon tapping on the "Wi-Fi" or "Wireless & Networks" option, you will be taken to the Wi-Fi settings page. Here, you will find a list of available Wi-Fi networks in your vicinity.
- Scroll through the list of Wi-Fi networks and tap on the one you want to connect to. If the network is secured, you may need to enter a password.
- After selecting the desired Wi-Fi network and entering any necessary credentials, your tablet will attempt to connect to the network. Once connected, you will see a confirmation message or an icon indicating a successful connection.
- You can now exit the settings menu and start using the internet on your tablet via the Wi-Fi network you just connected to.
Remember, accessing the Wi-Fi settings on your tablet allows you to easily connect to available wireless networks and stay connected to the internet wherever you go. Make sure to choose a secure network and enter the correct password to ensure a safe and reliable connection.
Ensure Wi-Fi Connectivity is Active
Before attempting to connect your device to a wireless network, it is essential to ensure that the Wi-Fi feature is enabled. By enabling Wi-Fi, you enable your device to establish a connection to available wireless networks, providing you with access to the internet and various online services.
- Firstly, navigate to the settings menu on your device.
- In the settings menu, locate and tap on the "Wireless & Networks" option.
- Next, find and select "Wi-Fi" to access the Wi-Fi settings.
- Verify that the Wi-Fi toggle switch is in the "On" position.
- If the toggle switch is in the "Off" position, tap on it to enable Wi-Fi connectivity.
- Once enabled, your device will start scanning for available Wi-Fi networks.
- Your device will display a list of available networks. Choose the network you wish to connect to by tapping on its name.
- If necessary, enter the network password to establish the connection.
- Your device will attempt to establish the connection, and once successful, you will see a notification confirming the connection.
By ensuring that Wi-Fi connectivity is active on your device, you can effortlessly connect to available wireless networks, enhancing your internet access and providing you with a seamless online experience on your iPad.
Select a Wireless Network to Connect to

In this section, we will explore the process of selecting a wireless network to establish a connection with your iPad device. By choosing a suitable Wi-Fi network, you can ensure seamless internet connectivity for your device. Let's delve into the steps to find and select an appropriate wireless network.
Step 1: Access the Wi-Fi Settings
To begin, navigate to the settings on your iPad device. Look for the Wi-Fi option, usually represented by an icon resembling wireless signals. Tap on it to access the Wi-Fi settings.
Step 2: Scan for Available Networks
Next, your iPad will present you with a list of available Wi-Fi networks in your vicinity. These networks are detected based on their signal strength and compatibility with your device. Wait for a moment as your iPad scans the area for networks.
Step 3: Review the List
Once the scanning is complete, you will see a list of Wi-Fi networks. The list will typically display the network names or SSIDs (Service Set Identifiers) along with their signal strength indicators. Take a moment to review the available networks.
Step 4: Choose a Network
Identify the desired network from the list. Consider factors such as network reliability, security, and any specific requirements you may have. Once you have made your decision, tap on the network's name to proceed with connecting to it.
Step 5: Provide Required Information
In some cases, you may need to enter a password or other necessary information to connect to the chosen network. If prompted, carefully enter the details using the on-screen keyboard. Pay attention to the case sensitivity of the password, if applicable.
Step 6: Establish Connection
After providing any required information, your iPad will attempt to establish a connection with the selected network. This process may take a few seconds. Once the connection is successfully established, you will see the Wi-Fi icon in the status bar at the top of the screen.
Step 7: Test the Connection
Finally, it is recommended to test the connection by opening a web browser or any app that requires internet access. Ensure that you can browse websites or perform online tasks to verify the successful connection to the Wi-Fi network.
Now you are ready to enjoy the benefits of your new Wi-Fi connection on your iPad device!
Entering Wi-Fi Network Password
In order to connect your device to a wireless internet network, you may need to provide a password. This password grants you access to the network and ensures a secure connection. Follow the steps below to enter the Wi-Fi network password on your iPad.
| Step 1: | Unlock your iPad by entering the passcode or using Touch ID. |
| Step 2: | From the home screen, tap on the "Settings" app to open it. |
| Step 3: | In the Settings menu, locate and tap on the "Wi-Fi" option. |
| Step 4: | A list of available Wi-Fi networks will appear. Find the network name you want to connect to and tap on it. |
| Step 5: | If the selected network is password protected, a password prompt will be displayed. |
| Step 6: | Tap on the password field and use the on-screen keyboard to enter the network password. |
| Step 7: | Ensure that the entered password is accurate and be mindful of uppercase and lowercase letters. |
| Step 8: | Once the password is entered, tap on the "Join" button or a similar option to connect to the network. |
| Step 9: | Your iPad will attempt to connect to the Wi-Fi network using the provided password. |
| Step 10: | If the password is correct, your iPad will establish a connection to the network. |
By following these steps, you will be able to enter the Wi-Fi network password on your iPad and enjoy a seamless internet browsing experience.
Troubleshoot Wireless Connectivity Problems

Having difficulties connecting to the internet on your portable Apple device can be frustrating. This section provides troubleshooting tips for addressing common issues that may arise while trying to establish a wireless connection.
- Reset Network Settings: Sometimes, resetting network settings can resolve any abnormalities in your device's Wi-Fi configuration.
- Check Wi-Fi Signal Strength: Verify that the wireless signal is strong enough in the area where you are trying to connect. Weak signals can lead to connectivity problems.
- Restart Router: Power off and restart the Wi-Fi router to eliminate any temporary glitches that may prevent your device from connecting properly.
- Check for Airplane Mode: Ensure that Airplane Mode is turned off on your device, as it disables all wireless connections.
- Forget Wi-Fi Network: If you are unable to connect to a specific network, try forgetting the network on your device and reconnecting afresh.
- Update Device Software: Keeping your iPad up to date with the latest software releases can address any compatibility issues that might arise with wireless networks.
- Disable VPN or Proxy: If you have a VPN or proxy enabled on your device, disabling them temporarily can help identify if they are causing any connection problems.
- Check Router Security Settings: Make sure that the router's security settings are correctly configured and match the requirements for your device to connect.
- Forget Bluetooth Devices: Bluetooth devices can sometimes interfere with the Wi-Fi connection. For troubleshooting, try forgetting any unnecessary or conflicting Bluetooth pairings on your iPad.
- Contact Network Administrator: If you are attempting to connect to a public or workplace network, contact the network administrator for assistance and to ensure you have the correct network credentials.
By following these troubleshooting steps, you can tackle common Wi-Fi connectivity issues on your iPad or other Apple devices, ensuring a smooth wireless experience.
Enhancing Wi-Fi Performance by Updating Your iPad Software
Keeping your portable device up to date is crucial for optimal performance. Regular software updates offer more than just bug fixes and new features. They can also improve the Wi-Fi connectivity on your iPad, ensuring a smoother and faster internet experience.
Software updates provide essential enhancements for your device, including improved compatibility with wireless networks and updated security protocols. By installing these updates, you can maximize the potential of your iPad's Wi-Fi capabilities and minimize any potential connectivity issues.
1. Check for Available Updates
Before proceeding with any software update, ensure that your iPad is connected to a stable Wi-Fi network. Open the "Settings" app on your device, and navigate to the "General" section. Look for the "Software Update" option and tap on it. Your iPad will then check for any available updates. If an update is found, it will be displayed here.
2. Download and Install the Update
If an update is available, tap on the "Download and Install" button to start the process. Make sure your iPad is connected to a power source or has a sufficient battery charge, as the update may take some time to complete. Follow the on-screen prompts to initiate the installation. Your iPad may restart during the process.
3. Benefits of Updating Software
Updating your iPad software provides several advantages for Wi-Fi performance. These updates often include optimizations that enhance the device's ability to connect to and maintain a strong Wi-Fi signal. They can also address known issues related to Wi-Fi connectivity, making your internet browsing and streaming experiences more seamless.
Please note: If you experience persisting Wi-Fi issues even after updating your iPad software, there may be other factors at play, such as router settings or hardware limitations. It is worth troubleshooting these aspects or seeking further assistance if needed.
By regularly updating your iPad software, you can enjoy the benefits of improved Wi-Fi performance. Stay connected to a stable network and explore the latest software updates to optimize your device's wireless capabilities.
Resetting network settings as a last resort

In certain circumstances, when all other options have been exhausted, resetting network settings on your device can help resolve Wi-Fi connectivity issues. This process involves reverting all network settings to their default state, which can help eliminate any potential software conflicts or misconfigurations that may be causing the problem.
It is important to note that resetting network settings will remove all saved Wi-Fi networks, passwords, and VPN configurations from your device. This means that you will need to re-enter the necessary information for any Wi-Fi networks you wish to connect to. Additionally, any other customized network settings will be restored to their default values.
Before proceeding with a network settings reset, it is highly recommended to first try other troubleshooting steps such as power cycling your router, checking for any software updates on your device, and forgetting and re-adding the problematic Wi-Fi network.
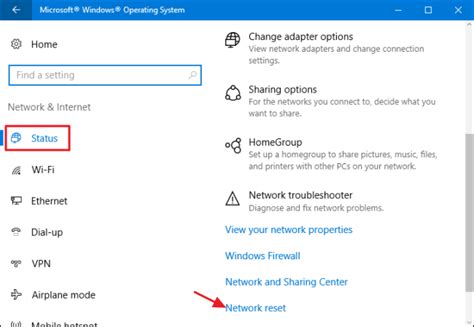
If none of these steps prove successful in resolving the Wi-Fi issue, you can proceed with resetting network settings. This can be done through the device's settings menu, typically found under the "General" or "Reset" section. It may be labeled as "Reset Network Settings" or something similar. Once selected, you will be prompted to confirm the action.
Keep in mind that resetting network settings will not erase any personal data or files on your device. It only affects the network-related settings and configurations.
After the network settings reset is complete, your device will restart and you can re-connect to Wi-Fi networks as needed. Remember to input the necessary information for each network, including passwords if required.
If the Wi-Fi issues persist even after resetting network settings, it may be necessary to seek further assistance from technical support or consider other hardware-related factors that could be affecting the device's Wi-Fi capabilities.
[MOVIES] [/MOVIES] [/MOVIES_ENABLED]FAQ
How do I enable Wi-Fi on my iPad?
To enable Wi-Fi on your iPad, go to the "Settings" app on your home screen. Then, tap on "Wi-Fi" and toggle it on by flipping the switch to the right.
Why can't I connect to Wi-Fi on my iPad?
If you are experiencing difficulty connecting to Wi-Fi on your iPad, there could be several reasons. First, make sure that Wi-Fi is enabled on your device. You can do this by going to the "Settings" app and checking if the Wi-Fi switch is turned on. Additionally, check if the Wi-Fi network you are trying to connect to is within range and functioning properly. Resetting your network settings or restarting your router could also help resolve the issue.
What should I do if my iPad doesn't recognize any Wi-Fi networks?
If your iPad does not recognize any Wi-Fi networks, there are a few things you can try. First, make sure that Wi-Fi is enabled on your device by going to the "Settings" app and checking if the Wi-Fi switch is turned on. If it is, try restarting your iPad and see if that resolves the issue. If not, you may need to reset your network settings or contact your internet service provider for further assistance.
Can I connect my iPad to Wi-Fi automatically?
Yes, you can connect your iPad to Wi-Fi automatically by enabling the "Auto-Join" option for Wi-Fi networks. To do this, go to the "Settings" app, select "Wi-Fi," and tap on the info (i) icon next to the Wi-Fi network you want to automatically connect to. Then, toggle on the "Auto-Join" option. Your iPad will now connect to that Wi-Fi network whenever it is in range.
Is it secure to connect my iPad to public Wi-Fi networks?
Connecting your iPad to public Wi-Fi networks can pose security risks, as these networks are often unsecured. It is recommended to avoid accessing sensitive information or entering passwords while connected to public Wi-Fi. If you must use a public network, consider using a virtual private network (VPN) to encrypt your internet connection and protect your data.
How do I enable Wi-Fi on my iPad?
To enable Wi-Fi on your iPad, go to the Settings app on your iPad's Home screen. Then, tap on Wi-Fi and toggle the switch to the right to turn it on. Your iPad will automatically scan for available Wi-Fi networks and display them in a list. Simply tap on the network you want to connect to and enter the password if required.
Why can't I see the Wi-Fi option in my iPad's Settings?
If you are unable to see the Wi-Fi option in your iPad's Settings, there might be a few possible reasons. First, ensure that your iPad is running on the latest version of iOS. If not, try updating your iPad's software. Second, check if Airplane Mode is enabled. If it is, disable it as Airplane Mode turns off all wireless connections, including Wi-Fi. Lastly, if the issue persists, try restarting your iPad by holding down the Power button and sliding the slider when prompted. This might help resolve any temporary software glitches.


