Do you own the latest advanced gadget from Apple, the illustrious tablet known as the iPad Pro? Are you struggling to grasp the process of linking it to other devices or networks? Well, fret no more! This comprehensive tutorial will explore the step-by-step procedure of establishing a connection with your iPad Pro, ensuring that you unlock its full potential and maximize its utility.
Connecting your iPad Pro is a vital aspect of harnessing its capabilities. By seamlessly integrating your device with various networks, peripherals, and accessories, you'll be able to enjoy a wide range of conveniences and possibilities. Whether it's linking your iPad Pro to a Wi-Fi network for internet access, pairing it with a Bluetooth device, or even connecting it to your computer for data transfer, the seamless connection allows you to unleash this powerful tool's immense potential.
In this guide, we'll explore each connection option in detail, highlighting the necessary steps and precautions to ensure a smooth and hassle-free process. Devoid of complicated jargon and technicalities, our user-friendly approach will empower you to connect your iPad Pro like a pro in no time.
Connecting your iPad Pro to a Wi-Fi network
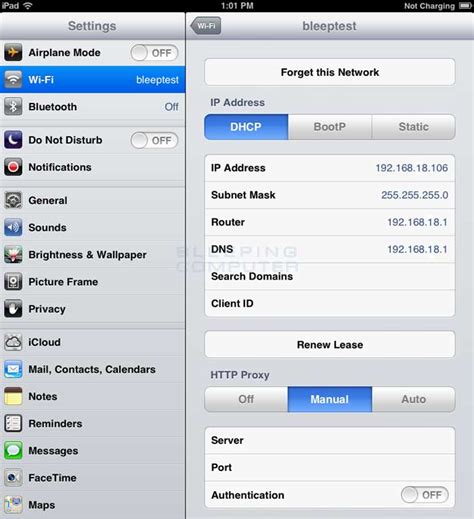
One of the first things you need to do after getting your new iPad Pro is to connect it to a Wi-Fi network. This will enable you to access the internet, download apps, and enjoy various online services. In this section, we will provide you with a step-by-step guide on how to connect your iPad Pro to a Wi-Fi network.
| Step | Description |
|---|---|
| 1 | Unlock your iPad Pro by entering your passcode or using Touch ID. |
| 2 | Tap on the Settings app on your home screen to open it. |
| 3 | In the Settings menu, locate and tap on the Wi-Fi option. |
| 4 | Toggle the Wi-Fi switch to the ON position. |
| 5 | A list of available Wi-Fi networks will appear. Select the network you want to connect to. |
| 6 | If the network is secured, you will be prompted to enter the password. Enter the password using the on-screen keyboard. |
| 7 | Once you have entered the password, tap on the Join button. |
| 8 | Your iPad Pro will now attempt to connect to the selected Wi-Fi network. It may take a few moments to establish a connection. |
| 9 | If the connection is successful, a checkmark will appear next to the Wi-Fi network name, indicating that your iPad Pro is connected. |
By following these steps, you will be able to effortlessly connect your iPad Pro to a Wi-Fi network and enjoy seamless internet connectivity on your device. Remember to ensure that you are connecting to a secure and trusted network to protect your privacy and data.
Pairing your iPad Pro with Bluetooth devices
In this section, we will discuss the process of connecting your advanced tablet, the iPad Pro, with various Bluetooth devices. Bluetooth technology allows for seamless wireless communication and data transfer between your iPad Pro and compatible devices.
Pairing your iPad Pro with Bluetooth devices is a simple and straightforward procedure. By following a few easy steps, you can establish a connection between your tablet and devices such as wireless headphones, speakers, keyboards, or even your car's audio system.
To begin the pairing process, go to the "Settings" menu on your iPad Pro and select "Bluetooth" from the options. Make sure the Bluetooth is turned on by toggling the switch to the "On" position. Your iPad Pro will then start scanning for nearby Bluetooth devices.
Once your iPad Pro detects a compatible device, it will appear in the list of available devices on the screen. Tap on the device you want to pair with to initiate the connection. Some devices may require you to enter a passcode or confirm the pairing process on both the iPad Pro and the device itself.
After successfully pairing the two devices, they will be connected via Bluetooth. You can now start using your iPad Pro with the paired device. Depending on the type of device, you may be able to control settings, stream audio or video, or use it as an input device for your iPad Pro.
If you want to connect multiple Bluetooth devices to your iPad Pro, simply repeat the pairing process for each device. Keep in mind that your iPad Pro can only connect to one device at a time for certain functions, such as audio playback.
In conclusion, pairing your iPad Pro with Bluetooth devices enables you to extend its capabilities and enhance your user experience. With the ease of wireless connectivity, you can enjoy seamless integration between your tablet and various devices for enhanced productivity and entertainment.
| Advantages of pairing with Bluetooth devices: |
|---|
| - Wireless communication |
| - Data transfer |
| - Audio streaming |
| - Device control |
| - Enhanced productivity |
| - Seamless integration |
| - Entertainment options |
Setting up your iPad Pro with iCloud
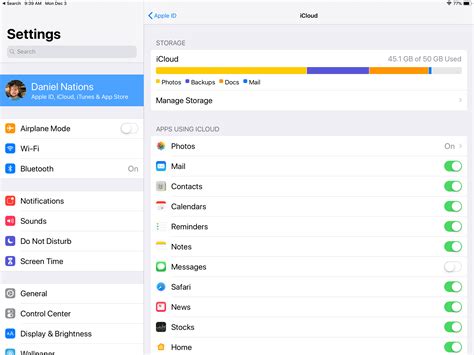
Securely sync your iPad Pro with iCloud for seamless access to your files, photos, and more.
When you bring home your new iPad Pro, one of the first steps you'll want to take is setting it up with iCloud. iCloud is Apple's cloud storage service that allows you to securely store and access your data across all your devices. By setting up iCloud on your iPad Pro, you'll be able to sync your photos, videos, documents, and other files automatically, ensuring that they are always up to date and accessible from any device.
Setting up your iPad Pro with iCloud is a quick and simple process that can be done in a few easy steps.
First, make sure your iPad Pro is connected to a reliable Wi-Fi network. iCloud requires an internet connection to sync your data across devices.
Next, go to the Settings app on your iPad Pro. Scroll down and tap on your Apple ID, which is located at the top of the screen. If you don't have an Apple ID, tap on "Create New Apple ID" and follow the prompts to set one up.
In the Apple ID menu, you'll find various options related to your account. Tap on "iCloud" to access the iCloud settings.
Here, you can toggle on the different types of data that you want to sync with iCloud, such as Photos, Contacts, Notes, and more. You can also enable features like Find My iPad, which helps you locate your device if it ever goes missing.
Once you've selected the options you want, your iPad Pro will start syncing with iCloud. Depending on the amount of data you have and the speed of your internet connection, this process may take some time. Make sure your iPad Pro is plugged into a power source and connected to Wi-Fi to ensure a smooth syncing experience.
Once the initial sync is complete, all your selected data will be available on your iPad Pro and synced with your other devices. Any changes you make, such as editing a document or adding a new photo, will automatically be updated across all your devices. This means you can seamlessly switch between devices and always have access to the latest version of your files.
In conclusion, setting up your iPad Pro with iCloud is an essential step to take full advantage of the device's capabilities. By syncing your data with iCloud, you can ensure that your files are always securely backed up and easily accessible from any device, providing you with greater flexibility and convenience in managing your digital life.
Syncing Your iPad Pro with iTunes
In this section, we will explore the process of synchronizing your powerful iPad Pro with iTunes, the popular media management and playback software. By syncing your device with iTunes, you can ensure that your iPad Pro is always up to date with the latest multimedia content, apps, and settings. Let's dive into the seamless synchronization experience provided by iTunes.
1. Launch iTunes and connect your iPad Pro:
Before syncing your iPad Pro, ensure that you have the latest version of iTunes installed on your computer. Connect your iPad Pro to your computer using a Lightning cable, and launch iTunes. This will establish a connection between your iPad Pro and iTunes.
2. Configure sync settings:
Within iTunes, navigate to the device icon located at the top-left corner of the iTunes window. Click on it to access the summary page of your iPad Pro. Here, you can configure various synchronization settings. You can choose to sync your entire library or specific media types, such as music, videos, or photos. Additionally, you can choose to sync your apps, books, and other selected content.
3. Start the synchronization process:
Once you have configured your sync settings, click on the "Apply" or "Sync" button in the bottom-right corner of the iTunes window. This will initiate the synchronization process, and iTunes will start transferring the selected content to your iPad Pro. The synchronization progress will be displayed in the status bar of iTunes.
4. Monitor and manage sync activities:
While the synchronization process is ongoing, you can monitor the progress and manage your sync activities in iTunes. You can view the files being transferred, pause or cancel the sync, or troubleshoot any issues that may arise during the syncing process. iTunes provides a user-friendly interface for you to stay in control of the synchronization process.
5. Enjoy the synced content on your iPad Pro:
Once the synchronization process is complete, you can disconnect your iPad Pro from the computer and start enjoying the synced content. Your iPad Pro will now have the latest music, videos, apps, and other media items that were selected during the synchronization process. Take full advantage of your iPad Pro's capabilities and enjoy your personalized multimedia experience.
In conclusion, syncing your iPad Pro with iTunes is a straightforward process that allows you to keep your device up to date with the latest multimedia content and settings. By following the steps outlined above, you can seamlessly synchronize your iPad Pro with iTunes and enjoy a personalized and immersive media experience on your device.
Connecting your iPad Pro to a computer
In this section, we will explore the process of establishing a connection between your iPad Pro and a computer device. By following these steps, you can seamlessly link your iPad Pro with a computer to transfer files, synchronize data, and enhance your overall digital experience.
Step 1: Locate the appropriate USB cable that is compatible with your iPad Pro and the computer. This cable is commonly known as a 'Lightning cable' and features a specialized port designed specifically for Apple devices.
Step 2: Connect one end of the USB cable to the USB port of your computer. Ensure that the USB port is in good working condition and provides a stable connection.
Step 3: Take the other end of the USB cable and insert it into the Lightning port of your iPad Pro. The Lightning port is located at the bottom of your device and should fit securely into place.
Step 4: Once the cable is successfully connected to both the computer and your iPad Pro, your device may prompt you with options regarding the type of connection you wish to establish. You can select options such as "Trust this computer" or "Sync with iTunes" based on your preferences and requirements.
Step 5: After selecting the appropriate options, your iPad Pro will establish a connection with the computer. This connection enables you to transfer files, backup data, install software updates, and perform various other tasks between the two devices.
Step 6: Once the connection is established, you can now access your iPad Pro files and folders directly from your computer. This allows for seamless file management, efficient data synchronization, and the ability to maximize the capabilities of both your iPad Pro and computer.
By following these steps, you can easily connect your iPad Pro to a computer and unleash the potential of a harmonious digital ecosystem for enhanced productivity and convenience.
Using AirPlay to connect your iPad Pro to TV
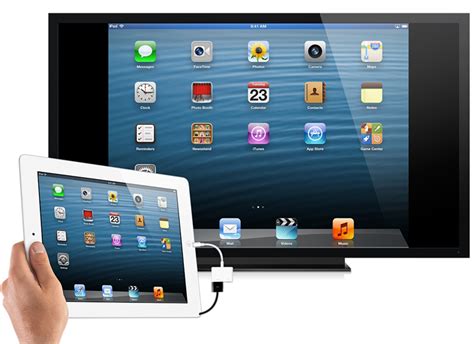
Streaming content from your iPad Pro to your TV can open up a whole new world of entertainment and convenience. One of the ways to easily achieve this is by using AirPlay, a feature that allows you to wirelessly mirror your iPad Pro screen onto a compatible TV or streaming device.
With AirPlay, you can effortlessly display your favorite movies, videos, photos, and even presentations on a larger screen, transforming your iPad Pro into a portable multimedia center. Whether you want to enjoy a movie night with friends or share a photo slideshow with your family, AirPlay makes it convenient and hassle-free.
To begin using AirPlay, ensure that your TV or streaming device supports AirPlay technology. Nowadays, many smart TVs and streaming devices come equipped with AirPlay functionality, but it's always a good idea to double-check the compatibility with the manufacturer's specifications or user manual.
Once you've confirmed the compatibility, make sure that both your iPad Pro and the TV or streaming device are connected to the same Wi-Fi network. This is important as it allows seamless communication between the devices for sharing content wirelessly.
Next, access the Control Center on your iPad Pro by swiping down from the top-right corner of the screen. Look for the AirPlay icon, which resembles a rectangle with a solid triangle at the bottom, and tap on it.
A list of available AirPlay devices will appear on the screen. Select your TV or streaming device from the list, and enable the "Mirroring" option if you want to mirror your iPad Pro screen. If you only want to stream specific content, such as videos or photos, you may choose the appropriate option.
Once connected, your iPad Pro's screen will appear on the TV or streaming device, allowing you to enjoy your desired content on a larger display. You can control playback, adjust volume, and perform other functions directly from your iPad Pro.
AirPlay also enables multi-screen functionality, where you can use your iPad Pro for different tasks while simultaneously streaming content on the TV. This feature enhances productivity and convenience, allowing you to browse the web, check emails, or chat with friends while watching your favorite show or movie.
When you're done using AirPlay, simply access the Control Center again, tap on the AirPlay icon, and select "Stop Mirroring" or disconnect from the streaming device. This will restore your iPad Pro's screen to its original state and disconnect it from the TV.
In conclusion, AirPlay offers a seamless and intuitive way to connect your iPad Pro to a TV or streaming device. Whether you want to indulge in media consumption or enhance your productivity, AirPlay provides a wireless solution that elevates your iPad Pro experience.
Setting up your iPad Pro with a wireless printer: A Comprehensive Guide
One of the convenient features of the iPad Pro is its ability to connect wirelessly to a printer. With this functionality, you can easily print documents, photos, and other files directly from your iPad Pro without the need for cables or physical connections. This guide will walk you through the step-by-step process of connecting your iPad Pro to a wireless printer, enabling you to print effortlessly and efficiently.
Step 1: Check Printer Compatibility
Before proceeding, it is crucial to verify that your wireless printer is compatible with the iPad Pro. Some printers may require specific software or support AirPrint, a feature that allows Apple devices to connect with compatible printers effortlessly. Check the printer's instruction manual or visit the manufacturer's website to determine its compatibility.
Step 2: Connect the Printer to Wi-Fi
Next, connect your wireless printer to the same Wi-Fi network that your iPad Pro is connected to. This step ensures that both devices are on the same network and can communicate with each other seamlessly. Refer to the printer's manual for instructions on how to connect it to a Wi-Fi network.
Step 3: Enable AirPrint on the Printer (if applicable)
If your printer supports AirPrint, make sure this feature is enabled. AirPrint allows your iPad Pro to discover and connect with the printer effortlessly. To activate AirPrint, access the printer's settings or preferences menu and toggle the feature on. Refer to your printer's manual for specific instructions on enabling AirPrint.
Step 4: Configure Printer Settings on the iPad Pro
On your iPad Pro, open the Settings app and navigate to the "Wi-Fi" section. Ensure that Wi-Fi is turned on and connected to the same network as your printer. Then, tap on the "Printers" option and select your wireless printer from the available devices. If your printer is not listed, you may need to add it manually using the "Add Printer" option.
Step 5: Test the Connection
Once you have completed the previous steps, it's time to test the connection between your iPad Pro and the wireless printer. Open any app on your iPad Pro that supports printing, such as Pages, Photos, or Safari. Locate the "Share" or "Print" option within the app and select it. Choose your wireless printer from the available printer options, customize any settings if required, and then tap on "Print" to send the document or file to the printer wirelessly.
Conclusion
By following this step-by-step guide, you can easily connect your iPad Pro to a wireless printer, granting you the ability to print wirelessly and conveniently. With this setup, you can print a variety of documents, photos, and files directly from your iPad Pro, saving time and enhancing productivity.
Exploring USB-C Connectivity on your iPad Pro
In this section, we will delve into the vast possibilities offered by USB-C to establish a seamless connection between your iPad Pro and various external devices. USB-C, a versatile and powerful technology, opens up a world of opportunities for enhancing your iPad Pro experience.
Expanding with External Devices: With USB-C, you can effortlessly connect your iPad Pro to a wide range of external devices, enabling you to extend its functionality beyond its built-in features. Whether you wish to connect to a larger display, high-speed storage, peripheral devices, or even charge other devices using your iPad Pro, USB-C provides a reliable and efficient solution.
Display Options: USB-C allows you to connect your iPad Pro to external displays, providing you with a larger canvas to work, present, or entertain. This opens up new dimensions for productivity, multitasking, or enjoying media content. Experience the joy of an expansive workspace or the thrill of sharing your creative work on a bigger screen.
High-Speed Data Transfer: With USB-C, you can enjoy blazing-fast data transfer speeds, allowing you to effortlessly move large files or access data from external storage devices. Whether you need to transfer photos, videos, or other files, USB-C ensures that your iPad Pro becomes a hub for ultimate connectivity and interchangeability.
Peripheral Compatibility: USB-C expands your iPad Pro's compatibility with peripheral devices, such as keyboards, mice, audio interfaces, MIDI controllers, and more. With the ability to connect a wide range of accessories, USB-C transforms your iPad Pro into a versatile and powerful tool tailored to your specific needs or creative endeavors.
Power Delivery: The power delivery capabilities of USB-C enable your iPad Pro to charge other devices, such as your iPhone or Apple Watch, using a simple USB-C to Lightning cable. This convenience eliminates the need for multiple chargers and cables, streamlining your digital lifestyle and keeping your devices powered up wherever you go.
In conclusion, the USB-C connectivity on your iPad Pro offers a multitude of advantages, from expanded display options to high-speed data transfer and the versatility to connect a variety of peripheral devices. Additionally, USB-C allows for convenient power delivery, eliminating the hassle of carrying multiple chargers. Embrace the power of USB-C and unlock a world of possibilities for your iPad Pro!
Troubleshooting common connectivity issues on your iPad Pro
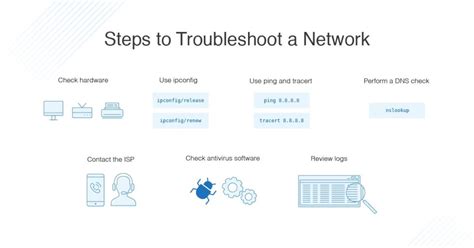
When using your iPad Pro, you may occasionally encounter connectivity issues that can hinder the device's ability to connect to networks and other devices. In this section, we will discuss some common problems users face and provide troubleshooting tips to help you resolve them.
One common issue users encounter is a weak or unstable Wi-Fi connection. If you are experiencing frequent disconnects or slow internet speeds, try moving closer to the router or access point. Additionally, ensure that your Wi-Fi network is functioning properly and that the password entered is correct. Restarting the router or resetting the network settings on your iPad Pro may also help resolve the issue.
If you are having trouble connecting your iPad Pro to a Bluetooth device, such as a pair of headphones or a keyboard, start by checking if Bluetooth is enabled on both devices. If it is, try disconnecting and reconnecting the Bluetooth connection. In some cases, unpairing the device and pairing it again can solve the problem. It is also worth checking if there are any software updates available for your iPad Pro, as they might include bug fixes that address connectivity issues.
In situations where your iPad Pro is unable to establish a cellular connection, try toggling Airplane Mode on and off. This can help reset the cellular network settings and may resolve the problem. Ensure that you are in an area with sufficient cellular coverage and that your data plan is active and has not reached its usage limit.
In rare cases, you might encounter issues connecting your iPad Pro to a computer via a USB cable. If your iPad Pro is not recognized by the computer, try using a different USB port or cable. Make sure that you have the latest version of iTunes installed on your computer and that it is compatible with your iPad Pro. Restarting both the computer and the iPad Pro can also help establish a successful connection.
If none of these troubleshooting steps resolve your connectivity issues, it is recommended to contact Apple Support or visit an authorized service provider for further assistance. They will be able to provide specialized guidance and help you identify and resolve any underlying hardware or software problems that may be causing the connectivity issues.
| Issue | Troubleshooting Tip |
|---|---|
| Weak or unstable Wi-Fi connection | Move closer to the router, reset network settings, or restart the router. |
| Trouble connecting to Bluetooth devices | Check if Bluetooth is enabled on both devices, reconnect or unpair and pair the device again. |
| Unable to establish a cellular connection | Toggle Airplane Mode on and off, ensure sufficient coverage and active data plan. |
| Issues connecting to a computer via USB | Try different USB port or cable, ensure latest iTunes version, restart both devices. |
FAQ
What is the first step to connect an iPad Pro?
The first step to connect an iPad Pro is to ensure that you have a stable Wi-Fi or cellular network connection.
Can I connect an iPad Pro to a computer?
Yes, you can connect an iPad Pro to a computer using a USB-C to USB-C cable or a USB-C to USB cable, depending on the ports available on your computer.
What are the benefits of connecting an iPad Pro to a television?
Connecting your iPad Pro to a television allows you to enjoy a larger screen for watching movies, playing games, or giving presentations. It can enhance your viewing experience and make it more enjoyable.
Is it possible to connect an iPad Pro to a projector?
Yes, you can connect an iPad Pro to a projector using an adapter or a cable, depending on the ports available on your projector and iPad Pro. This allows you to project your iPad's screen onto a larger display for presentations or watching videos.
Can I connect a Bluetooth keyboard to my iPad Pro?
Yes, you can easily connect a Bluetooth keyboard to your iPad Pro. Simply go to the Settings app, select Bluetooth, turn it on, and follow the instructions to pair and connect your keyboard.
What is the first step to connect an iPad Pro to another device?
The first step is to ensure that both the iPad Pro and the other device have a stable internet connection.
Can I connect my iPad Pro to a TV?
Yes, you can connect your iPad Pro to a TV by using an HDMI adapter or Apple TV. The HDMI adapter allows you to connect the iPad Pro directly to the TV using an HDMI cable, while Apple TV allows for wireless mirroring of the iPad Pro's display onto the TV.


