Efficient communication and high-quality sound reproduction have become integral parts of our daily lives. Whether it's immersing ourselves in our favorite music or engaging in important virtual meetings, headphones have become our trusted companions. However, encountering problems with headphone functionality on a Windows 10 operating system can dampen our audio experience. In this article, we explore common issues with audio output devices and provide effective solutions to restore seamless audio performance.
Streamlined Sound Solutions:
Despite the advanced technology offered by Windows 10, it is not immune to occasional glitches. If you find yourself experiencing frustration due to headphone malfunctions or audio inconsistencies, fear not – you are not alone. We understand the importance of troubleshooting these problems to maximize productivity and enjoyment. By following the steps outlined in this guide, you can quickly and efficiently address any audio-related issues that may arise on your Windows 10 device.
Unleashing the Potential:
Your headphones are designed to provide immersive soundscapes that transport you to new realms. However, even the most advanced pair can encounter compatibility issues with certain platforms or operating systems. By exploring the solutions provided here, you can unleash the full potential of your headphones and restore the audio experience that you deserve on Windows 10. Let us delve into troubleshooting techniques that will pave the way to audio bliss without the need for technical jargon or external assistance.
Troubleshooting Common Headphone Issues on Windows 10

In this section, we will explore the various troubleshooting techniques to address common problems that may arise when using headphones with the Windows 10 operating system. By following these steps, you can resolve issues related to audio output, connectivity, and audio control on your Windows 10 device without resorting to professional assistance.
1. Checking Audio Settings: Ensure that your headphones are selected as the default audio device in the Windows 10 sound settings. This step verifies that the operating system recognizes your headphones and routes audio output to them.
2. Updating Audio Drivers: Outdated or incompatible audio drivers can often lead to headphone related issues. Update your audio drivers to the latest version provided by your device manufacturer or use automatic driver update tools to ensure compatibility with Windows 10.
3. Checking Headphone Connections: Confirm that your headphones are securely connected to the appropriate audio jack on your Windows 10 device. Loose connections can cause audio disruptions or complete sound loss.
4. Testing Headphones on Other Devices: To determine if the issue lies with your Windows 10 system or your headphones, try connecting them to another device, such as a smartphone or tablet. If they work fine on other devices, the problem may be specific to your Windows 10 configuration.
5. Disabling Audio Enhancements: Windows 10 includes various audio enhancements that can sometimes interfere with headphone functionality. Disable these enhancements by accessing the Enhancements tab in the sound settings and unchecking all the options.
6. Running the Windows Audio Troubleshooter: Windows 10 provides a built-in troubleshooting tool specifically designed to identify and resolve common audio issues. Run the Windows Audio Troubleshooter to automatically diagnose and fix any problems related to your headphones.
7. Checking for Software Conflicts: Certain software or applications installed on your Windows 10 device can conflict with headphone operation. Temporarily disable or uninstall any recently installed programs to determine if they are causing the issue.
By following these troubleshooting steps, you should be able to resolve common headphone problems on your Windows 10 device. If you encounter persistent issues, it may be necessary to seek further assistance from technical support or your device manufacturer.
Understanding and Resolving Headphone Connectivity Issues
When it comes to troubleshooting headphone connectivity problems, it's important to have a clear understanding of the underlying issues and potential fixes. In this section, we will explore common causes for headphone connection problems and provide step-by-step solutions to get your headphones up and running seamlessly.
Identifying Connectivity Issues:
Before diving into the troubleshooting process, it is crucial to be able to identify the specific connectivity issue you are experiencing. Whether it's a failure to connect, intermittent connection dropouts, or distorted audio, knowing the symptoms will help in finding the appropriate solution.
Checking Hardware and Connections:
One of the first steps in resolving headphone connectivity problems is to inspect the physical components. This includes examining the headphone jack for any visible damage, ensuring the headphones are securely plugged in, and checking for any cable or connector faults. Additionally, verifying that the headphones are compatible with your device is vital.
Updating Audio Drivers:
Oftentimes, outdated or incompatible audio drivers can cause headphones to malfunction. To address this, it is recommended to update the audio drivers on your Windows 10 device. This can be done through the Device Manager or by visiting the manufacturer's website and downloading the latest drivers for your specific audio device.
Adjusting Sound Settings:
Incorrect sound settings can also contribute to headphone connectivity issues. In this step, we will guide you through the process of checking and adjusting sound settings, such as volume levels, audio enhancements, and default playback devices, to ensure optimal headphone performance.
Utilizing Troubleshooters:
Windows 10 provides built-in troubleshooters that can automatically diagnose and fix various hardware and device-related issues. We will show you how to utilize these troubleshooters specifically designed to address headphone connectivity problems, saving you time and effort.
Consideration for Third-Party Software:
If the above steps fail to resolve the headphone connectivity problems, it may be worth examining whether any third-party software, such as audio enhancement tools or virtual surround sound programs, could be causing conflicts. We will provide guidance on identifying and addressing these potential software-related issues.
By understanding the underlying causes and following the step-by-step solutions outlined in this section, you will be equipped to effectively troubleshoot and resolve headphone connectivity problems on your Windows 10 system.
Checking Audio Settings for Headphones on Windows 10

In this section, we will explore the steps to verify and adjust the audio settings specifically for headphones on the Windows 10 operating system. By examining the audio configuration options, we can ensure that the headphones are correctly recognized and that the sound output is optimized for an enhanced listening experience.
Step 1: Accessing the Sound Settings
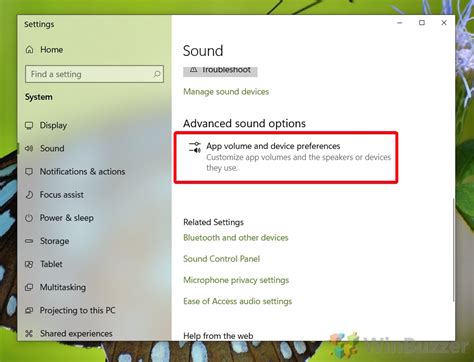
To begin, we need to navigate to the sound settings on Windows 10. This can be done by clicking on the Start menu and typing "Sound settings" in the search bar. Once the option appears in the search results, click on it to open the sound settings window.
Note: Alternatively, you can access the sound settings by right-clicking on the volume icon in the system tray and selecting "Open Sound settings".
Step 2: Selecting the Headphones as the Output Device
Within the sound settings window, locate the "Output" section. Here, you will find a list of available audio devices. Look for the entry that represents your headphones. It may be labeled as a specific brand or model, or it might simply display "Headphones". Once you have identified the correct entry, click on it to select it as the default output device.
Note: If your headphones are connected via a USB adapter or audio interface, ensure that it is properly connected to your computer before proceeding with this step.
Step 3: Adjusting the Volume and Enhancements
Next, navigate to the "Volume" section within the sound settings window. Here, you can adjust the volume level for your headphones using the slider. Move the slider left or right to decrease or increase the volume, respectively. Additionally, you can explore the "Enhancements" tab to enable or disable any audio enhancements that may be available for your headphones.
Note: Some headphones may come with their own audio software or control panel. If this applies to your headphones, make sure to also check and adjust the settings within their dedicated software.
By following these steps, you will be able to check and configure the audio settings for your headphones on Windows 10. This ensures that your headphones are recognized and that the sound output is optimized for an immersive audio experience.
Ensuring Proper Playback Device and Sound Settings
In this section, we will explore the necessary steps to ensure that the correct audio playback device is selected and the sound settings are properly configured to address issues with headphones not functioning correctly on your Windows 10 operating system.
- Checking the Playback Device
- Updating Audio Drivers
- Checking Sound Settings
- Testing with Different Applications
- Using Troubleshooters
One of the first things to verify is whether the correct playback device is selected. By accessing the sound settings, you can ensure that the device you want to use, such as your headphones, is set as the default playback device. This will ensure that sound is directed to the appropriate output.
Outdated or incompatible audio drivers can often cause problems with headphones not working correctly. It is important to regularly update your audio drivers to ensure compatibility with the Windows 10 system. This can be done by visiting the manufacturer's website or using built-in Windows tools to update the drivers.
Within the sound settings, there are various options that can affect the functionality of your headphones. It is advisable to check the volume levels, audio enhancements, and spatial sound settings to make sure they are properly configured. Making any necessary adjustments can help resolve issues with sound output.
If your headphones are not working with a specific application, it is worth testing them with other applications to identify whether the issue lies with the headphones or the software. By trying different audio applications, you can determine whether there are compatibility issues or settings specific to a particular program.
Windows 10 provides built-in troubleshooters that can assist in diagnosing and resolving common audio-related issues. Running the audio troubleshooter can help identify and fix problems that may be preventing your headphones from working properly.
By following these steps and ensuring the correct playback device and sound settings are configured, you can troubleshoot and resolve issues with headphones not working on your Windows 10 system.
Resolving Headphone Issues on Windows 10 by Updating Audio Drivers

Ensuring that your headphones are functioning properly on Windows 10 can be a frustrating experience if you encounter issues. However, by updating your audio drivers, you can effectively resolve various headphone problems on your Windows 10 computer.
Why Update Audio Drivers?
Audio drivers serve as the communication link between your operating system and audio devices, such as headphones. Outdated or incompatible audio drivers can result in malfunctioning headphones, including sound distortion, no audio output, or connectivity problems.
The Benefits of Updating Audio Drivers
Updating your audio drivers offers several advantages in resolving headphone issues on Windows 10. It ensures compatibility with the latest Windows updates, enhances audio performance, and addresses any known bugs or glitches that may affect your headphone functionality.
How to Update Audio Drivers
Updating audio drivers on Windows 10 is a straightforward process that can be accomplished using a few simple steps. Firstly, you need to identify the audio device manufacturer and model of your computer. Then, you can visit the manufacturer's website or utilize Windows Device Manager to download and install the latest audio drivers specific to your device.
Note: It is recommended to create a system restore point before updating audio drivers, as it allows you to revert to the previous configuration if any issues arise.
Verifying Successful Driver Update
Once you have updated your audio drivers, it is important to verify whether the update has been successfully applied. You can do this by checking the Device Manager for any error symbols or notifications associated with your audio device. Additionally, test your headphones to ensure they are now functioning correctly on your Windows 10 system.
In conclusion, updating your audio drivers plays a crucial role in resolving headphone problems on Windows 10. By following the simple steps outlined above, you can ensure that your headphone functionality is restored, delivering an enhanced listening experience on your Windows 10 computer.
Step-by-step guide to updating and reinstalling audio drivers
In this section, we will provide you with a comprehensive step-by-step guide to help you update and reinstall audio drivers on your Windows 10 system. By following these instructions, you can troubleshoot any issues related to audio playback and ensure that your headphones are working properly.
- Identify the audio device: Begin by identifying the specific audio device that is causing the problem. It could be the built-in speakers, external speakers, or the headphones themselves.
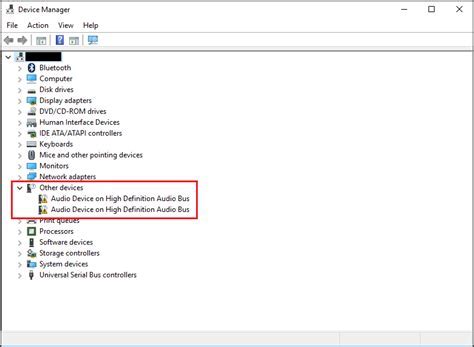
- Access the Device Manager: Open the Device Manager by right-clicking on the Start button and selecting "Device Manager" from the menu.
- Locate the audio driver: In the Device Manager, locate and expand the "Sound, video, and game controllers" category. Look for the audio device that is related to your headphones or speakers.
- Update the audio driver: Right-click on the audio device and select "Update driver" from the context menu. Choose the option to search automatically for updated driver software. Windows will then search for the latest driver and install it if available.
- Reinstall the audio driver: If updating the driver did not resolve the issue, you may need to reinstall it. Right-click on the audio device and select "Uninstall device" from the context menu. Follow the on-screen prompts to complete the uninstallation.
- Download and install the latest driver: Visit the manufacturer's website or the Windows Update catalog to download the latest audio driver for your device. Once downloaded, double-click on the file to install it on your system.
- Restart your computer: After installing the updated or reinstalled audio driver, it is recommended to restart your computer to ensure that the changes take effect.
- Test the headphones: Once your computer restarts, connect your headphones and test them to see if the issue has been resolved. Play some audio or video files to check if the sound is working properly.
By following these step-by-step instructions, you can easily update and reinstall audio drivers on your Windows 10 system, resolving any issues you may have been experiencing with your headphones or other audio devices. It is important to keep your drivers up to date to ensure optimal audio performance.
Windows 10 Not Detecting Headphones When Plugged In Fix (2023)
Windows 10 Not Detecting Headphones When Plugged In Fix (2023) by Tweak Library 885,095 views 4 years ago 2 minutes, 39 seconds
FAQ
Why are my headphones not working on Windows 10?
There could be several reasons why your headphones are not working on Windows 10. It could be a driver issue, faulty headphone jack, improper settings, or hardware compatibility problems. Troubleshooting these aspects can help resolve the issue.


