Imagine a scenario where you are all set to enjoy your favorite music or have a productive video call, but your headphones fail to work properly. Frustrating, isn't it? One of the common issues that headphone users encounter is a malfunctioning microphone connection. The microphone plays a crucial role in ensuring clear voice transmission, and without it, your headphone experience can be seriously compromised.
So, what can you do when faced with this problem? Instead of rushing to buy a new pair of headphones, why not try troubleshooting the microphone connection on your computer? By identifying and addressing the root cause, you may be able to restore your headphone's functionality and save yourself from unnecessary expenses.
When it comes to troubleshooting microphone connection issues, there are several factors to consider. It could be a hardware problem, such as a loose wire or a damaged connector, or perhaps a software glitch that is affecting the microphone's functionality. With a little patience and some simple steps, you might be able to pinpoint the issue and find a suitable solution.
Throughout this article, we will walk you through different methods to troubleshoot microphone connection problems on your computer. From checking the audio settings to verifying hardware connections, and even reinstalling or updating drivers, we'll provide you with a comprehensive guide to help you get your headphones working flawlessly again. So, without further ado, let's dive into the world of microphone troubleshooting!
Troubleshooting Mic Connectivity Issues: A Step-by-Step Guide

If you're experiencing problems with your computer's microphone, there are several steps you can take to troubleshoot and resolve the issue. By following these troubleshooting steps, you can ensure that your microphone is properly connected and working correctly on your device.
- Check the physical connections: Start by examining the physical connections of your microphone. Make sure it is securely plugged into the appropriate port on your computer. If you are using an external microphone, ensure that the cable is not damaged or frayed.
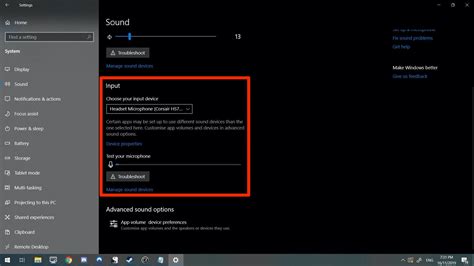
- Verify microphone settings: Open the audio settings on your computer and check the microphone settings. Ensure that the microphone is not muted and that the correct input source is selected.
- Update audio drivers: Outdated or incompatible audio drivers can cause microphone connection issues. Check for any available driver updates for your computer's audio hardware and install them if necessary.
- Adjust microphone volume levels: Sometimes, the microphone volume settings might be too low, causing connectivity problems. Increase the microphone volume level and test if the issue is resolved.
- Disable conflicting applications: Certain applications or programs on your computer might be interfering with the microphone's functionality. Disable any unnecessary applications and try using the microphone again.
- Run a malware scan: Malware or viruses can sometimes disrupt the functionality of your computer's hardware, including the microphone. Use a reliable antivirus program to scan your computer for any potential threats.
- Try a different microphone: If the previous steps don't resolve the issue, try using a different microphone to determine if the problem lies with the specific microphone or your computer's microphone port.
- Consult technical support: If none of the above steps solve the problem, it may be necessary to reach out to technical support for further assistance. They can provide additional troubleshooting steps or diagnose any underlying hardware issues that may be causing the microphone connectivity problem.
By following these troubleshooting steps, you can identify and resolve microphone connection issues on your computer, ensuring that your microphone functions properly for all your audio recording and communication needs.
Check the physical connections
In order to troubleshoot any issues with your headphones, it is important to start by checking the physical connections. While using headphones, there could be factors that affect the connection between the device and the headphones. This section will guide you through the process of ensuring all physical connections are secure and functioning properly.
1. Verify the headphone plug: Begin by inspecting the headphone plug. Ensure it is firmly inserted into the audio jack of your device. Sometimes, a loose or partially inserted plug can cause audio issues. Give it a gentle push to make sure it is fully connected.
2. Examine the cable: Take a close look at the cable connecting your headphones to the device. Check for any visible signs of damage, such as cuts, frays, or bends. These can affect the audio signals and result in a faulty connection. If you notice any damage, it may be necessary to replace the cable.
3. Clean the audio jack: Over time, dust, dirt, or other debris can accumulate in the audio jack, affecting the connection quality. Use a clean, dry cloth or a cotton swab to gently clean the inside of the audio jack. Be cautious not to push any debris further into the jack.
4. Try a different audio source: If you are still experiencing issues after examining the physical connections, it is worth trying a different audio source. Connect your headphones to another device, such as a smartphone or tablet, to determine if the issue lies with the headphones or the original device you were using.
By carefully checking the physical connections of your headphones, you can eliminate potential issues caused by loose plugs, damaged cables, or debris in the audio jack. Taking these simple steps can often resolve headphone connectivity problems and ensure a clear audio experience.
Update Your Sound Drivers

Keeping your computer's sound drivers up to date is crucial for ensuring optimal performance and resolving any issues with your audio devices. These drivers act as the communication bridge between your operating system and the hardware components of your computer that produce sound.
Regularly updating your sound drivers can improve audio quality, fix bugs or glitches, and even enable new features and functionalities. Manufacturers often release driver updates to address compatibility issues with new software, enhance performance, and provide better overall user experiences.
To update your sound drivers, you can follow these steps:
- Check for manufacturer updates: Visit the website of your computer's manufacturer or the manufacturer of your sound card to look for the latest driver updates. Most manufacturers provide driver downloads and installation instructions on their support pages.
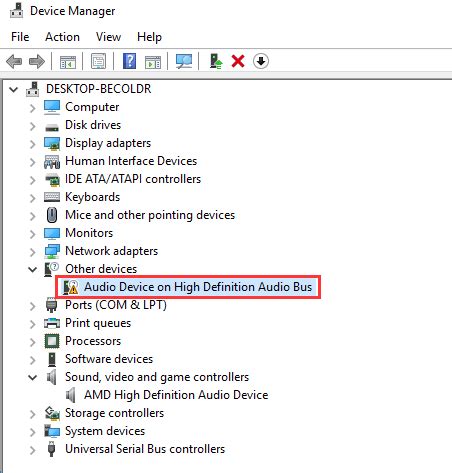
- Use Device Manager: Access the Device Manager on your computer by right-clicking on the Start button and selecting "Device Manager." Expand the "Sound, video, and game controllers" category, right-click on your audio device, and select "Update driver." Choose the option to search automatically for updated driver software.
- Consider third-party software: If manually updating your drivers seems time-consuming or complicated, you can also use third-party software designed to scan your system for outdated drivers and automatically install the latest versions. Popular examples include Driver Booster, DriverEasy, and Snappy Driver Installer.
Note: Before updating your sound drivers, it's advisable to create a restore point or backup your important files to avoid any potential disruptions or data loss.
By keeping your sound drivers up to date, you can ensure that your computer's audio devices are functioning properly and maximize your listening experience. Don't neglect this essential step in troubleshooting audio issues!
Adjusting the microphone settings
In order to ensure proper functioning of your audio recording and communication, it is important to adjust the settings of your microphone. By optimizing the microphone settings, you can enhance the quality of your recordings, minimize background noise, and ensure clear communication during audio calls or video conferences.
Firstly, it is recommended to check the volume levels of your microphone. Adjust the microphone sensitivity or gain settings to an appropriate level to ensure that your recordings or voice transmissions are not too faint or distorted. Increasing the sensitivity will capture even subtle sounds, while lowering it will reduce background noise.
Furthermore, it is advisable to configure the microphone input to a suitable sample rate and bitrate. This will determine the quality of the recorded audio. Higher sample rates and bitrates can result in clearer and more detailed recordings, while lower settings may sacrifice some levels of audio fidelity. Finding the right balance is important to optimize the microphone's performance.
Another critical aspect to consider is the microphone input mode. Stereo or mono modes can be selected depending on your specific needs. Stereo mode captures a wider audio field and is suitable for recording music or capturing audio with spatial characteristics. On the other hand, mono mode is ideal for voice recordings and general communication as it simplifies the audio signal and focuses on the speaker's voice.
In addition, it is worth examining the microphone's frequency response range. Adjusting the equalizer settings can help compensate for any specific frequency biases or limitations of your microphone. By boosting or reducing specific frequency ranges, you can tailor the sound to your preferences or the particular audio content you are working with.
Lastly, it is important to regularly check for software updates related to your microphone. Manufacturers often provide firmware or driver updates that can improve the compatibility, stability, and performance of the device. Check the manufacturer's website or product support page for any available updates and install them accordingly.
By making these adjustments to your microphone settings, you can optimize its performance and ensure a seamless audio experience for your recordings or communication needs.
Test your microphone on a different device

One troubleshooting step you can take to determine if there is an issue with your microphone is to test it on another device. By connecting your microphone to a different device, such as a smartphone or another computer, you can isolate whether the problem lies with your computer or with the microphone itself.
Here are some steps you can follow to test your microphone on another device:
- Disconnect your microphone from the current device it is connected to.
- Find another device, such as a smartphone or another computer, that has a microphone input or a compatible connector.
- Connect your microphone to the other device using the appropriate cable or adapter.
- Launch a recording or voice memo app on the other device.
- Speak into the microphone and check if the audio is being recorded or if the sound levels indicate activity.
- Listen to the playback of the recording to ensure that the audio is clear and without any issues.
If you are able to successfully record and playback audio on the other device, it suggests that the issue may lie with the settings or configuration on your original computer. In this case, you may need to further troubleshoot or adjust the microphone settings on your computer.
On the other hand, if the microphone still does not work or if the audio quality is poor when connected to a different device, it indicates that there may be an issue with the microphone itself. In this situation, you may need to consider replacing or repairing the microphone to resolve the problem.
Testing your microphone on another device can provide valuable insight into the source of the problem and help guide your troubleshooting process. Remember to try different devices and applications to ensure accurate results, and don't forget to check the compatibility and settings on each device to ensure proper functionality.
Consider utilizing a USB adapter for improved functionality
If you're experiencing difficulty with your audio equipment, there are alternative options you may want to explore. One possible solution is the implementation of a USB adapter to enhance the performance and compatibility of your headphones. By incorporating this device into your setup, you can ensure a more reliable and efficient connection, facilitating a seamless audio experience.
USB adapters offer numerous benefits, including increased flexibility and versatility. They allow you to connect a wide range of headphones to your computer, regardless of the specific port compatibility. This enables you to use your favorite pair of headphones without limitations, ensuring optimal audio quality for both your listening pleasure and communication requirements. Furthermore, USB adapters often come equipped with additional features, such as built-in sound cards or volume controls, further enhancing your overall audio experience.
- Improved compatibility with various computer models and devices
- Greater audio quality and clarity
- Enhanced control over volume and sound settings
- Minimal setup and configuration required
- Easy plug-and-play functionality
When selecting a USB adapter for your headphones, it's essential to consider the specific requirements of your setup. Evaluate the compatibility of the adapter with your computer's operating system and the headphones you use. Additionally, prioritize adapters that offer advanced features or additional connectivity options, such as multiple headphone jacks or microphone inputs, to future-proof your setup.
By opting for a USB adapter, you can overcome potential limitations and amplify the capabilities of your headphones, ensuring an uninterrupted and immersive audio experience on your computer.
Fixed OBS Headphone Mic & Audio not working in 15 seconds !
Fixed OBS Headphone Mic & Audio not working in 15 seconds ! מאת The Chaos 105,315 צפיות לפני 3 שנים 34 שניות
Working Solution to Fix "Microphone Connected But Not Working on Windows 10"
Working Solution to Fix "Microphone Connected But Not Working on Windows 10" מאת Easy Classes 274,334 צפיות לפני שנה 3 דקות, 52 שניות
FAQ
Why can't I hear any sound through my headphones?
If you're not hearing any sound through your headphones, there could be a few reasons for this issue. First, check if the headphones are properly connected to the audio jack on your computer. Also, ensure that your volume settings are not too low or muted. If the headphones are wireless, make sure they are charged and paired correctly with your computer. Lastly, try using a different pair of headphones to see if the issue is with your current set.
How do I troubleshoot microphone connection problems on my computer?
If you're having trouble with your microphone connection on your computer, there are a few steps you can take to troubleshoot the issue. First, ensure that the microphone is securely plugged into the correct port on your computer. Next, check your computer's sound settings to make sure the correct input device is selected. You can also try restarting your computer, as this can sometimes resolve connectivity issues. If these steps don't work, consider testing the microphone on a different computer or using a different microphone on your computer to determine if the problem is with the microphone or your computer.
Why is my microphone not being recognized by my computer?
If your microphone is not being recognized by your computer, there are a few potential reasons. First, check if the microphone is properly connected to the correct port on your computer. Additionally, ensure that your computer's drivers are up to date, as outdated or missing drivers can cause compatibility issues. If you're using an external microphone, verify that it is turned on and functioning correctly. Finally, check your computer's sound settings to ensure the microphone is selected as the input device. If the issue persists, you may need to troubleshoot or replace the microphone.
How can I fix static or distorted sound in my headphones?
If you're experiencing static or distorted sound in your headphones, there are a few troubleshooting steps you can try. First, check if the headphone cable is securely connected to both the headphones and the audio jack. If you're using wireless headphones, make sure they are charged and connected properly. Additionally, try plugging your headphones into a different audio jack on your computer to see if the issue is with the jack. If the problem persists, consider testing your headphones on a different device to determine if the issue lies with the headphones themselves.
What should I do if my headphones are working on other devices but not on my computer?
If your headphones are functioning correctly on other devices but not on your computer, there may be compatibility issues or driver problems. First, ensure that the headphones are properly connected to the audio jack on your computer. Then, check your computer's sound settings to see if the correct output device is selected. If the issue persists, try updating your computer's audio drivers. You can also try using a different set of headphones on your computer to determine if the problem is specific to your headphones or your computer.
My headphones are not working, what should I do?
If your headphones are not working, there are a few troubleshooting steps you can try. First, check if they are properly plugged into the headphone jack of your computer. If they are plugged in correctly, try using a different pair of headphones to see if the issue is with the headphones themselves. Additionally, make sure the volume on your computer is turned up and not muted. If none of these steps resolve the issue, you may need to update your audio drivers or seek further assistance.


