In today's interconnected world, the ability to remotely access and manage your Linux system is not only convenient but also essential for efficient workflow. Whether you're a system administrator, a developer, or simply a curious enthusiast, knowing the ins and outs of connecting to a Linux server using SSH opens up a world of possibilities.
By using the power of SSH, you can securely establish a connection to your remote Linux system, allowing you to execute commands, transfer files, and even troubleshoot issues without being physically present. This versatile protocol, also known as Secure Shell, combines encryption, authentication, and secure communication, ensuring that your data remains protected even over insecure networks.
While accessing a remote Linux server via SSH may sound daunting to a novice, fear not! In this guide, we'll take you step-by-step through the process, providing clear instructions and tips to simplify the setup. So, whether you're a seasoned user looking to refresh your knowledge or a beginner eager to dive into the world of remote Linux management, this article will equip you with the skills needed to confidently connect to your server using SSH.
What is SSH and why is it crucial for establishing a secure connection to a remote server?

When it comes to connecting to a server located remotely, there is a fundamental tool that plays a pivotal role in ensuring a secure and encrypted communication: SSH.
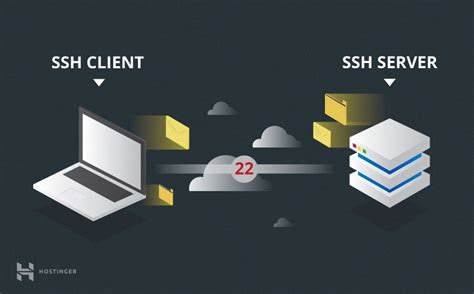
SSH, or Secure Shell, is a cryptographic network protocol that allows users to securely access and manage a remote server over an unsecured network, such as the internet. It provides a secure channel through which data can be transmitted, protecting it from unauthorized access and ensuring the integrity of the connection.
The significance of SSH in remote server connection lies in its ability to establish a secure and encrypted session between the client and the server. This means that all communication and data transferred between the two entities are encrypted, reducing the risk of data interception, manipulation, or eavesdropping by malicious actors.
Furthermore, SSH utilizes public-key cryptography, which provides a secure method for the authentication of the client and the server. This means that the server can verify the identity of the client, and vice versa, before granting access. This authentication process adds an extra layer of security to the remote server connection.
- SSH ensures the confidentiality of data by encrypting it during transmission.
- It verifies the identities of both the client and the server, preventing unauthorized access.
- SSH offers secure remote command execution and file transfers, enabling efficient management of the remote server.
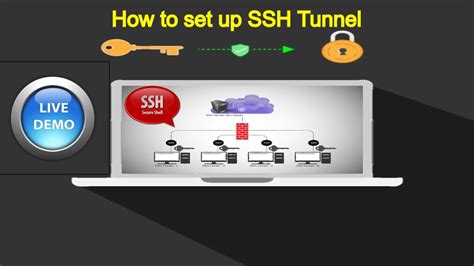
- It allows for the creation of secure tunnels, enabling secure access to services running on the remote server.
- SSH provides a versatile and widely supported method for connecting to remote servers across various operating systems.
In conclusion, SSH plays a vital role in establishing a secure connection to a remote server. Its ability to encrypt data, verify identities, and provide secure remote management makes it an indispensable tool for remote server administrators and users requiring secure access to their resources.
Setting Up Secure Shell Access
Establishing a secure and reliable method of accessing a remote system is an essential step in ensuring efficient and protected remote management. In this section, we will explore the process of setting up Secure Shell (SSH) access, a widely used protocol for securely connecting to remote servers.
To begin, you will need to ensure that the remote server has SSH installed and enabled. SSH provides a secure channel over an unsecured network, such as the internet, by encrypting all data transmitted between the client and the server.
First, check if SSH is already installed on your remote system. You can do this by running the following command in your terminal:
ssh -V
If you see a version number displayed, SSH is already installed. If not, you will need to install SSH on the remote server. The installation process may vary depending on the Linux distribution you are using.
Once SSH is installed, you will need to configure it to allow remote access. The configuration file for SSH is usually located at /etc/ssh/sshd_config. Open this file using a text editor and make the necessary modifications to enable remote access.
Typically, you will need to ensure that the following settings are configured correctly:
- Port number: Change the default SSH port number (22) to a different value for added security.
- PermitRootLogin: Set this option to "no" if you want to disable direct root login via SSH.
- AllowUsers: Specify the usernames allowed to connect via SSH. Restricting access to specific users enhances security.
After making the required changes, save the file and restart the SSH service on the remote server for the changes to take effect. The command to restart SSH may vary depending on your Linux distribution:
sudo service ssh restart
With SSH properly configured, you can now securely connect to your remote Linux server using an SSH client. This allows you to execute commands, transfer files, and perform various administrative tasks from your local machine.
Next, we will explore the process of establishing an SSH connection and the basic commands you can use to interact with the remote server.
Setting up Secure Shell (SSH) on your local machine - A Step-by-step guide

In this section, we will walk through the process of installing and configuring SSH on your local machine. With SSH, you can securely access and manage remote systems, providing a reliable and encrypted connection for remote administration tasks.
1. Install SSH Software:
Start by installing the SSH software package on your local machine. This software enables your device to establish a secure connection with remote servers. Look for a suitable SSH client application that is compatible with your operating system, such as OpenSSH or PuTTY.
2. Configure SSH Settings:
Once the SSH software is installed, you need to configure its settings to establish a successful connection with remote servers. Open the SSH configuration file, usually located in the/etc/ssh directory, and modify the necessary parameters. These settings include port number, host key algorithms, and authentication methods.
3. Generate SSH Key Pair:
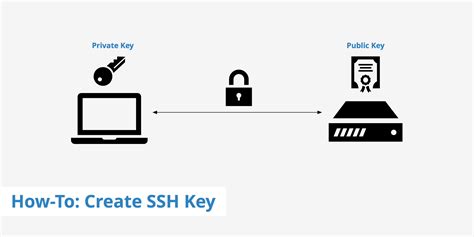
To enhance the security of your SSH connections, it is recommended to generate an SSH key pair. The key pair consists of a public key and a private key. The private key is stored securely on your local machine, while the public key is copied to the remote server. This will allow you to authenticate securely without needing to enter a password for each connection.
4. Enable SSH Agent:
To simplify the authentication process, you can enable the SSH agent. The SSH agent securely stores your private key and allows you to authenticate with remote servers without having to re-enter your passphrase for the private key every time. This improves convenience and eliminates the need for repetitive password entry.
5. Test SSH Connection:
After completing the installation and configuration steps, it is essential to test your SSH connection. Open your SSH client application and attempt to connect to a remote server using the provided hostname or IP address. If the connection is successful, you should be prompted to enter your passphrase (if using a key pair) or your login credentials for the remote server.
By following this step-by-step guide, you will be able to install and configure SSH on your local machine, allowing you to establish secure and encrypted connections with remote servers effortlessly.
Establishing a Connection with a Distant Linux Machine
When it comes to interacting with a remote Linux system through secure shell access, there are various methods available to successfully accomplish this task. In this section, we will delve into the process of establishing a connection to a distant Linux machine, employing the widely-used secure shell protocol. By following the steps outlined below, you can connect securely and efficiently, without being physically present near the remote system.
- Choose a suitable secure shell client: Begin by selecting a reliable and user-friendly secure shell client that suits your preferences and operating system. This client will serve as your gateway for establishing the connection with the remote Linux server, enabling you to execute commands and access the server's resources remotely.
- Obtain the necessary connection details: To connect to the remote Linux machine, you will need to gather essential connection details, including the server's IP address or hostname, the port number for the SSH service, and your authenticated user credentials.
- Open the secure shell client: Launch your chosen secure shell client and locate the option to establish a new connection. This feature might be presented as "New Session" or "Connect" in the client's user interface.
- Enter the connection details: Input the gathered connection details into the appropriate fields within the secure shell client. This typically includes specifying the server's IP address or hostname, choosing the correct port number (usually 22 for SSH), and entering your username and password for authentication purposes.
- Establish the connection: With all the necessary information provided, initiate the connection by clicking the "Connect" or similar button within the secure shell client. The client will then attempt to establish a secure connection to the remote Linux machine using the SSH protocol.
- Verify the connection: After establishing the connection, the secure shell client will request and verify your credentials. If successful, you will be granted access to the remote Linux server, allowing you to execute commands and manage the server remotely as if you were physically present.
By following the above steps, you can effortlessly connect to a remote Linux server via the SSH protocol. This method of remote access offers numerous advantages, allowing for secure and efficient management of Linux systems from anywhere in the world.
Establishing a secure connection to a remote Linux server using SSH

When it comes to accessing a Linux server located remotely, a secure connection is of utmost importance. By following a few simple steps, you can establish a secure SSH connection to the remote server and ensure the confidentiality and integrity of your data.
Step 1: Authentication
Before establishing a connection, it is crucial to authenticate yourself to the remote server. This can be done by providing a valid username and password or by using SSH key-based authentication. SSH key-based authentication offers enhanced security by eliminating the need for passwords and instead relies on cryptographic keys to authenticate the user.
Step 2: Generating SSH keys
If you choose to use SSH key-based authentication, the next step is to generate the necessary SSH keys. This involves creating a public key and a private key pair. The public key is then securely stored on the remote server, while the private key is kept on your local machine. It is essential to protect the private key with a strong passphrase to ensure its security.
Step 3: Configuring the remote server
In order to establish a secure SSH connection, the remote server needs to be properly configured. This includes enabling SSH access, configuring firewall rules to allow SSH traffic, and disabling any unnecessary SSH authentication methods for improved security.
Step 4: Establishing the SSH connection
With the authentication and configuration steps completed, you can now establish the SSH connection to the remote server. This can be done using a command-line interface or through SSH clients that provide a graphical user interface.
Step 5: Verifying the connection
After establishing the SSH connection, it is important to verify its authenticity and ensure that you have connected to the intended remote server. This can be done by comparing the fingerprint of the server's public key with the one provided during the initial connection attempt.
Step 6: Securing the connection
To further enhance the security of the SSH connection, there are additional measures that can be taken. This may include disabling SSH root logins, restricting SSH access to specific IP addresses, using SSH agents for key management, and implementing two-factor authentication.
| Step | Description |
|---|---|
| Step 1 | Authentication |
| Step 2 | Generating SSH keys |
| Step 3 | Configuring the remote server |
| Step 4 | Establishing the SSH connection |
| Step 5 | Verifying the connection |
| Step 6 | Securing the connection |
Using Secure Shell Key Authentication for Remote Server Access
In the realm of securing remote access to servers, one approach that stands out is the use of Secure Shell (SSH) key authentication. This method provides a highly secure and efficient way of authenticating users and establishing a connection between client and server without relying on traditional password-based authentication.
When utilizing SSH key authentication, a pair of cryptographic keys is generated: a public key and a private key. The public key, which is stored on the remote server, serves as a lock, while the private key, which is kept securely on the client machine, acts as the corresponding key to unlock and gain access to the server.
| Benefits of SSH Key Authentication | |
|---|---|
| Enhanced Security: | By eliminating the need for password-based authentication, SSH key authentication significantly reduces the risk of unauthorized access to the server. Private keys are difficult to guess or crack, providing an extra layer of security. |
| Ease of Use: | Once the SSH key pair is set up, logging in to the remote server becomes a seamless and hassle-free process. There's no need to remember and enter passwords each time, saving time and effort. |
| Scalability: | SSH key authentication is well-suited for environments with multiple users. Each user can have their own key pair, making it easy to manage access permissions and revoke access if needed. |
To set up SSH key authentication, the first step is to generate a key pair on the client machine. This can be done using the ssh-keygen command. Once the keys are generated, the public key needs to be copied to the remote server and added to the authorized keys list. This can be achieved by manually copying the public key to the server's ~/.ssh/authorized_keys file or by utilizing tools like ssh-copy-id.
After the keys are properly exchanged, SSH key authentication can be tested by attempting to connect to the remote server. If everything is set up correctly, the connection should be established without prompting for a password.
Overall, SSH key authentication offers a robust and secure method for connecting to remote servers. By utilizing encryption and cryptographic keys, this authentication method ensures the confidentiality and integrity of data transmitted over the SSH protocol.
Advantages of SSH Key Authentication and Setting it up

In this section, we will explore the numerous advantages of using SSH keys for authentication on a remote Linux server. SSH keys provide a secure and convenient method for accessing your server without the need for passwords. By eliminating the reliance on passwords, SSH keys enhance security and reduce the risk of unauthorized access.
- Enhanced Security: SSH keys employ strong encryption algorithms, making them highly secure. Unlike passwords, which can be easily guessed or intercepted, SSH keys use public-key cryptography to ensure a secure connection.
- Elimination of Passwords: SSH keys eliminate the need to remember complex passwords. Instead, the user is authenticated using their unique SSH key pair, providing a seamless and convenient login experience.
- Protection against Brute-Force Attacks: As SSH keys are not susceptible to brute-force attacks, they provide an additional layer of protection for your Linux server. Attackers cannot repeatedly guess or crack a password to gain access to the server.
- Improved Workflow: SSH keys allow for streamlined access to your remote server. Once the keys are set up, you can easily connect to the server without having to enter a password each time, saving valuable time and effort.
- Centralized User Management: With SSH keys, you can enable centralized user management, where individual users can have their own unique key pair. This simplifies key distribution and revocation when a user's access needs to be modified or revoked.
To set up SSH key authentication, follow these steps:
- Generate SSH key pair on your local machine using the
ssh-keygencommand. - Copy the public key to the remote Linux server using the
ssh-copy-idcommand or manually appending the key to the~/.ssh/authorized_keysfile on the server. - Adjust the permissions of the
.sshdirectory and theauthorized_keysfile to ensure proper security. - Disable password authentication in the SSH server configuration file (
/etc/ssh/sshd_config) to enforce key-based authentication. - Restart the SSH service for the changes to take effect.
- Test the SSH key authentication by attempting to connect to the remote server without entering a password.
By following these steps, you can leverage the advantages of SSH key authentication and enjoy a more secure and efficient method of logging into your remote Linux server.
How to Connect to Ubuntu Remotely Using SSH
How to Connect to Ubuntu Remotely Using SSH by Inno TechTips 28,393 views 1 year ago 5 minutes, 9 seconds
Ubuntu/WSL SSH Server Setup Guide | Remote SSH WSL
Ubuntu/WSL SSH Server Setup Guide | Remote SSH WSL by TroubleChute 16,460 views 1 year ago 4 minutes, 57 seconds
FAQ
What is SSH?
SSH stands for Secure Shell and is a cryptographic network protocol used for secure communication between computers. It provides a secure channel over an unsecured network and allows users to connect to a remote server securely.
How can I connect to a remote Linux server via SSH?
To connect to a remote Linux server via SSH, you can use the command-line tool called "ssh". Open your terminal and type the following command: "ssh username@remote_server_ip". Replace "username" with your actual username and "remote_server_ip" with the IP address of the remote server. Press enter and enter your password when prompted. You will then be connected to the remote server via SSH.
Is it possible to connect to a remote Linux server without using a password?
Yes, it is possible to connect to a remote Linux server without using a password by setting up SSH key-based authentication. This involves generating a public/private key pair, adding the public key to the remote server's authorized_keys file, and securely storing the private key on your local machine. Once this is set up, you can connect to the remote server without entering a password.
Can I specify a custom SSH port when connecting to a remote Linux server?
Yes, you can specify a custom SSH port when connecting to a remote Linux server. By default, SSH uses port 22 for communication. However, if the remote server is configured to use a different port, you can specify it by adding "-p port_number" flag to the ssh command. Replace "port_number" with the actual port number you want to use.
What are some common troubleshooting steps if I am unable to connect to a remote Linux server via SSH?
If you are unable to connect to a remote Linux server via SSH, there are several troubleshooting steps you can take. Firstly, make sure the remote server is turned on and connected to the network. Check if the SSH service is running on the remote server. Verify that you are using the correct IP address or domain name, username, and password. Ensure that your local machine has network connectivity. Firewall settings on either your machine or the remote server could also be blocking the SSH connection. Checking the SSH server logs for any errors or issues can also provide useful information for troubleshooting.
What is SSH and why do I need it to connect to a remote Linux server?
SSH stands for Secure Shell and it is a network protocol that allows secure remote access to a server. It enables you to connect to a remote Linux server securely over an unsecured network, such as the internet. SSH provides a secure channel for data communication and can be used for executing commands, transferring files, and managing the server remotely.


